Map QuickBooks Payroll items in QuickBooks Time
by Intuit• Updated 1 month ago
Map payroll items to make sure your team is paid correctly for the hours they work. If your employees are paid different rates based on the type of work they do, use overrides to assign pay rates to customers, service items, or classes.
QuickBooks Online Plus, Essentials
Initial payroll item mapping is performed during setup of the QuickBooks Time and QuickBooks Online integration. Use the directions below if you want to change your previously mapped payroll items.
Select the Use QuickBooks Online for payroll box in the QuickBooks Online Integration Preferences to enable this option.
QuickBooks Desktop
First, set up the QuickBooks Time and QuickBooks Desktop integration, then map payroll items.
Important: Before performing a sync, be sure you are logged in to QuickBooks Desktop as the administrator and in single-user mode.
In this article, you'll learn how to map payroll items:
Notes:
- Only account administrators can map payroll items.
- If employees may be paid overtime or double time, make sure the employees are assigned the appropriate payroll items in QuickBooks. Then, in QuickBooks Time, enable overtime tracking: Company Settings > Payroll & Overtime > Overtime (or use the Pay Rate Engine for more advanced overtime options).
By employee
If you would like a default payroll item assigned for each type of hours your employees' track, use the Payroll Item Mapping by Employee option. This means that for all regular hours tracked per employee, there will be one payroll item assigned to those hours in QuickBooks. For all overtime hours tracked per employee, there will be one payroll item assigned to those hours in QuickBooks. This can be done for regular time, overtime, double-time, and any PTO codes that you have set up.
- In QuickBooks Time, at the top right, select QuickBooks or QuickBooks Payroll, then Preferences.
- Select the Payroll Item Mapping Tool.
- On the Map Employees tab, select an employee's name.
- In each hour type column, select one payroll item for each. Selections are saved automatically.
- (Optional) To download a spreadsheet, select Employee CSV.
- Close the window once finished.
Note: If you use the Pay Rate Engine for more advanced overtime options, you will need to map any employee overtime payroll items within Pay Rate Engine Settings:
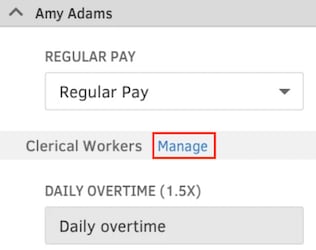
- In the Payroll Item Mapping Tool, select Manage next to the Overtime rule name in the employee payroll item details. (Note: the mapped items will be visible in the Payroll Item Mapping Tool, but cannot be changed there.)
- Any Setting that has unmapped rules, and any rule that is unmapped, is indicated by

- Choose a rule to map it. Any Overtime pay item from QuickBooks will appear in a dropdown next to QuickBooks pay item.

By customer/service item/class
If you prefer to assign payroll items based on specific customers, service items, or classes, you first need to set an employee default for any customer/service item/class that remains unmapped. Then set the override setting by your preferred criteria.
- After mapping payroll items by employee, in QuickBooks Time, at the top right, select the QuickBooks or QuickBooks Payroll, then Preferences.
- Select the Payroll Item Mapping Tool.
- In the right corner of the Payroll Item Mapping Tool, select the Gear icon to open the settings.
- Select the Allow Overrides By: box, and select Customer, Service Item, or Class.
- On the Customer Map, Service Item Map, or Class Map tab, select + Add Overrides.
- Select none under Select Customer/Service Item/Class (whichever displays).
- Select a Customer, Service Item, or Class and select Save.
- Under each hour type column, select one payroll item each.Note: If you use the Pay Rate Engine for advanced overtime, each overtime setting and its rules will display. They can be mapped here.
- Repeat until each Customer, Service Item, or Class is mapped appropriately.
- Additions and changes are saved automatically. Close the window when the mapping is complete.
By employee choice
If you would prefer not to do any mapping and have your employees select their payroll items when they clock in and out, you can set this up on your account.
Note: Any Payroll Items selected by the employee on their timesheets will override any overtime calculation account settings. For example, even though an employee might have two hours of overtime for the week displayed in the reports and export details, it is up to the employee to select the appropriate payroll item for overtime on that timesheet in order to get paid the overtime rate.
To allow employees to select their own payroll items:
- In QuickBooks Time, at the top right, select QuickBooks, and select Preferences.
- Select the Payroll Item Mapping Tool.
- In the right corner of the Payroll Item Mapping Tool, select the Gear icon to open the settings.
- Select Let Employees choose Payroll items.
- Select Save.
More like this