Use your Intuit account to manage or invite users in QuickBooks Desktop
by Intuit•69• Updated 2 years ago
Learn how to manage Intuit account users associated with a company file.
You'll need an Intuit account to sign in when you create a new company file. You also need one if you use a connected service like Payments, Payroll, Receipt Management, or QuickBooks Time.
An Intuit account is different from your QuickBooks company file user ID. An Intuit account gives you access to all connected Intuit services for your company file. You can manage user roles and access from the Intuit account user management dashboard.
Check out what to do if you need to transfer the primary admin role for the company file to another user.
- How to create Intuit account users and assign roles
- Edit a user’s Intuit account or role
- Delete a user’s Intuit account or role
- How to accept an Intuit account invite
How to create Intuit account users and assign roles
Here’s how to invite users to create an Intuit account. They can use Intuit services like QuickBooks Payments, Payroll Direct Deposit, Payroll Workforce, QuickBooks Time, Receipt Management, and more.
From QuickBooks Desktop
- Sign in as the company admin.
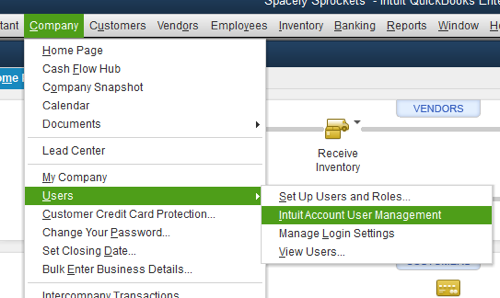
- Go to Company, then Users and select Intuit Account User Management.
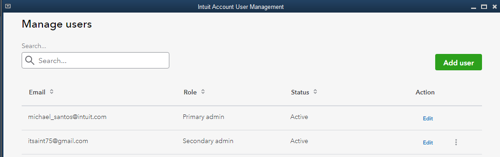
- To add a new user to the file, select Add user. Enter a valid first name, last name, and email address.
- Go to Roles and select the role for the user. You can select View role description to see available roles and their descriptions.
- Select send invitation to notify the user.
Note: If you added the user as a secondary admin a verification code will be sent to the admin's phone number. - QuickBooks displays a message of the invite status with the role(s) assigned and the QuickBooks Desktop Company file name. Select OK to close the message.
The Intuit account user management dashboard shows the added user(s) with a status of Invited. Once the user accepts the invite, their status will become Active.
From a web browser
The Intuit account user management dashboard shows the added user(s) with a status of Pending. Once the user accepts the invite, their status will become Active.
What to do if you can't see the company file you want
If you're the admin
If you’re the admin and don't see your company, you might not have signed in to your company file with your Intuit account yet. In this case, learn how to open a company file using your Intuit account.
If you're an employee
If you’re an employee and don’t see your company, your admin didn't invite you yet. In this case, ask your admin to invite you to the Intuit account.
Edit a user’s Intuit account or role
You can only edit a user if you're not signed in as that user and they're not the primary admin.
Note: If the user is assigned to the Payment role. You must change the role in your QuickBooks Payments account first.
- Sign in as the company admin.
- Go to Company, then Users and select Intuit Account User Management.
- Select the user, then select Edit from Action.
Note: You can search for a user with their name or email address in the search bar. You can select the email or status column to sort and find a user. - Edit the user's name or reassign their role then select Save.
- Select Update info to confirm the changes.
Note: If you changed the user's role to secondary admin a verifiction code will be sent to the admin's phone number. - QuickBooks shows a message that the user's role was updated.
The Intuit account user management dashboard shows the users with updated names and roles.
Delete a user’s Intuit account or role
- Sign in as the company admin.
- Go to Company, then Users and select Intuit Account User Management.
- Select the user, then select Delete from Action.
Note: You can search for a user with their name or email address in the search bar. You can select the email or status column to sort and find a user. - Select Delete user to confirm the deletion.
How to accept an Intuit account invite
When you’re invited to create an Intuit account, you’ll need to respond to the invite within 30 days before you can sign in. Here’s what to do.
- Check your email.
- From the email invite, select Accept Invite and sign in using your Intuit account email or user ID.
- If asked, select a method to verify your identity and then type a 6-digit code and select Continue.
- QuickBooks will make sure you’ve accepted the invite. Select OK.
Your role will be active and can now access services connected to the company file.
More like this
- Set up your Intuit Account for QuickBooks Desktop Payrollby QuickBooks
- Get started with the new Shipping Manager in QuickBooks Desktopby QuickBooks
- Add and manage usersby QuickBooks
- Create and manage users and roles in QuickBooks Desktop Enterpriseby QuickBooks