QuickBooks HelpQuickBooksHelpIntuit

Condense your QuickBooks Desktop for Mac company file

by Intuit Updated 2 years ago

Learn how to use the Condense Data utility in QuickBooks Desktop for Mac to reduce the size of your company file.

If your company file has grown too large, you can condense your file to a smaller date range. QuickBooks removes the transactions that fall outside the date range you select and replaces them with new summary transactions by month. 

Important: Condense Data should be your last option to improve performance.

How to use the condense data utility

Select your QuickBooks version to learn how to condense your file. 

Note: The Condense Data utility will save a backup of your file before any data is removed. If the condense fails, you can restore the backup to see your original data.

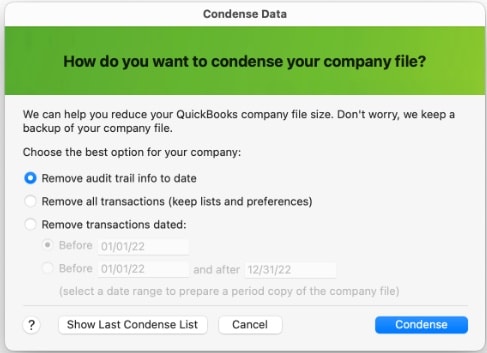
With QuickBooks Mac Plus 2023, you can now choose from multiple options to reduce your company file size and keep or remove specific data. 

QBDT_US_Mac23Condense.jpg

The updated Condense provides an option to remove the audit trail which reduces your file size but leaves all the detailed transactions.

  1. Go to File and select  Utilities, then select Condense Data.
  2. Select Remove audit trail info to date.
  3. Select Condense.
  4. Save a backup of your file.
  5. Review the info displayed in the Condense Data Completed window.

This option will remove all transactions from your company file which reduces your file size but leaves the list entries and preferences.

  1. Go to File and select Utilities, then select Condense Data.
  2. Select Remove all transactions (keep lists and preferences).
  3. Select Condense.
  4. Save a backup of your file.
  5. Review the info displayed in the Condense Data Completed window.

This option will remove all transactions from your company file before a specific date and provides additional options for the condense operation.

  1. Go to File and select Utilities. then select Condense Data.
  2. Select Remove transactions dated.
  3. Select Before and select a date.
  4. Select More Options… and choose the options you need. Select Help if you need assistance.
  5. Save a backup of your file.
  6. Review the information displayed in the Condense Data Completed window.

A period copy is a condensed version of your company file that only contains data for a specific period. Note: The period copy may not display cash basis reports correctly.

To create a perios copy:

  1. Go to File and select Utilities, then select Condense Data.
  2. Select Remove transactions dated.
  3. Select before and after and select dates.
  4. Select More Options… and choose the options you need. Select Help if you need assistance.
  5. Save a backup of your file.
  6. Review the info displayed in Condense Data Completed.

Here's the list of options you will be asked to choose when you select Remove transactions dated:


Do you want to remove the following transactions?
• Uncleared (unreconciled) bank and credit card transactions
• Transactions marked "To be printed"
• Invoices and Estimates marked "To be sent"
• ALL Estimates, Sales Orders, Purchase Order, and Pending Invoices
• ALL Time and Mileage activities
Transactions containing unbilled expenses and items


How should transactions be summarized?
• Create one summary journal entry
• Create a summary journal entry for each month
• Don’t create a summary


How should inventory be summarized?
• Summarize inventory transactions
• Keep inventory transactions


Do you want to remove unused list entries?
• Accounts
• Customers and Jobs
• Vendors
• Other Names
• Items
• To-Do notes marked Done
• Classes
• Unused items in all other lists

QBDT_US_Mac22Condense.jpg

  1. Go to File and select Utilities, then select Condense Data.
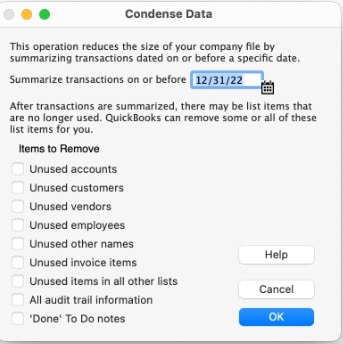
  2. Enter the date you want to remove transactions from.
    Note: If you track inventory, set the date to the last day of the month to keep your average cost accurate.
  3. Select OK.
  4. Select OK to create a backup file.
  5. Select OK once the backup is complete. 
  6. Select OK once and review the info in Condense Data Completed . If any transactions couldn’t be removed, you’ll be able to select Show List to review those transactions along with an explanation of why they were kept.
QuickBooks Desktop

Sign in now for personalized help

See articles customized for your product and join our large community of QuickBooks users.

More like this