QuickBooks HelpQuickBooksHelpIntuit

Fix overdue or red scheduled liabilities in QuickBooks Desktop

SOLVEDby QuickBooks9Updated April 19, 2023

Learn why scheduled liabilities show as overdue or appear in red in QuickBooks Desktop.

In QuickBooks Desktop Payroll you can set up and pay your  liabilities, such as health insurance or payroll taxes, in the Pay Liabilities window.  Sometimes, even though you have paid them, the liabilities may appear overdue or red. There are several reasons this may occur, read below to find out how to fix them.

Create a Payroll Liability Balance Report to view any unpaid liabilities. If you have unpaid liabilities, create a liability payment in QuickBooks Desktop.

  • Enter the payment in Pay Scheduled Liabilities or
  • Enter the payment using the Enter Prior Payments option in the YTD Adjustment window:
    1. Select the Help menu. Then choose About QuickBooks. And press Ctrl+Alt+Y.
    2. Choose the date range. Then select Next until you see the Create Payments button.
    3. Under Item Name, select the drop-down arrow. And choose the item you need to create a prior payment for.
    4. Verify the dates and update as necessary.
      • Select Next Payment to enter another prior payment.
    5. Select Done.

To determine whether a liability was paid with Write Checks or Bill Payment:

  1. Select Vendors > Vendor Center.
  2. Choose the vendor's name.
  3. In the Type column, ensure all are listed as Liability Check.
  4. If there is a Check, double-click to view the transaction.
  5. Verify that this transaction was created to pay payroll liabilities.

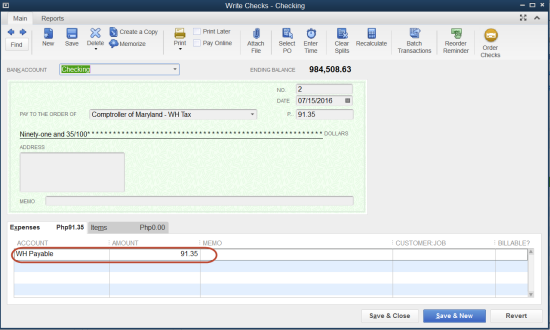
If a liability was paid through the Write Checks screen or Bill Payments:

  1. Back up the Company file.
  2. Go to Write Checks or Bill Payment and use the Previous and Next keys to locate the payment. Note the amount paid and the expense account used.
    scheduled payroll liabilities amount in QuickBooks Payroll
  3. In the Payroll Center, go to the Pay Liabilities tab. And select the overdue liability that was paid through Write Checks.
  4. Select the View/Pay button, which brings up the liability check.
  5. Select the Expense tab.
  6. In the Account column, select the drop-down ▼ arrow. And choose the account used in Write checks. In the Amount field, enter a negative amount equal to the amount of the liability check.
    negative amount in scheduled payroll liabilities in QuickBooks Payroll
    (Note: If the liability shown as being owed was only partially paid through Write Checks, enter the actual amount paid through Write Checks as a negative instead of the whole amount shown as being owed.)
  7. Select the Recalculate button to zero the check amount.
  8. Uncheck the To be printed box.
  9. If the check number field populates, remove the check number.
  10. Date the transaction to be the same date as the payment that was already entered into the QuickBooks Desktop bank register.
  11. Select Save > Close.

To eliminate this from happening the next time:

QuickBooks Desktop payroll works best when all payroll activity is performed from within the payroll menus. This includes paying accrued payroll taxes to the respective taxing authorities. If you write checks or use the Enter/Pay Bills functionality to pay for the liabilities and the QuickBooks-created Payroll Liabilities account was assigned, the following warning message appears:

you’re about to pay your payroll liabilities warning in QuickBooks Payroll

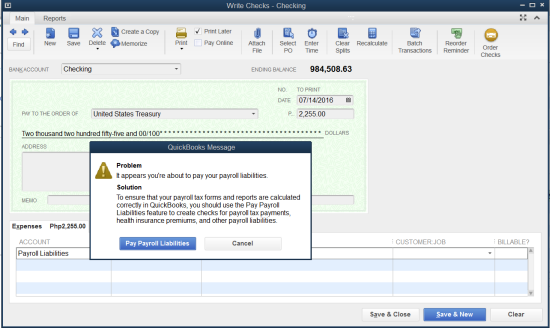
The message warns but does not prevent you from using the wrong type of payment (i.e., Write Checks or Enter/Pay Bills) when attempting to make payroll liability payments. When you select the Pay Payroll Liabilities button in the warning message, you will be directed to the Select Date Range for Liabilities dialog. The message directs you to the Pay Payroll Liabilities feature to create a payroll liability check.

Here's what to do if the liabilities were overpaid in one period and underpaid in a previous period.

  1. Select Employees on the menu bar > Payroll Center.
  2. Select the Transactions tab.
  3. Select Liability Checks .
  4. Double-click on the liability check that was underpaid to compensate for the overpayment in the prior period.
  5. Edit the liability period to cover both periods (the period that the item was overpaid and the period it was underpaid).
  6. Select Save & Close.
  7. Double-click on the liability check that had the overpayment.
  8. Edit the liability period to cover both periods (the period that the item was overpaid and the period it was underpaid).
  9. Select Save & Close.

If the paid through date on the liability check is after the check date:

  1. Choose Employees on the menu bar > Payroll Center.
  2. Select the Transactions tab.
  3. Select  Liability Checks.
  4. Double-click on the liability check for the period that is appearing in the Scheduled Liabilities window.
  5. Edit the check date so it is on or after the paid through date.
Note For QuickBooks Desktop Payroll Assisted: If you receive an error that you are not allowed to make the changes in the liability check, print a copy of the check to capture the details. Delete and recreate this check. (If the check was created as a scheduled liability, recreate through the Pay Scheduled Liabilities module.)

If the Period dates cross from one year to the next, you may also need to edit the paid through dates to be within the year the pay checks are dated.

  • If there are pay checks dated in only the previous year, change the paid through date to reflect the previous year.
  • If there are pay checks dated in the next year, change the paid through date to reflect the next year.
  • If there are pay checks dated in each year, change the paid through date to reflect the next year.

Was this helpful?

You must sign in to vote, reply, or post
QuickBooks Payroll AssistedQuickBooks Payroll BasicQuickBooks Payroll EnhancedQuickBooks Payroll Standard

Sign in for the best experience

Ask questions, get answers, and join our large community of QuickBooks users.

More like this