Fix print alignment for preprinted checks in QuickBooks Online Payroll
by Intuit•480• Updated 1 month ago
Learn how to fix the alignment when printing paychecks using QuickBooks-compatible checks in QuickBooks Online Payroll.
If you use QuickBooks-compatible checks, ensure that they are properly aligned when you print or reprint paychecks. We’ll show you how to fix the alignment in QuickBooks.
For a better experience, open this article in QuickBooks Online. Launch side-by-side view
Align paycheck printing
- Go to Settings
 , then select Payroll Settings.
 - In the Printing section, select Edit ✎.
- Select Paycheck on QuickBooks-compatible check paper.
- Select Print paycheck and 1 pay stub or Print paycheck and 2 pay stubs.
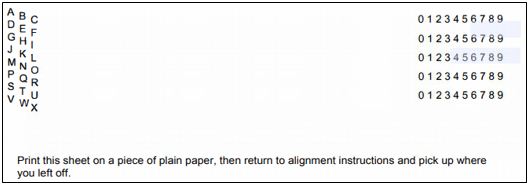
- Select Align check, then select Print alignment form to print a sample check.
- Follow the instructions, then close the window.
- Follow the instructions, then enter the letter and number that fits best. Here are some tips on how to adjust the alignment.
- Select Save, then Done.
Now try to print a check. If you still need to make adjustments, repeat the steps above.
Tips on how to adjust the alignment
For example, the letter K and number 5 are your current settings in the Printer setup preference. You print a sample check but the information is too:
- Low: Enter a letter that’s before the letter K (A to J) to move the info up.
- High: Enter a letter that’s after the letter K (L to X) to move the info down.
- Far-right: Enter a number that’s less than 5 (0 to 4) to move the info to the left.
- Far-left: Enter a number that’s more than 5 (6 to 9) to move the info to the right.

More like this
- Troubleshoot printing paychecks, pay stubs, and formsby QuickBooks
- Print your 1099 and 1096 formsby QuickBooks
- Troubleshoot printing in QuickBooks Desktop for Macby QuickBooks
- Set up and print deposit slipsby QuickBooks