Fill unassigned shifts using Shift Bidding
by Intuit• Updated 1 month ago
Learn how to use the Shift Bidding feature in QuickBooks Online Advanced Payroll to assign open shifts to employees.
Shift Bidding is a rostering feature that allows managers to assign an open (unassigned) shift to a group of employees. The first employee that accepts the shift will then be assigned to the shift and the roster will update accordingly.
Shift bidding is not available by default in a business. This will need to be activated by a full access user. Instructions on how to do this can be found here: Manage Rostering Settings.
How to create a bidding shift
- Follow this link to complete the steps in product
- Then select the Manage Employees dropdown and selecting Rostering.
- Create a shift as per the instructions here: Create, Edit and Publish Employee Shifts
- In the Create Shift panel, tick Shift Bidding.
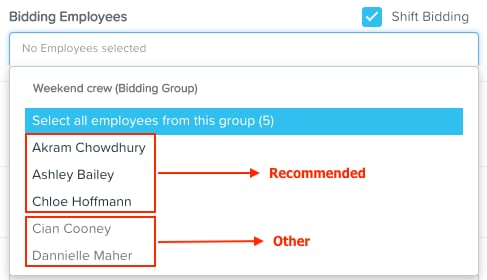
- The Employee field will turn into Bidding Employees, and the employee list will break down into the following sections:
- Recommended Employees: Employees are defined as 'recommended' if they fulfil all the criteria of that shift.
- Other Employees: Employees are defined as 'other' if they are not recommended.
- Bidding Groups: This is a pre-defined group of employees. Instructions on how to create a bidding group are found below.
- With bidding groups, only recommended employees within the group will be highlighted and can be assigned to a shift. For example, with the below bidding group "Weekend crew", not all the employees are defined as recommended - those employees are in a grey font - only the employees defined as recommended will be offered the shift:


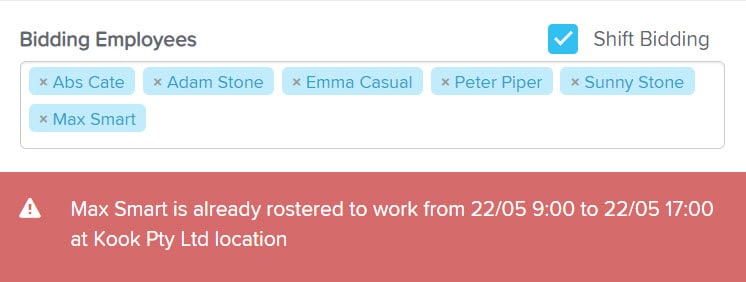
- You may also see a scenario where you select a bidding group, but within that bidding group there are employees who are already rostered to work for the same period as the biddable shift. In this case, the system will show the following warning:

- The system will not automatically remove the employee from the bidding group even if they have a conflicting shift.
- With bidding groups, only recommended employees within the group will be highlighted and can be assigned to a shift. For example, with the below bidding group "Weekend crew", not all the employees are defined as recommended - those employees are in a grey font - only the employees defined as recommended will be offered the shift:
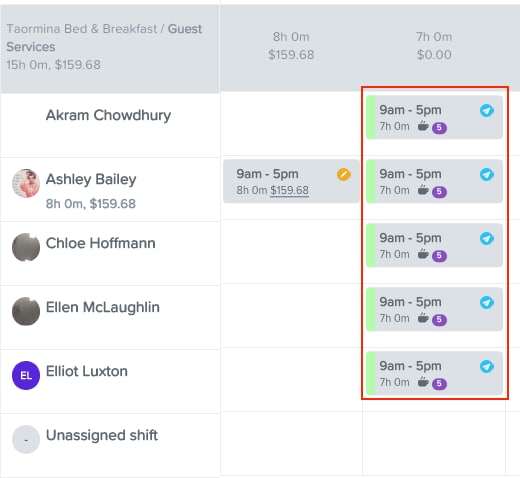
A bidding shift will be displayed in the roster as follows:

Bidding shifts are not costed. They will display as $0. This is because multiple employees are assigned to the shift. Only when an employee accepts the shift will it have a costing associated to it.
The purple icon indicates it is a bidding shift and the number within the purple circle indicates how many bidding employees are attached to that shift.
How do employees bid for the shift?
When you publish the bidding shift, a notification will be sent to all bidding employees as per the normal process. An example email sent to a bidding employee is as follows:

An employee can action a bidding shift through various methods:
- By clicking on the go here link contained within the email notification (the link will appear if the employee has not been provided with employee portal access)
- Via the employee portal, if they have access. The link in the email notification will say log in to the employee portal.
- Via Employment Hero Work, if the employee has employee portal access and they have downloaded the Employment Hero Work app.
When an employee declines a bidding shift, they will be removed from the bidding shift in the roster.
When an employee accepts a bidding shift:
- All other bidding employees will be removed from the bidding shift in the roster
- The shift will be assigned to the employee as a normal shift
- The shift will be costed
- All other bidding employees (yet to action the bidding shift) will be notified they are no longer able to bid on the shift.
How to create a bidding group
The benefit of creating bidding groups is that you then don't have to individually attach employees to a bidding shift. You can create different bidding groups according to different requirements, for example you can create a group for employees who can work weekends or employees who can do night shift, etc.
To create a bidding group:
- From the Rostering screen, select Roster actions, then select Bidding groups.
- Select Add.
- Enter the Group Name and list of employees. Tick the private box if you want to be the only user who can see this bidding group.
- Select Save.
Bidding Shifts and Cutoff Times
In the Rostering Settings, you can configure a cutoff time for shift bidding. The following actions will occur after the cutoff time:
- Employees will no longer see the bidding shift in Employment Hero Work or the employee portal.
- If an employee attempts to action a bidding shift via the "go here" link in the notification email, an error will appear on the screen advising the employee they can no longer action the bidding shift.
The bidding shifts will still be assigned against the employees in the roster however the warning icon will appear on the shift tile stating that the cutoff time has passed and it is no longer a bidding shift. At this time, the manager can convert the shift to an unassigned shift or reallocate to just one employee.
Manager Notifications for Shift Bidding
You can choose to receive the following email notifications:
- When an employee you supervise accepts a biddable shift
- All pending biddable shifts
- When a biddable shift has not been accepted by the notification cutoff time.
- This notification is useful as it will highlight to the manager what bidding shifts need to be actioned by them immediately, i.e. follow up with the employees directly, to ensure there is someone working the shift.
To set this up:
- Follow this link to complete the steps in product
- Then select Manage Employees.
- Select Notifications.
- Tick the relevant email notifications you want to receive.
- Select Save.
More like this
- What Happens When an Employee Declines a Shift?by QuickBooks
- Manage Rostering Settingsby QuickBooks
- Manage shifts in QuickBooks Workforceby QuickBooks
- Manage Shift Swappingby QuickBooks