Understand the navigation menu in QuickBooks Online
by Intuit•135• Updated 3 months ago
Learn how to customize your navigation menu in QuickBooks Online.
Manage your regular bookkeeping tasks in a more convenient way through the QuickBooks Online menu. Here’s how you can customize it to manage your workflows and quickly reach your preferred QuickBooks pages, which saves you time.
For a better experience, open this article in QuickBooks Online. Launch side-by-side view
Overview of the navigation menu
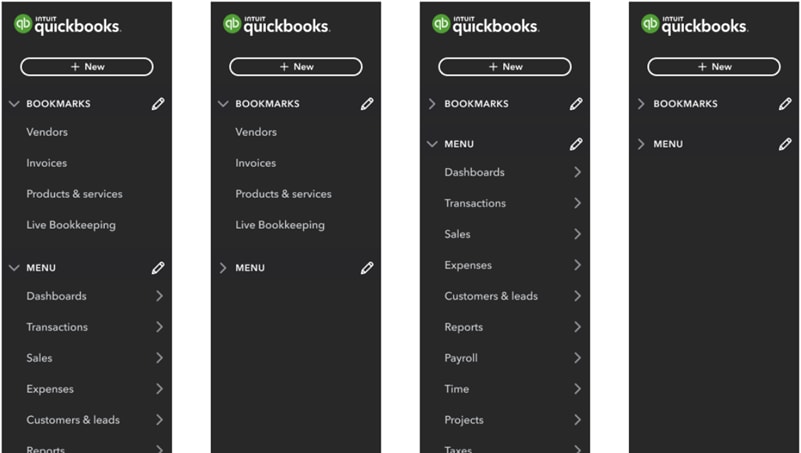
The navigation menu is now more manageable for both accountants and business owners. You have one consolidated menu shared across the business view and accountant view. You can also switch views if you prefer.
You can choose to Expand ![]() and Collapse
and Collapse ![]() the different sections of your menu to suit your viewing preferences.
the different sections of your menu to suit your viewing preferences.

Your navigation menu options and their functions are as follows:
Bookmarks is used for quick access to pages.
Hover and flyout shows all the sub-menu items when you hover over the main menu.
Dashboards is where you create, plan, budget, and take control of your finances. This includes the customizable home productivity center and the cash flow page and planner.
Transactions lets you import, categorize, and review bank transactions, app transactions, and receipts. You can also reconcile and manage your chart of accounts.
Sales holds your invoicing center and can monitor income over time.
Expenses shows your expense actions such as paying vendors and tracking mileage.
Customers & leads are where you set up and track customers and market to customers with access to Mailchimp.
Reports show company data and analysis to organize and monitor progress and document important activities that can help with decision-making.
Payroll is where you manage employees and contractors, track their time and benefits, and stay in compliance with tax and legal requirements.
Time helps you track the schedules and tasks of your employees using QuickBooks Time. Then, that time flows into QuickBooks for payroll, invoicing, and more.
Projects (available in Plus and Advanced) help you track profitability from project income, expenses, labor costs, and run project-specific reports from a single dashboard.
Taxes helps you set up automatic tax calculations to keep you tax-compliant and lets you file contractor 1099 forms.
Lending & banking offers quick access to resources like a personal QuickBooks Checking account and business funding.
Commerce is where you’ll access whichever major e-commerce platform you use to sell and track your products or services.
My accountant lets you directly communicate and collaborate with your accountant from within QuickBooks.
Apps is where you’ll find other QuickBooks products and third-party apps.
Live Experts (only available to companies without an added accountant) offers a dedicated bookkeeping team to help manage your books or walk you through the initial QuickBooks setup.
Customize your navigation menu
Set your preferred navigation view, add the pages you use the most and hide those you don't. This way, your menu is tailored to your specific needs.
Bookmark a page
- Select Edit ✎ next to the BOOKMARKS ▼ dropdown menu.
- Select which pages you want to appear in the BOOKMARKS column.
- To reorder your bookmarks, select reorder
 and drag them to your desired order.
 - Select Save.
Tip: Another way to bookmark your page is to select the Bookmark this page option located under the BOOKMARKS column. This also works for pages that aren’t included under the list of menu and sub-menu items.
Remove a bookmark
- Select Edit ✎ next to the BOOKMARKS ▼ dropdown menu.
- Uncheck the pages you want to remove from BOOKMARKS.
- Select Save.
Hide or show a page
- Select Edit ✎ next to the MENU ▼ dropdown.
- Uncheck any pages you don’t need, or check any you do.
- To reorder your menu, select reorder
 and drag them to your desired order.
 - Select Save.
For feedback, sign in to QuickBooks, scroll down, select ⚙ Menu settings, then select Give feedback.
Sign in now for personalized help
See articles customized for your product and join our large community of QuickBooks users.
More like this
- Navigate QuickBooks Online: Menus, Transactions & Set Upby QuickBooks
- Read and understand the QuickBooks Time timesheet history logsby QuickBooks
- Accessibility features in QuickBooks Timeby QuickBooks
- Understand how your payroll taxes are calculatedby QuickBooks