Learn how to enter an opening balance for a bank, credit card, and other types of accounts.
When you create a new account in QuickBooks Desktop, pick a day to start tracking all of your transactions. You enter the balance of your real-life bank account for the day you pick. This way, QuickBooks matches your bank records from the start.
This starting point is the account's opening balance. It summarizes all the past transactions that came before it. Here's how to enter an opening balance for accounts you create in QuickBooks.
Step 1: Enter an opening balance
Follow the steps for the type of account the opening balance is for:
Bank or credit card accounts
Before you create a new account on your QuickBooks Chart of Accounts, make sure you know what to enter for your opening balance.
You can enter an opening balance for a real-life bank account you just created, or one you've had for a while.
- Get your bank statements or sign in to your bank's website.
- In QuickBooks Desktop, go to the Company menu and then select Chart of Accounts.
- Right-click anywhere on your Chart of Accounts and select New.
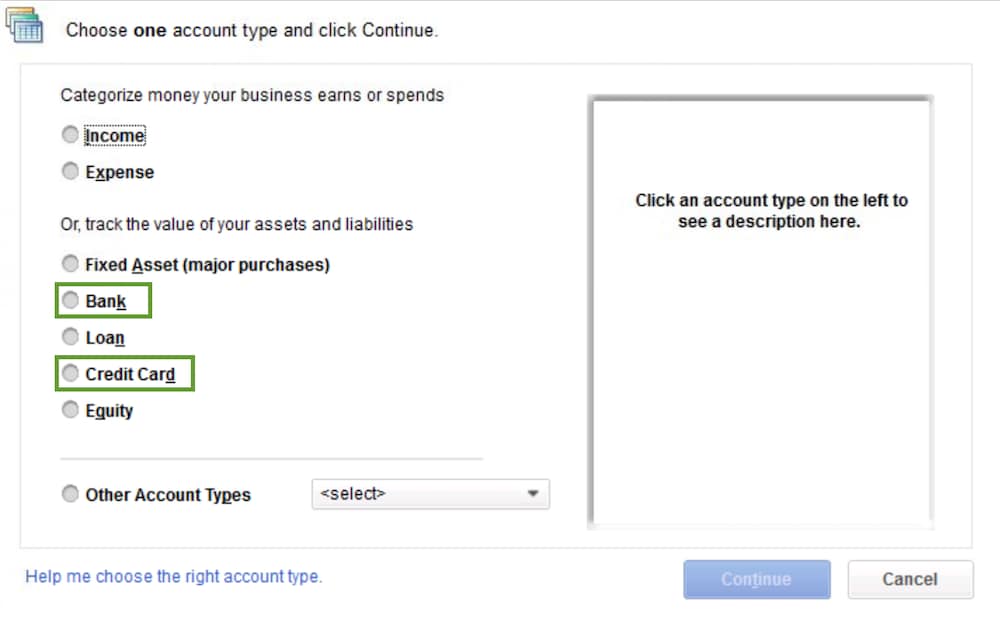
- Select Bank or Credit Card for the account type. Then select Continue.

- Give your account a name. If you have multiple accounts of the same type or at the same bank, give them unique names so they're easy to tell apart.
- Fill out the rest of the data fields.
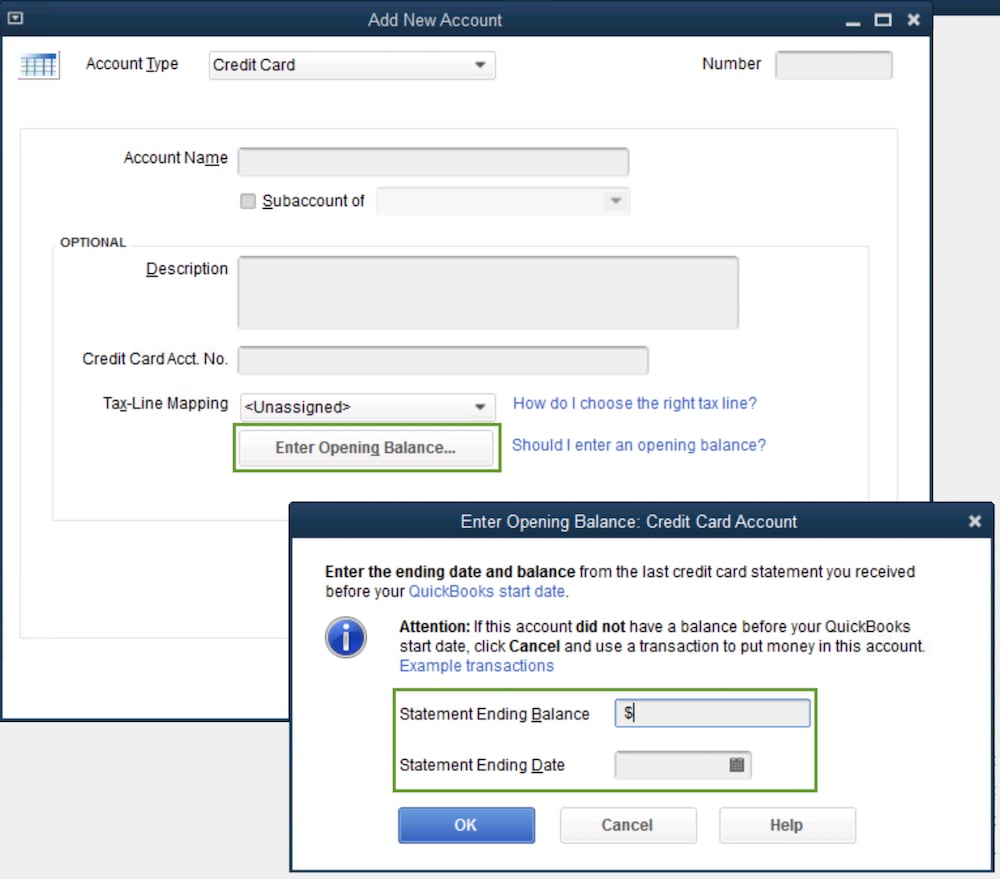
- Select Enter Opening Balance. Later on, if you need to edit your opening balance, the button will be Change Opening Balance.
 What you enter as the opening balance depends on how you want to handle your past transactions:
- If you don't plan to enter older transactions that come before the opening balance date in QuickBooks: Enter the ending balance and ending date from your most recent bank statement. Then select OK. This summarizes all of your past transactions. You'll start tracking new transactions going forward.
- If you want to enter your past transactions in detail: Decide how far back you want to go. Pick a date that's older than the oldest transaction you want to track in QuickBooks. Your opening balance summarizes everything before the date you pick. Enter the date you picked in the Ending date field. In the Ending balance field, enter the balance of your real-life account for that date. Then select OK. This method prevents you from counting past transactions twice.
- When you're done, select Save & Close to record the opening balance.
Asset, liability, and other types of accounts
You can enter an opening balance for a real-life bank account you just created, or one you've had for a while.
Be careful entering the opening balances for accounts on your Balance Sheet. This includes Fixed Asset, Equity, Long-term Liability, Other Assets, Other Current Asset, and Other Current Liability accounts.
If you're unsure or have questions, reach out to your accountant. If you don't have an accountant, we can help you find one:
- Get your bank statements or sign in to your bank's website.
- In QuickBooks Desktop, go to the Company menu and then select Chart of Accounts.
- Right-click anywhere on your Chart of Accounts and select New.
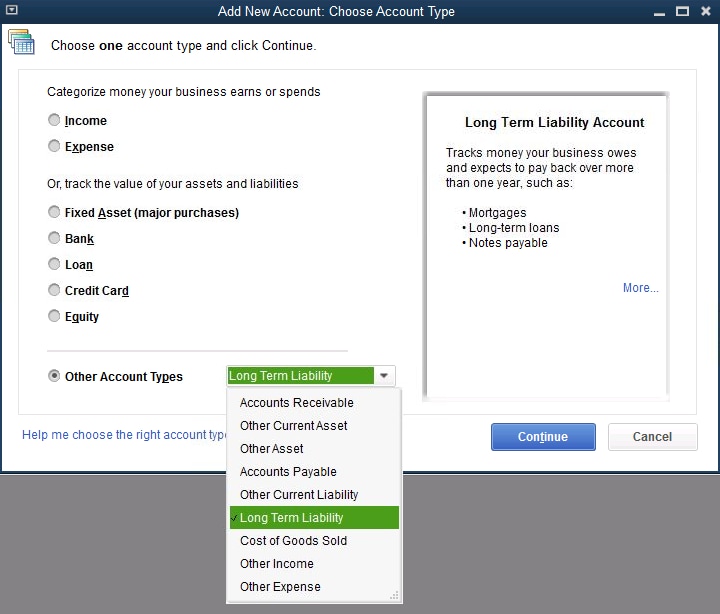
- Select Fixed Asset, Loan, or Equity. For other types of accounts, select the Other Account Types drop-down and one of the types. Then select Continue.

- Give your account a name. If you have multiple accounts of the same type or at the same bank, give them unique names so they're easy to tell apart.
- Fill out the rest of the data fields.
- Select Enter Opening Balance. Later on, if you need to edit your opening balance, the button will be Change Opening Balance. What you enter for the opening balance depends on how you want to handle your past transactions:
- If you don't plan to enter older transactions that come before the opening balance date in QuickBooks: Enter the ending balance and ending date from your most recent bank statement. Then select OK. This summarizes all of your past transactions. You'll start tracking new transactions going forward.
- If you want to enter your past transactions in detail: Decide how far back you want to go. Pick a date that's older than the oldest transaction you want to track in QuickBooks. Your opening balance summarizes everything before the date you pick. Enter the date you picked in the Ending date field. In the Ending balance field, enter the balance of your real-life account for that date. Then select OK. This method prevents you from counting past transactions twice.
- When you're done, select Save & Close to record the opening balance.
Income and expense accounts
You don't need to enter opening balances for income or expense accounts. These accounts simply track your earnings and spending.
Customer or vendor balances in Accounts Payable and Accounts Receivable
If your customers or vendors have outstanding balances from before your opening balance date, enter the individual unpaid invoices or bills. This creates open balances that collectively result in your Accounts Payable and Accounts Receivable opening balances.
Step 2: Check the opening balance entry
After you enter the opening balance, go to your account register and make sure it's accurate. The Opening Balance Equity account shouldn't have a remaining balance.
- Go to the Lists menu and select Chart of Accounts.
- Search for and open the Opening Balance Equity account.
- Check the account balance. It should be 0.00.
If the balance isn't 0.00, don't worry. Write down the remaining balance. Then run a Balance Sheet Report for last year.
- Go to Reports and hover over Company & Financial.
- Select Balance Sheet Standard.
- From the Dates dropdown, select Last Fiscal Year.
- In the Equity section, check the Retained Earnings balance.
- Compare last year's Retained Earnings balance with the remaining balance in the Opening Balance Equity account.
If they match, you're good to go. Everything is balanced. If they don't match, reach out to your accountant. They know how to get your accounts back in balance.