- Someone entered an incorrect opening balance when they created the account in QuickBooks.
- Someone added transactions that are older than the opening balance, but didn't edit the original opening balance entry to reflect the change.
- Someone edited, deleted, moved, or unreconciled an already reconciled transaction. This changes the ending balance of your last reconciliation, which impacts the beginning balance of the next one.
- Someone manually reconciled a transaction, so it didn't show up on the next reconciliation.
- Mark as New
- Bookmark
- Subscribe
- Permalink
- Report Inappropriate Content
Fix issues for accounts you've reconciled in the past in QuickBooks Online
Learn what to review so you can start reconciling.
Each time you start reconciling an account, you review the beginning balance in QuickBooks. It's the amount in the account at the beginning of the time period you're reviewing. Think of it as a checkpoint. It lets you know if you're starting with accurate numbers.
The beginning balance amount should match what's on your bank statement for the same start day. If it doesn't, don’t worry. QuickBooks lets you know if and what you need to change. Here's how to fix beginning balance issues so you can start reconciling.
To watch more how-to videos, visit our video section.
| Tip: If you've never reconciled this account before, don't follow these steps. Here's what to review for the first time you reconcile an account. Or, if you're new to the entire process, start with our reconciliation guide. |
Learn what causes beginning balance issues
Step 1: Review the original opening balance
The opening balance is the starting point for accounts in QuickBooks. If it’s incorrect, it affects all following reconciliations.
Make sure your opening balance is correct before checking your beginning balance.
Then move on to Step 2.
Step 2: Check your bank statement
Make sure you're reconciling the correct account for the correct month:
- In QuickBooks, go to Bookkeeping or Accounting, then select Reconcile (Take me there).
- Review the account you selected in the Account dropdown menu.
If you have multiple accounts at the same bank, or more than one account of the same type, make sure you're reconciling the right one.
Step 3: Match and categorize downloaded transactions
If your account is connected to online banking, match and categorize all of your downloaded transactions before you start reconciling. You need to categorize everything to get your final correct beginning balance.
Step 4: Review any discrepancy reports
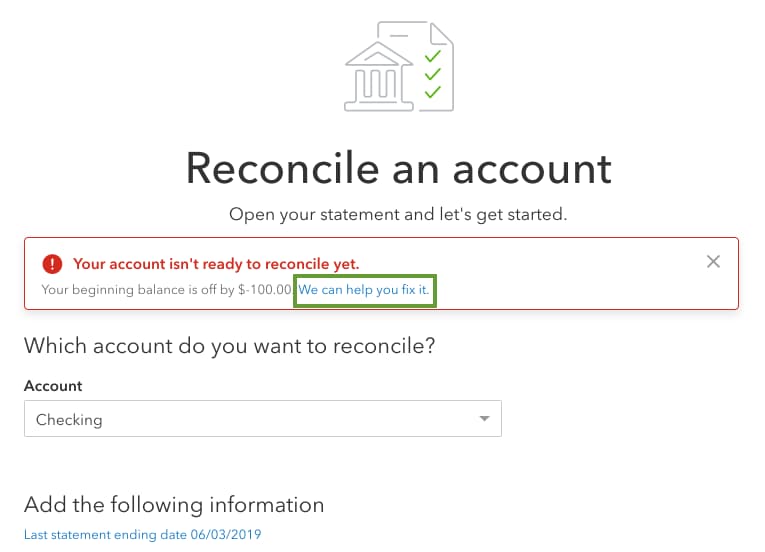
If anyone makes a change that affects your beginning balance, you'll get a message before you start reconciling.
- Select the We can help you fix it link to open your discrepancy report.
- Review the discrepancy report. Use it to decide if and how to make changes.
- Before editing anything, talk with whoever made the changes - they may be intentional.
Once you know you need to make corrections, review each transaction on the report one at a time:
- Select View to see the history of changes to the transaction.
- Review the Change Type column. This tells you what changed.
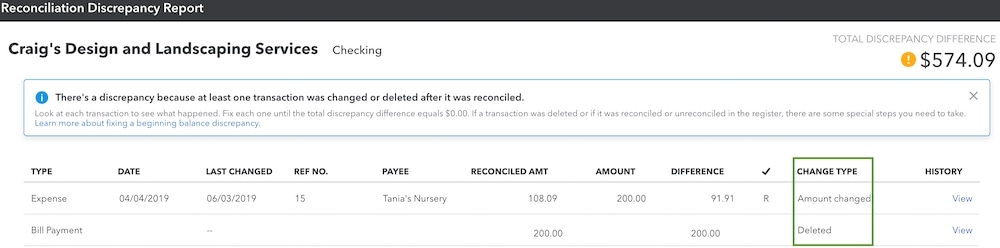
- Make edits based on the message in the Change Type column:
Amount changed
This means someone edited a reconciled transaction or moved it to another account. To fix it:
- Select the transaction to expand the view.
- Select Edit to open the form.
- Adjust the total or change the account as needed.
- Select Save and close.
Unreconciled in register
This means someone unreconciled the transaction. To reconcile it again:
- Select the transaction to expand the view.
- Select the box in the checkmark column until you see an R. This manually reconciles the transaction.
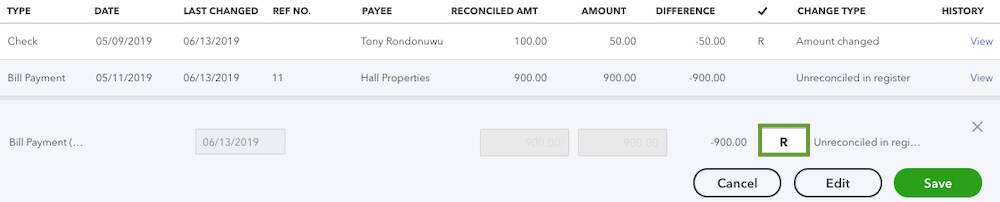
- Select Save.
Reconciled in error
This means someone already reconciled the transaction by accident. To remove it and add it to your next reconciliation:
- Select the transaction to expand the view.
- Select the box in the checkmark column until it's blank or you see a C. This removes the transaction from the reconciliation.
- Select Save.
Deleted
This means someone deleted the transaction. If this was an accident, recreate the transaction exactly as it appears on your discrepancy report:
- Select + New.
- Select the correct form (invoice, sales receipt, expense, etc).
- Fill out the form and select Save and close.
- Go to Bookkeeping or Accounting, then select Chart of accounts (Take me there).
- Find the account that you put the transaction into and select View register.
- Find the transaction and select it to expand the view.
- Select the box in the checkmark column until you see an R. This manually reconciles the transaction.
- Select Save. If you still see an alert the next time you reconcile, open the discrepancy report. The deleted transaction may still be on the list, but the difference should be $0.00. It won't affect your reconciliation.
After you review everything on the discrepancy report, the Total Discrepancy Difference on the report should be $0.00. Check the beginning balance again in QuickBooks. It should match the beginning balance on your bank statement. Select Resume reconciling to continue reconciling.
Next steps: Start reconciling
Once you know your beginning balance is correct, you can start reconciling. If you see issues in the middle of your reconciliation, here's what you should review.
If you’ve followed everything in our reconcile guide but still have questions, connect with your accountant. They can help get back on track.
Your books done right - guaranteed.
Get a QuickBooks-certified bookkeeper to categorize transactions and reconcile your bank statements every month so your books are always 100% accurate. Learn more about QuickBooks Live Bookkeeping.
Labels:
