Turn on suggestions
Auto-suggest helps you quickly narrow down your search results by suggesting possible matches as you type.
Showing results for
Thank you for choosing QuickBooks. Let me help you create templates in QuickBooks, Southy.
Invoices will look different depending on the experience you're using or whether you're using the old or new experience. With the new layout, you can already personalise forms while creating invoices at the same time. However, any changes or additions to your invoices will be applied to existing and future ones.
If you want to create a new template, you can select New style under the Custom form styles option. To do so, see the steps below:
After that, customise the appearance. Here's how:

Once done, you can choose a different template if you want it to be in a different format for specific customers.
On the other hand, you can use the Location Tracking feature if you want to create templates with different company names. This allows you to create multiple invoice templates with unique company names and addresses.
First, turn on the feature so you can create a location. To do so, follow the steps below:
Once done, the system will automatically choose the name, contact number, and address that you've provided once you select the location.
Additionally, learn how you can record sales transactions in various ways. To know more details, read this article for your reference: Record Invoice Payments in QuickBooks Online.
Post your comment below if you need anything else or if you have any other concerns. The Community is always here to assist you.
Hi cvo1,
Thanks for posting in the Community!
If you've applied or match the overpayment to the invoice, the overpayment itself will serve as a credit that you can apply to future invoices.
If the overpayment is shown in your Bank transactions tab, you can click on Find match option to apply it to the invoice. Or you can categorise it under Accounts Receivable account and select the customer to apply it to.
When you're ready to apply the credit to a new invoice. Here's how to:
You can also check this link to learn more about: Handle customer payments in QuickBooks Online.
As always, you can reach out to our Customer Care Team if you need further assistance with the steps. They'll be able to pull up your account in a secure form and help record the overpayment.
Post again in the Community if you have further concerns.
Hi, we import our vendor bills then have to change items line by line to add GST code and Class. Is there a way to amend the entire bill in one go rather than having to change line by line.
Hi Julia,
When importing bills with multiple line items make sure the bill has the same bill.no and, in the Line Tax Code choose the the correct GST for each line like GST on purchases. Then, on the mapping stage in QBO, decide if it's Exclusive or Inclusive of Tax in the Line Amount.
You can also download the sample file when importing bills for reference. And check this link to learn more about: Import your bills in QuickBooks Online.
If the issue persist, I recommend contacting our Customer Care Team. That way, our care agent can check your CSV file and help you format it.
Post again in the Community if you have questions about importing data in QuickBooks.
Is it possible to keep notes on customer invoice for our internal reference. For example: The status of when Invoice will be paid. Or there is an issue with some of the services on the Invoice that need to be negotiated.
Thank you,
Chris
Hi Chris,
Thanks for posting in the Community!
You can turn on the custom fields option to add internal notes if you're subscribed to the Essentials and the Plus versions. If not, you'll have to upgrade your subscription to either Essentials or Plus.
Here's how to add custom fields in your sales forms:
Once done, open an invoice you've created and locate the Internal notes field to enter information and click on Save after.
For reference you can also check this link to learn more about: Add custom fields to sales forms and purchase orders in QuickBooks Online.
Drop by again in the Community if you have other questions. I am around to help you.
I'd be glad to assist you in adding a customer discount and reducing the sales tax on your customer's sales form, Jean. I'll lay down the steps below.
In QuickBooks Online (QBO), the method for setting up and applying discounts differs based on whether you're using the new or old invoice experience. The system automatically generates a "Discounts given" account in your Chart of Accounts to track these adjustments. Before you start using reductions, you'll need to enable this feature in your settings.
If you're using an old layout, here's how to activate and add this on an invoice:

Then, refer to the steps below to apply the discount as a percentage or a flat amount:

Alternatively, you may add them as a line item on your sales form where you include a description of what this is for.
However, if you're on a new layout:
For further details, visit this resource: Add a discount to an invoice or sales receipt in QuickBooks Online.
Regarding reducing sales tax, you have the option to manually create a custom rate. However, please know it should be recommended by the State Agency to record the accurate sales tax.
Here's how to generate a personalized rate:


Additionally, I'll provide you with a helpful resource for generating transaction records for customers who make on-the-spot payments for goods or services at the time of sale: Create sales receipts in QuickBooks Online.
If you have other questions or need guidance managing invoices or sales taxes in QBO, please feel free to comment below. My role is to support you in navigating these aspects of your financial management effectively.
I want to know it I can attach a document to an invoice created in Quickbooks, like attaching a hand written invoice or a Purchase order.
And can I attach a document to a deposit transaction made straight to sales income account, like attaching a rental statement
Hi Kwikbooks,
We can add attachments to invoices and deposits in QuickBooks Online. Attachments can be added to the following transactions like invoices, bills, cheques, quotes, expenses, deposits, payments and so on.
The supported file types for attachments are, jpeg, pdf, png, doc, xlsx, csv, giff, xml.
To be able to add attachments for a transactions:
You'll see all of your attachments in QuickBooks Online by going to the Settings and click on Attachments.
For reference you can check this link to learn more about: Add or delete attachments in QuickBooks Online.
Drop by again in the Community if you have other questions about QuickBooks Online.
Thanks for posting in the Community, Joanna.
Yes, we can add the link/URL link to the email message prior to sending the invoice to your customer.
If it is a one time add on to the message body:
If you wanted to permanently add the link:
That's it. For reference you can also check this link to learn more about: How to set up or change customer messages in QuickBooks Online.
Post again in the Community if you have further questions. I am around to help you.
I mostly mark invoices as paid when I match payments on the transactions pages. That way it it reconciles the payment the same time
Hi Ma101,
Thank you for joining the thread!
Let me share with you the steps on how to mark invoices as paid using the QuickBooks Online mobile app.
iPhone
Android
For your reference, you can also check this article: Record invoice payments in QuickBooks Online.
Feel free to drop a comment below if you need further assistance with recording an invoice payment.
When importing invoices I keep getting a "Unable to add Item(s)" error
I've copied the item names from QuickBooks, I've also tried letting it create new items but get the same error
not sure what could be wrong
Thanks
Hello there, MGISolutions. Troubleshooting your browser could resolve your experience importing your invoices. I'm here to guide you through the steps to do it.
Before we begin, ensure that your file is in CSV format. You can download a sample spreadsheet during the import process for guidance. For more detailed information about the import process, please refer to this article: Import multiple invoices at once in QuickBooks Online.
Let's now refresh your browser. Start by logging into your QBO account using an incognito or private browsing window. This will enable you to work with a clean slate. Please use these keyboard shortcuts:
Then, please attempt to import the invoices again. If it works, clear your browser's cache to remove specific issues and help the program run efficiently. You can also use other devices and supported browsers to ensure everything works as expected.
Additionally, you can send customer statements to show summaries of their invoices, payments, credits, and balances.
We are always here to help you with importing concerns in QBO, MGISolutions. Have a great day ahead.
I have invoices that go over two pages. How can I get the footer which contains bank details and message to only show on the last page ?
Thank you for reaching out about customizing your invoice footers in QuickBooks Online (QBO), Doyle2. I understand you want to display the footer containing bank details and a message only on the last page of multi-page invoices. Here's some insight on how to achieve a similar result.
While QBO doesn't have a built-in feature to display footers exclusively on the last page of multi-page invoices, I can guide you through a workaround to achieve a similar outcome. This method involves removing the standard footer and strategically placing your bank details and message in specific fields. Here's a step-by-step guide:


By following these steps, your bank details and message will only appear on the last page of the invoice, as the standard footer will be removed from all pages.
Your input is valuable for shaping future improvements in QuickBooks. Since it isn’t currently possible to remove the footer from every page, I encourage you to provide feedback to our product development team.
Here’s how you can submit your suggestion:
For more information on modifying your invoices, I recommend checking out this article: Customize invoices, estimates, and sales receipts in QuickBooks Online. This resource provides comprehensive guidance on tailoring financial documents to your specific needs.
Additionally, QBO offers the option to send customer statements. These statements provide a concise overview of your clients' invoices, payments, credits, and current balances, which can be particularly useful for maintaining clear financial communication with your customers.
I hope this information helps you customize your invoices to meet your needs, Doyle2. If you have any questions about implementing these steps or need further assistance, please don't hesitate to reply. We're committed to helping you make the most of QuickBooks Online and streamline your invoicing process.
Why am I unable to add a two-digit, double-digit, or triple-digit invoice number in QuickBooks Self-Employed? I need to create unique invoice numbers (e.g., 01, 02, 101, etc.) to differentiate between invoices for different organizations, but the system won’t allow it. How can I resolve this issue?
We can perform some fixes so you're able to add invoice numbers in QuickBooks, @FANTA07. Let me provide detailed steps on how to do it.
Before we begin, let's ensure that the Invoice Number option is enabled under the Customise section of your Invoices tab. This will allow you to add a number. If this option is already enabled, we can proceed with performing basic troubleshooting steps.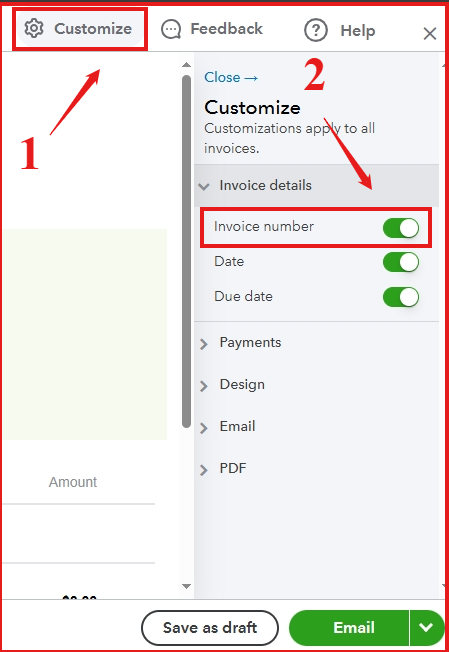
Performing basic troubleshooting steps can often quickly solve common issues, such as outdated cached files causing features doesn't work as it is.
First, please open your QBSE account trough private or incognito tab and open your invoices tab.
Here are the keyboard shortcuts:
If it works, return to your regular browser and clear its cache to remove any unnecessary data and start afresh. You can consider a different supported browser to optimize your QuickBooks experience.
Additionally, you can check this article on how to run report and export it through CSV file. This will allow you to view and analyze your financial data, aiding in making informed business decisions: Export transactions and get reports in QuickBooks Self-Employed.
By doing basic troubleshooting, we can ensure navigation efficiency, FANTA07. If you have more questions or need further assistance with sales transactions, feel free to contact us. We'll be here
One of my clients has just purchased another business, which we will run under the same ABN as current business. How do I go about setting up a different template for the invoices. I can't find anywhere that allows me to have two different templates?
TIA
Annette
I have all the steps to help you set up different invoice templates in QuickBooks Online (QBO), Annette.
QBO offers a Custom form style feature, enabling you to edit or create your template according to your preferences and use it in your sales forms. Here's how you do it:
Then, we can customise the appearance of your template according to your preference.


You can repeat these steps if you want to create another one with a different template or style for your invoices. After that, when you create a new invoice, click the Customise button to select the template you want for that invoice.
For more information about personalising your templates, check out this article: Customise invoices, quotes, and sales receipts in QuickBooks Online.
You can also create recurring transaction templates to automate regular financial tasks, saving time and reducing errors.
Moreover, visit this article to learn how to automatically or manually send reminders to customers when your invoices are soon to be overdue: Set up automatic reminders.
I'm willing to help you out if you have more questions about managing your invoices or other QuickBooks concerns, Annette. Just leave a reply below and I'll provide the necessary help.
I have made an edit to my standard invoice but Quickbooks is not Applying the customisation which you say in your Help file: I have made it the Default. " After you apply customisations to the new template, make it the default template to reflect changes."
You have clicked a link to a site outside of the QuickBooks or ProFile Communities. By clicking "Continue", you will leave the community and be taken to that site instead.
For more information visit our Security Center or to report suspicious websites you can contact us here
