April Sale
Buy now and pay only $1/month
for your first 3 months
March into savings Don't miss out!
$1 /monthfor 3 months
Track your expenses as you go and save 11 hours of admin per week
QuickBooks Online $1 /monthfor 3 months
Start fresh this new year
with QuickBooks Online
$1 /monthfor 3 months
Sale ends soon. Don't miss out, sign up today
$1 /monthfor 3 months
Start fresh this new year
with QuickBooks Online
$1 /monthfor 3 months
$1/month
for 3 months
$1/month
for 12 months
When purchased in bundles of 10
50 %off for 3 months
50 %off for 12 months
  • Invoices
  • Expenses
  • Reports
Image Alt Text
Tools

LinkedIn advertising for small businesses: Account setup, best practices & campaign build templates

I’m going to walk you through how to set up the perfect LinkedIn Advertising account for your small business. Or, if you already have an account, the perfect setup for basic LinkedIn campaigns.

This is incredibly helpful because—if you haven’t run LinkedIn Ads before—the system will be a little bit different and we’ll have a significant learning curve… so I can help you cut that out.

But also realize that LinkedIn Advertising campaigns are quite expensive compared to other self-service PPC platforms on social networks such as Facebook but not as expensive as search based Google Ads.

Let’s start with the prerequisites.

Setting up your LinkedIn Ads account

  1. Become a company page admin
  2. Create or join a LinkedIn Ads account
  3. Install the LinkedIn insight tag
  4. Set up conversion tracking
  5. Create your retargeting audiences
  6. Integrate Lead Gen forms
  7. Upload your lists

1. Become a company page admin

First, you will want to get admin access to your company’s LinkedIn page.

Without admin access, LinkedIn will not allow you to delete ads you’re unhappy with. With lesser account privileges, LinkedIn will send your ad to the approval queue and once approved push it live; and you won’t be able to delete it on your own.

Think of admin access as an insurance policy against fat-fingers.

LinkedIn advertising admin access.

If your admin won’t grant you admin access, you can still use the “Direct Sponsored Content Poster” access to run and manage ads for your company page.

Generally speaking though, if you can get admin access, do so, so you can create, edit, and delete ads.

2. Create or join a LinkedIn Ads account

Next you’ll want to either get access to – or create – your LinkedIn Ads account. This will log you in to the ad platform aptly titled “Campaign Manager.”

LinkedIn advertising campaign manager.

3. Install the LinkedIn Insight tag

Next you want to get the Insight Tag installed on your website to see which companies, departments, job titles and seniority levels are clicking through your ad and viewing your offer.

LinkedIn advertising insight tag.

Log into your LinkedIn Ads account, click on Account Assets, then click Insight Tag. There will be instructions on how to take that snippet of javascript and put it on every page of your website.

Putting the Insight Tag on all of your web pages gives you three significant benefits:

1. Conversion tracking – You can see right within the advertising platform how many conversions your ads have lead to, and how much they cost to get.

2. Retargeting – The Insight Tag also creates retargeting audiences for you so that you can show ads to the warm audiences who have already landed on your website or interacted with you in some way.

3. Free web demographics – The Insight Tag also gives you access to a free tool that LinkedIn calls Web Demographics, which is like a free analytics tool for all the traffic on your website, (not just the ads you paid for) which shows you the professional makeup of everyone who visits your website.

The Insight tag is critical to gathering data for many of the post click activities. Without it, it will be impossible to track the success of your campaigns.

4. Set up conversion tracking

Next- conversion events.

LinkedIn advertising retargeting.

This will let you know if the person clicking on the ad has actually taken action all the way through the funnel.

For example, after someone fills out a contact form or downloads an ebook, you’ll send them to a separate “thank-you” page which will have your conversion tracking pixel embedded. This’ll tell LinkedIn that anyone who landed on this page took action and should be identified as a conversion.

Note: Conversion tracking is not possible without the Insight Tag installed.

5. Create your retargeting audiences

Next you’ll want to create retargeting audiences which is also dependent on the Insight tag.

To do this you will click Account Assets, Matched Audiences, Website Audiences and create an audience there.

LinkedIn advertising matched audiences.

I would encourage you to have a Website Audience of anyone who visit your website, but then maybe also create other niche audiences (for example, anyone who landed on a landing page, or anyone who visited your Contact Us page. Those can be helpful in the future as well.

Next, you want to set up your lead gen forms integration, if you decide to use LinkedIn Lead Generation Form Ads.

6. Integrate Lead Gen forms

LinkedIn advertising lead generation forms.

Lead Gen forms are a type of PPC ad where a form appear within the LinkedIn feed and can generate leads without asking the user to leave LinkedIn at all.

Lead Form ads are nice because they take a lot of the friction away from your users. These typically lead to higher conversion rates, but there is a little bit of integration work to make sure you can get that data out of LinkedIn and into your CRM or marketing automation software.

To do this, go to Account Assets, click on lead gen forms and create a new form there. Refer to the below for a list of how you can integrate these into your current CRM.

If you use Eloqua, Marketo, Salesforce or Hubspot as an email service, there is a native integration into all of these tools (and even a few others).

If you do not use one of these enterprise-level tools, for $20/mo, you can use a Zapier integration to send these leads into whatever systems you need.

7. Upload your email and company lists

Finally, you’ll want to go in and upload all of your lists so that they are ready in this account to be used in ways that we’ll talk about later.

LinkedIn advertising company lists.

You can upload these lists by going to Account Assets -> Matched Audiences -> Create Audience and click List Upload. Here you should upload lists like:

  • Email addresses from your current customers
  • Email addresses of past leads that haven’t purchased
  • Email addresses of target personas from other sources
  • Company names for high priority targets
  • Company names of current customers for exclusion
  • Company names list of competitors for exclusion

Once you’ve uploaded all these lists, you’re good to go. Let’s go to start creating some campaigns.

Linkedin Ads campaign buildout

The first question you need to ask is, “what is the purpose of this campaign?”

It sounds simple, but you need to get very specific on this goal in order to create some guardrails for your campaign. “More leads,” or “Brand awareness,” for example, lack the specificity that will help you benchmark your success.

“We want to get 200 leads within the next 30 days,” however, does. Once you have this, within a few days, you should have an idea of what your cost per lead will be so you can adjust your spend to help you meet your goal, or prevent yourself from overspending.

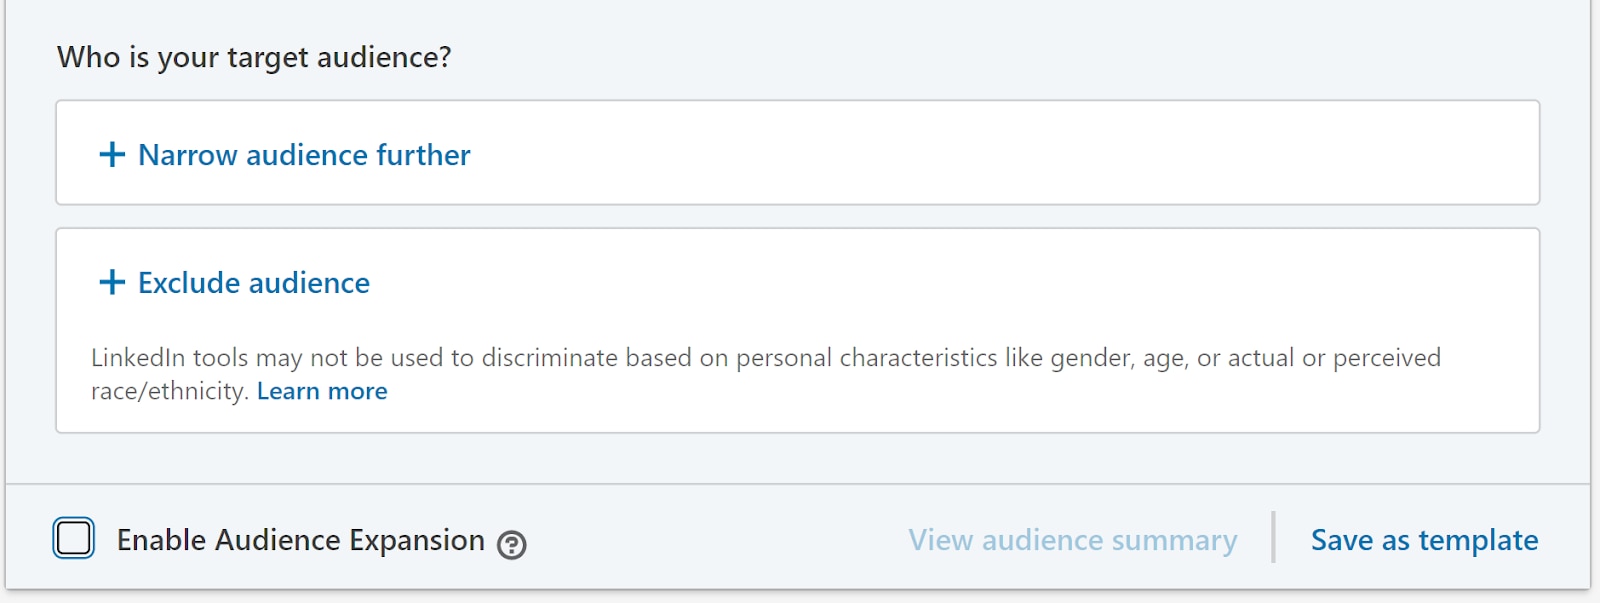
The next question you need to ask is equally as simple with a complex answer, “Who am I targeting?

The answer to this question can help you get ultra specific in your copywriting, ad targeting, and your email list selection if you’re running retargeting campaigns.”

Many audiences can be reached by multiple targeting methods and this is helpful for reasons that we’ll go into later.

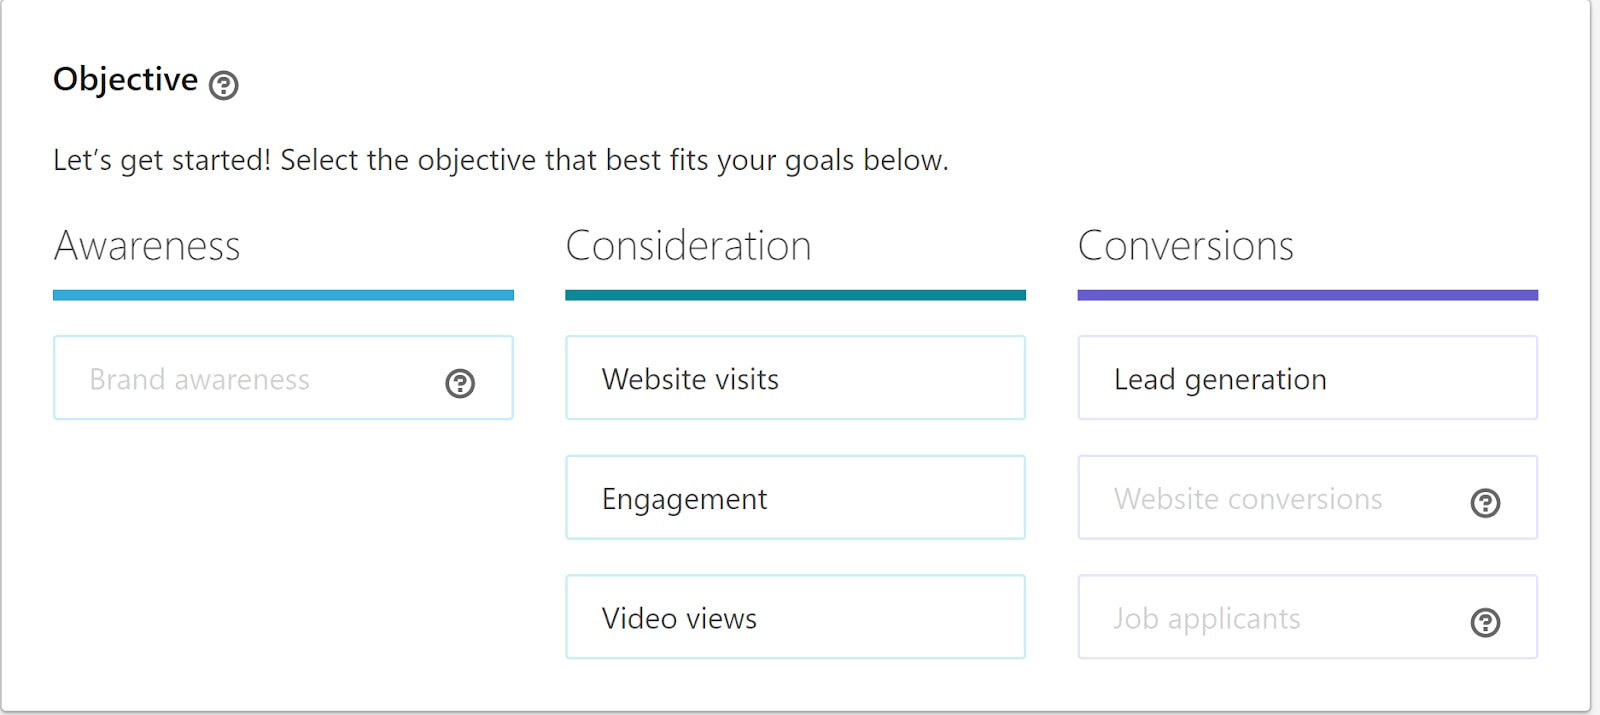
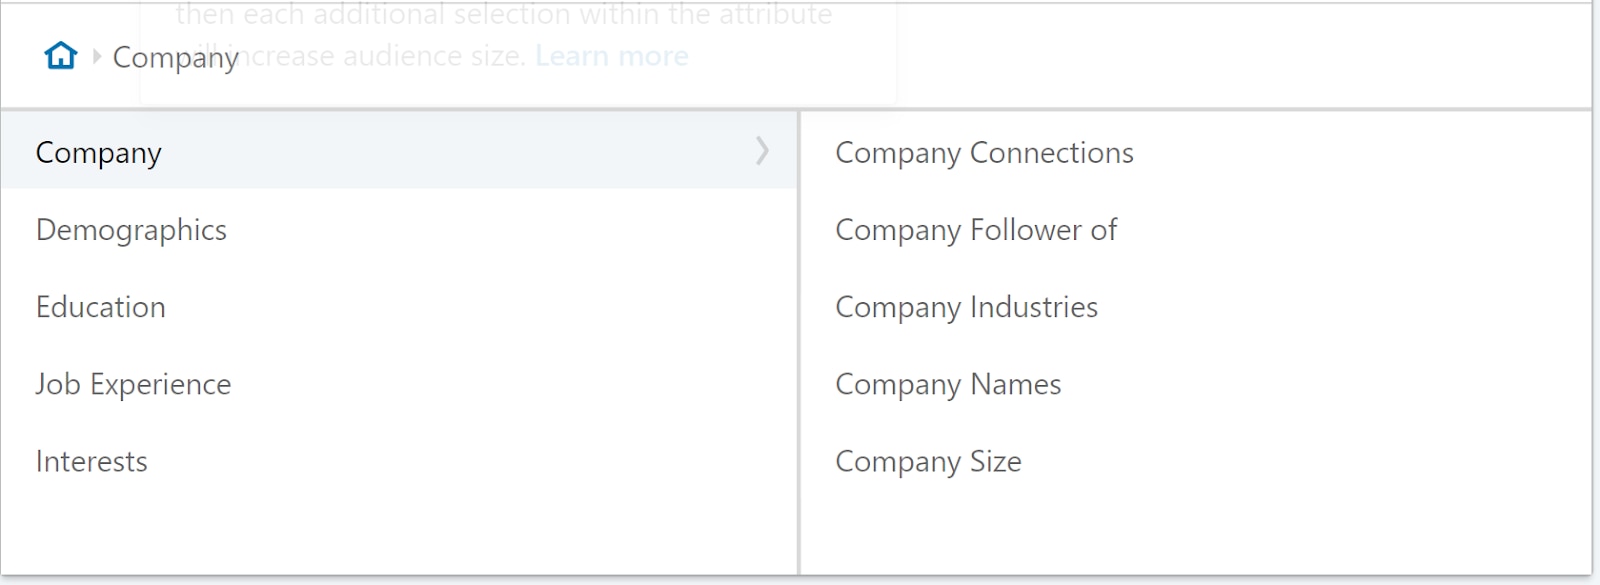
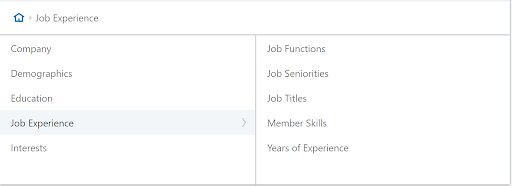
For each persona, I would recommend creating a campaign with each of the four different targeting types:

  1. Job Title
  2. Job Function with Seniority
  3. Skills with Seniority
  4. Groups with Seniority

Once we have answered these questions with the utmost specificity, we can begin to walk through the steps of building a campaign.

These can just be placeholder or template campaigns for now as you can refer to the campaign setting section down below for how specifically to set these up.

Next, consider creating a campaign for targeting an email list. This could be an email list you’ve acquired of email addresses who would make ideal customers.

Next, consider creating a campaign for retargeting your website visitors, because they will be a warmer audience and more likely to take action.

Finally, consider setting up an Account Based Marketing (ABM) targeting campaign for just targeting the top accounts that your sales team might want to go after.

Campaign settings

Since you’re going to be creating all of these campaigns within Campaign Manager, let’s walk through each of the campaign settings as we go through to make sure that you know exactly what to select.

Objective

First, when you create a campaign, you’ll be asked to select an objective.

LinkedIn advertising objective.

The simplest objective to start with is “Website Visits” because it is easy to set up, can provide brand awareness, and will give you the Insight data you need to refine your campaigns later.

“Website visits” will also allow you to either pay only when someone clicks (CPC) or by 1,000 impressions (CPM), which is a great level of control and the most simple for troubleshooting and pinpointing the issue.

There are other objectives like lead generation, video views and conversions. But for just a simple campaign, let’s start with Website Visits.

Ad formats

Next, you’ll choose your ad format.

Ad formats are further down the page, but it’s important to understand your ad format first since the options widely vary.

LinkedIn advertising ad formats.

Since we’re keeping things simple for now, the ad type you’ll want to start with is called Sponsored Content and it comes in several different flavors; including carousel ads, video ads and lead generation forms. The one you’ll want to select is “Single image ad” since it’s the easiest to run tests with and is easiest to get all the traffic you’ll need.

There are also Text Ads which are the simplest and least risky of the ad formats. They’re the least expensive $3-5 per click is common) and they don’t drive much traffic. They’re perfect if you’re just dipping your toe into the water.

There is also Sponsored InMail (called “Message ad” in the campaign creation process) which is by far LinkedIn’s most expensive ad format and I don’t recommend starting with this unless you have a very specific offer that would work well as a personal invitation.

Finally, there’s also Dynamic Ads (shown here as “Spotlight ad” and “Follower ad”) and I don’t recommend these, simply because they’re more expensive than Sponsored Content and get far less engagement.

Grow Your Business With QuickBooks

Geography

LinkedIn will ask you to define your geography first before you do any other type of targeting. You can choose by country, continent or even drill down into specific states or cities or providences.

LinkedIn advertising geography.

These currently are determined by the information LinkedIn users put in their profile, so “location” can be pretty broad. However, if you need to be ultra specific, you can target prospects their physical location as determined by their IP address.

Exclusions

As you go to set up your targeting (like we mentioned in the [previous] section), you will notice that there is the ability to exclude.

LinkedIn advertising exclusions.

Exclusions can be extremely powerful on LinkedIn because you are paying a premium for each click, so it makes sense to ensure that you are excluding as many non-relevant people as possible.

Some great ideas for exclusions here might be:

1. Excluding the list of competitors that you uploaded in the prerequisite section. 

This will make sure that your competitors are not seeing your ads because they would love to click to charge you money, but they won’t end up giving you money. You can do this by excluding a list and setting the list for the previous section of your competitor’s company names.

2. Excluding your employees from seeing your ads. 

Employees might be interested to see what you’re doing, but you pay them, you don’t need to pay LinkedIn money for them as well. You can do this by going to exclude by company name and typing your own company.

There is also an option to exclude followers of your company page, which also might be a good idea because you may have a lot of employees or friends who are following your company page.

3. Excluding your current customers. 

You will exclude by matched audience list and select that list of customers you uploaded in the prerequisite section.

4. Excluding Job Functions of Marketing, Sales, and Business Development from Skills/Groups Campaigns. 

If you are targeting anyone by skill or group or interest in this campaign, consider adding an exclusion of the Job Functions of Sales, Business Development or Marketing.

The reason why you might want to do this is there are a lot of people who will add skills or join groups or have interest of the people they are trying to sell to. So if you are not specifically targeting the functions of sales, business development and marketing , they can be good to exclude here because they may not be your direct competition, but they will click to see what other people are saying to their target audience and they likely won’t become customers.

5. Excluding anyone who has already converted on your ads. 

Do this to save your dollars just for net-new prospects. You can do this by excluding your Web Audience of converters that you created in the prerequisites.

Audience expansion

Next, you will see a box down below that says enable audience expansion. Make sure you uncheck this as it is checked by default.

LinkedIn advertising audience expansion.

This box essentially allows LinkedIn to place other people that they think are relevant to your audience. But if you are already specific about who the audience is you want to target, there’s no need to waste money on anyone who isn’t an exact fit.

LinkedIn audience network

If you are creating Sponsored Content, there will be an option to enable the LinkedIn Audience Network, which allows your LinkedIn Ads to show to LinkedIn members while they’re visiting partner sites.

LinkedIn advertising placement.

This can be beneficial if you have an exceptionally small audience that you want to fully saturate, or a budget that is larger than your social media ad campaign can naturally spend and you might want to get in front of people as often as possible.

If you’re working with a limited budget, I would recommend disabling this option and focusing 100% of your spend on people while they’re on LinkedIn, because you know they’re in the business mindset.

Bids

Next you’ll get down to the bidding and budgeting section where you get control of finances.

Automated Bidding will be selected by default, but you’ll want to immediately change that to max CPC bid. Automated bidding will let LinkedIn get pretty crazy with how high they’re willing to bid for you because it’s based off of machine learning and the machine hasn’t learned yet.

LinkedIn advertising bids.

Max CPC bidding will allow you to tightly control and keep things efficient from the beginning. (You can always change this later.)

If you are just getting started with a small budget, set your max CPCs pretty low. (LinkedIn won’t tell you how low the floor is, but if you insert something very low, like $2, into your bid box, LinkedIn will flash a red message telling you what the lowest allowed bid is.)

If you’re just getting started, it probably makes sense to go as low as possible here or maybe slightly above that floor just so you know where you stand.

The lower the bid you can have while still spending the amount of money that you’d like on the network, the better. This is the key to getting the lowest cost per conversion on LinkedIn.

Budgets

Next, you can set your daily budget.

I recommend if you are starting with the lowest possible bids to set your budget very high (I set mine to $100-200 per day).

If you have a low bid to start out with, you are not incentivizing LinkedIn very much to show your ads so you probably won’t spend much anyway. You want your budget high enough that LinkedIn won’t reach your prospects during the day and not give you the full picture of how much your ads actually can spend at very low bids.

LinkedIn advertising budgets.

Once you found the right bid amount to get the right amount of traffic to your ads, then you can set your budgets where you actually want them to act like a safety net against overspending.

Ad rotation

There is an option that is somewhat hidden that a lot of people ask about and that’s Ad Rotation.

I don’t recommend using the “Rotate ads evenly” function as the default is generally great.

By default, LinkedIn will optimize the ads in your campaign for the ad that gets the highest click through rate.

LinkedIn advertising ad rotation.

If you force LinkedIn to rotate your ads evenly, it doesn’t actually show your ads evenly. It only enters both into the auction evenly and the ad with the lower click through rate are going to lose more auctions (resulting in your ads showing less). The auctions that the ad does win, it will win at a higher price (resulting in an increase in your Cost Per Click).

Sometimes I call the rotate evenly option the “charge me more and show me less” button. I recommend sticking to optimizing by click through rate to get the best rates from LinkedIn.

Ad creation

I recommend in every campaign to publish only two ads at a time and to test some elements. Any more than 2, and some ads will not get enough impressions to get a true feel for how they perform.

I like to start with A/B testing the intro field since that’s where we’ve found the most variance.

When creating Sponsored Content ads, you have three different fields that are visible to the user:

Intro

The intro field gives you about 150 characters of text that comes above your image. Don’t go over as you’ll get the dreaded “See more…” link and your text will get truncated.

For your intro, try to share:

  1. Why someone should be paying attention
  2. Give them a call to action (CTA).

This will give you a good start at ads that are clear and perform well.

LinkedIn advertising ad creation.

Headline

Your headline is the text that shows at the bottom of the image in your ad. Keep your headline below 70 characters.

This should describe your offer. If you’re sharing a free ebook, I like to format it like this:

[Free Ebook] Winning the War Against Poor-Quality Leads

Image

The point of your image is to grab attention. Include colors that contrast against LinkedIn’s color palette of blues, grays and whites. If it stands out, more people will pay attention to your ad copy.

Targeting

With any persona you might want to be going after, you can consider splitting them into two different pieces:

  1. Who they are professionally
  2. What type of organization they’re a part of

Organization

For understanding what type of organization they’re a part of, there are three filters that you can add on to all of the different targeting:

  • Company Size
  • Company Industry
  • Company Name
LinkedIn advertising organization.

Professional

Defining who the professional is usually a lot more fun:

  • Job Title
  • Job Function with Seniority
  • Skills with Seniority
  • Groups with Seniority

If your audience doesn’t break down nicely into those categories, feel free to omit any of them that don’t make sense. You can also consider other types of targeting like their educational background, interests, gender, etc.

LinkedIn advertising targeting.

Targeting pros and cons

Job Title targeting is going to be the most narrow since LinkedIn doesn’t understand everyone’s job title, so you’ll only get very specific audiences. It’s often a more competitive audience because a lot of marketers like to target by job title so you might pay a little bit more for this targeting.

Job Function with Seniority is the polar opposite here. It’s the department someone sits in with their level of seniority. This is the most broad targeting, so you might end up with some irrelevant people in there if you’re trying to be very specific, but keep in mind this is also LinkedIn’s least expensive targeting option most of the time.

Skills with Seniority brings you a wider audience of targeting because each user can have up to 50 skills. Its cost is often somewhere in the middle.

Groups with Seniority targeting brings a much narrower audience since you have to go way out of your way to join a group on LinkedIn. These will be very passionate and active audiences, but will oftentimes be small in size.

Go forth and conquer!

If you’ve been keeping track, now you have both the full checklist of what you need to set up a LinkedIn Advertising account as well as template for how to build the perfect LinkedIn Ads account to start with.

We’ve also covered best practices for bidding and budgeting, as well as designing the targeting around your ideal target prospect, and how to actually create the ads themselves.

The only thing left for you to do is actually go implement these learnings and create a rockstar-level LinkedIn Ads program for your company.

Now go forth and conquer LinkedIn Ads!


Related Articles