Understand the navigation menu in QuickBooks Online
by Intuit•8• Updated 1 month ago
The QuickBooks Online menu gives you quick access to your most important job centres like invoicing, banking, employee management, and more. We'll show you around your menu and how you can customise it to best meet your workflows and habits.
In this article, you'll see:
- An overview of the navigation menu
- How to customise your view
- How to bookmark a page
- How to hide or show a page
Overview of the navigation menu
The navigation menu is now more manageable for both accountants and business owners. You have one consolidated menu shared across the business view and accountant view.
You can clean up the way your menu looks by selecting Expand ![]() and Collapse
and Collapse ![]() for the different sections of your menu.
for the different sections of your menu.
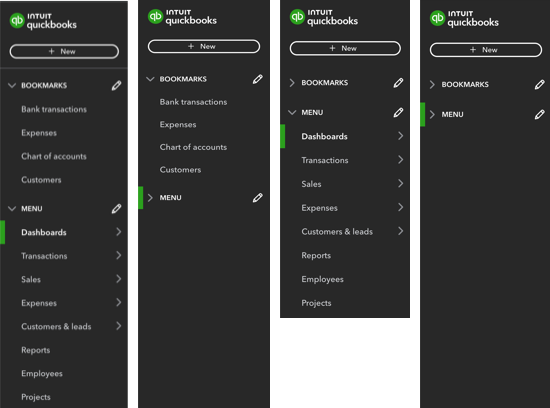
Bookmarks are at the top of the menu for quick access.
Hover and flyout menu interactions show all sub-menu items when you hover over the main menu item.

Dashboards include the Home productivity centre and your Cash flow page.
Transactions let you import, categorise, and review bank transactions, and receipts. You can also reconcile and manage your Chart of accounts.
Sales hold your invoicing centre and can monitor income over time.
Expenses have your expense actions like paying suppliers.
Customers & leads are where you set up and track customers and market to customers with access to Mailchimp.
Reports tell you about different aspects of your business. Some focus on sales, others focus on your spending, and some look at parts of each.
Employees are where you manage employees.
Projects (available in Plus) is where you can track profitability from project income, expenses, labour costs, and run project-specific reports from a single dashboard.
Budgets (available in Plus and Advanced) is where you can add a new or edit an existing budget. You can also run reports to compare your actual income and expenses vs. your estimated budget.
Tax helps you set up, track, and manage your taxes. It helps to keep you tax compliant, knowing exactly what you owe and when to pay.
My accountant lets you directly communicate and collaborate with your accountant from within QuickBooks.
Apps is where you find other QuickBooks products and third-party apps.
Customise your view
You can update the navigation menu to feature the pages you use most or hide pages you don’t use, to make your menu customised to your needs.
To customise your view, select ⚙ Menu settings, then select Customise this menu, then follow the steps to bookmark, hide or show, or reorder your bookmarks or pages. Or, you can directly Bookmark a page or Hide or show a page using the edit icon ✎ next to the respective menu options.
Bookmark a page
- Next to Bookmarks, select Edit ✎.
- Select which pages you want to appear under Bookmarks.
- To reorder your bookmarks, select reorder
 and drag them to your desired order.
 - Select Save.
Tip: Another way to bookmark your page is to select the Bookmark this page option located under the Bookmarks column. This also works for pages that aren’t included under the list of menu and sub-menu items.
To remove a bookmark:
- Next to Bookmarks, select the Edit ✎.
- Uncheck the pages you want to remove from Bookmarks.
- Select Save.
Hide or show a page
- Next to Menu, select the Edit ✎.
- Uncheck any pages you don’t need, or select any you do.
Note: Any pages you uncheck can be found under More. - To reorder your menu, select the reorder and drag them to your desired order.
- Select Save.
If you have questions or feedback, sign in to QuickBooks, scroll down, select ⚙ Menu settings, and ![]() Give feedback.
Give feedback.