How to import credit notes
by Intuit• Updated 2 years ago
QuickBooks Online makes it easy for you to import data so you can have more time for your business. We'll walk you through the steps so you can import credit notes into QuickBooks with ease.
- Credit notes can be imported with multiple line items OR as a total value for each invoice.
- Multi-currency is supported.
- VAT codes are mapped so there's no need to change your VAT codes to QuickBooks VAT code formats before importing. Learn more about common VAT codes.
Note: We recommend that no more than 100 credit notes are imported at any one time.
Step 1: Open the Import Credit Notes tool
- Select the Gear icon.
- Under Tools, choose Import Data.
- Select Import credit notes.
Step 2: Upload your CSV file
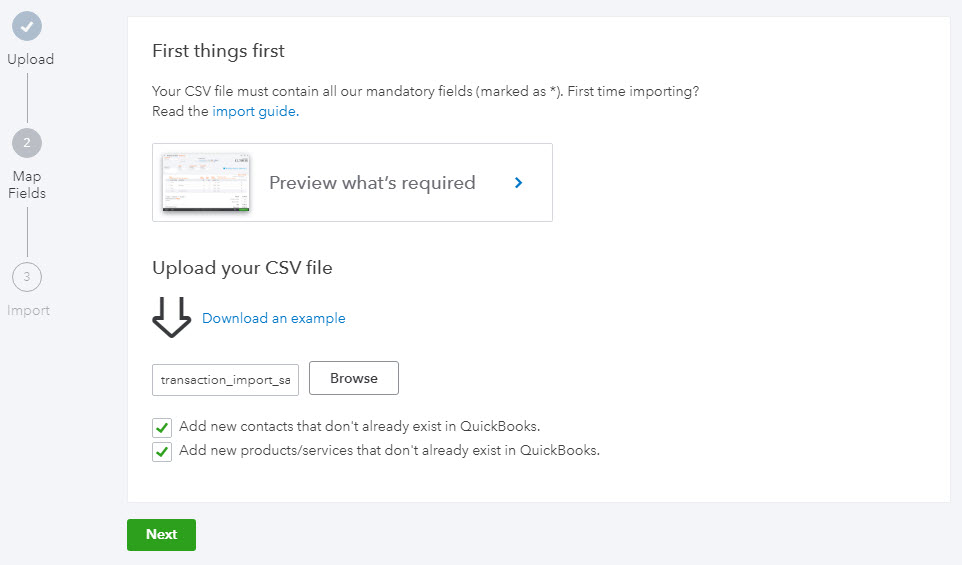
- Preview what's required to import credit notes. There is also an example data file available.
- Once you have all the mandatory fields, select Browse, then select your .csv file.
Note: If no line item is present QuickBooks will populate this field with a generic item called 'Sales'.
- Next you have the option to automatically create any new customers or line items that are not in QuickBooks Online. If you would like to auto create customers and/or line items, then check the applicable option(s) and select Next.

Step 3: Map column headings
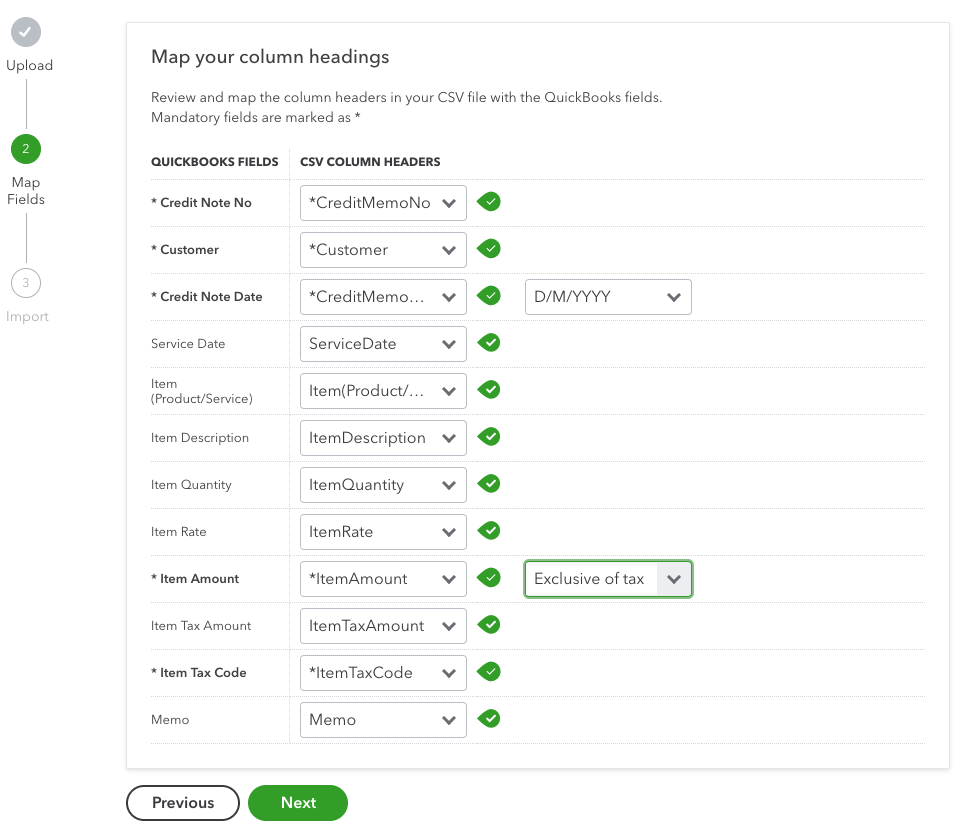
- Mandatory fields are marked with an asterisk (*). Other fields not present require Not Applicable to be selected.
- Select the date format you have used. For example, DD/MM/YYYY
- Select your VAT option if applicable; Exclusive or Inclusive. This option is only available if VAT is set up in QuickBooks.

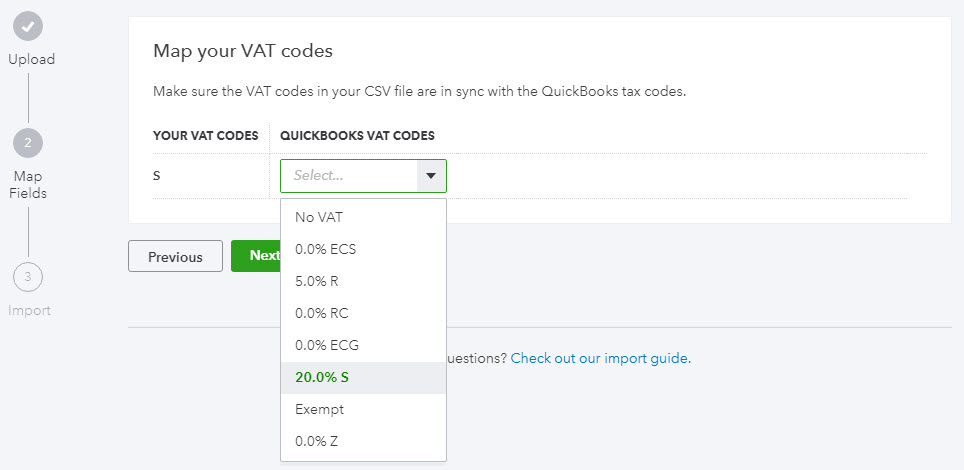
- On the final mapping page, map your VAT codes to those of QuickBooks, then select Next.
- At this stage any mapping issues will be highlighted so you can go back and resolve them.

Step 4: Import credit notes
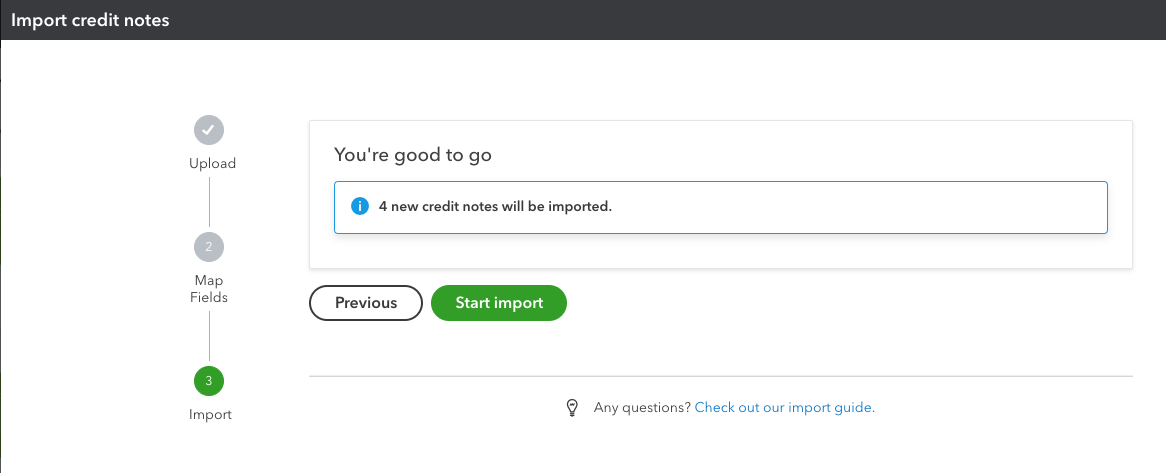
- Once mapping is complete, you will see a summary of your import as shown in the screenshot. Select Start Import to begin the import process.
- Once done, an import summary will be displayed. If any credit notes fail to import, note why, then select All Done and you'll be greeted with a final completion summary, select OK to finish.

What do I need to know?
- The following list import methods should be considered if you have a large volume of new customers or products/services to import:
- Import products and services
- Import customer, supplier, or supplier contacts from Outlook, Excel or Gmail
- New product/service items are created as services and can be edited after importing.
- Discounts and negative amounts in general are not supported.
- When new customers are imported, if no currency is specified QuickBooks assumes the customers home currency is GBP.
- When credit notes have multiple line items ensure each line entry specifies the credit note number, customer, Credit Note Date and so on, as seen in the example .csv file, specifically credit note 1001.
Important notes for VAT:
- VAT must be enabled in QuickBooks to import transactions with VAT amounts.
- If VAT is not applicable/turned on in QuickBooks then VAT codes and VAT amounts are not required, plus your sample file will not contain VAT columns.
- If VAT is applicable/turned on in QuickBooks then VAT coding will be required, plus your sample file will contain VAT columns.
- QuickBooks will calculate VAT based on the VAT code IF no VAT amount is specified.
- When a VAT amount is specified, the amount will override any calculation that would normally be made by QuickBooks. This allows for any rounding differences between QuickBooks and other 3rd party applications.
- To retain credit note numbering in your CSV file, ensure Custom Transaction Numbers is switched ON.
- When importing products/services that need to be allocated to a Category, enter the item in your CSV file using the following format: [category name]:[item name]; for example, Jewelry:Earrings.
Note: A product can't be imported if its name is already allocated to a Category.
You must sign in to vote.
Sign in now for personalized help
See articles customized for your product and join our large community of QuickBooks users.
Take control of your business finances with QuickBooks
![[object Object]](https://digitalasset.intuit.com/content/dam/intuit/sbsegcs/en_gb/quickbooks-online/images/sdr/refer-an-accountant-hero.jpg)
Not relevant to you? Sign in to get personalised recommendations.