Need help choosing a plan?
Created with Sketch. 1800 917 771 Schedule a call
Need help?
We're here for you.
Schedule call
Created with Sketch.
Image Alt Text
product update

Bank reconciliation on QuickBooks: new look, new feel

With the new-look Bank Reconciliation program now available, it’s a great time to refresh your memory onΒ how to reconcile your bank accounts.

Of course, as mentioned in our earlier blog post, the reason it’s so important to process your bank reconciliation remains the same:

β€œ The transactions in QuickBooks Online should mirror your business bank account. This is a significant part of the process of bookkeeping. If you do not take the time to reconcile correctly, you may find that you have missed some very important transactions that are not entered or transactions that are entered twice. These errors could cause serious discrepancies in your file.”

So, let’s delve into the refreshed look and explain the new way to process your bank reconcilation. But don’t panic, it’s not all that different.

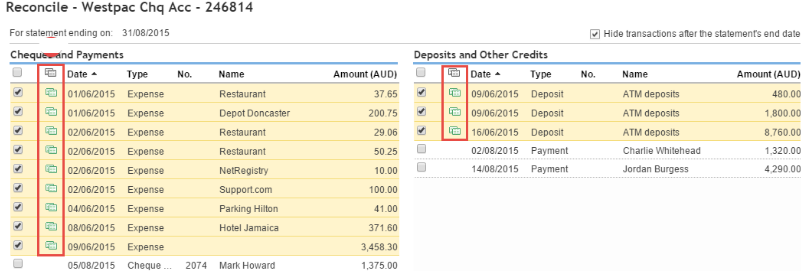
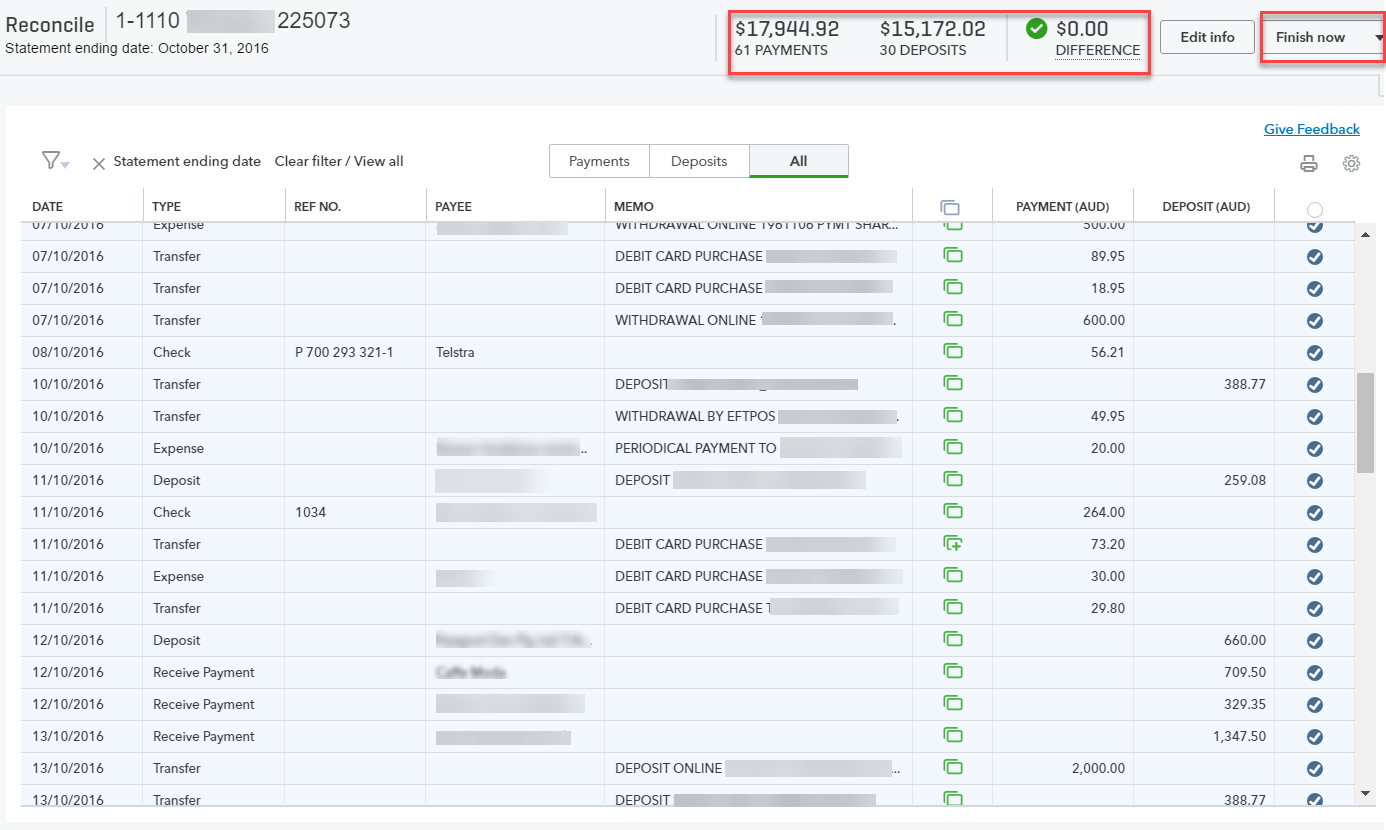
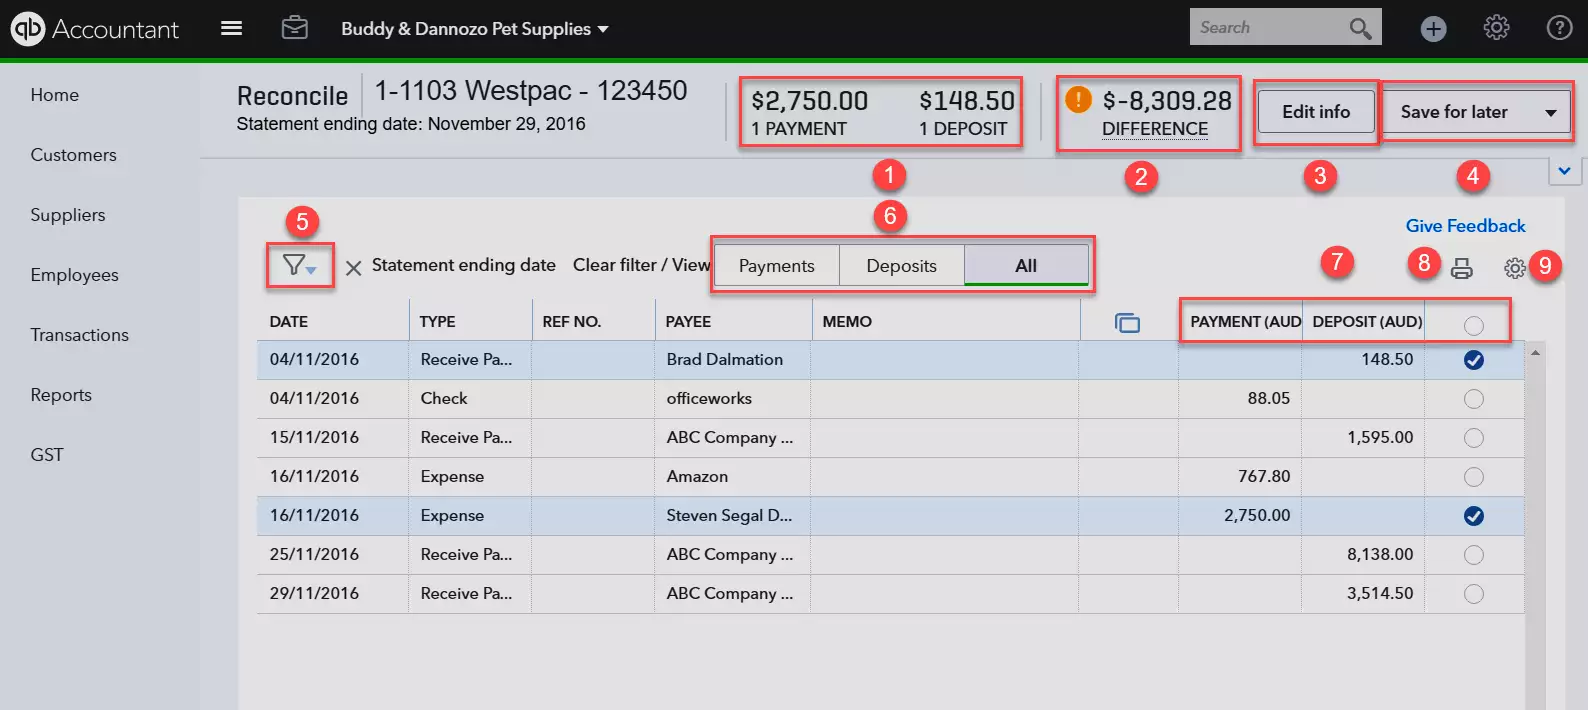
Before we begin, it’s important to note that the old look shows payments and deposits in columns on the left and right respectively (Cheques and PaymentsΒ on the left andΒ Deposits and Other CreditsΒ on the right).

The new look is more streamlined, with the payments and deposits sitting side by side. It also allows you to filter by dates, payments and deposits. All you need to do is click on the headings in the top row, as outlined below.

1.Β Total payments and depositsΒ that have been selected for the bank reconciliation

2.Β DifferenceΒ in the bank reconciliation

3. Edit info – where you can change yourΒ Ending BalanceΒ orΒ Ending date

4.Β Save for LaterΒ can be selected to continue at a later time, or chooseΒ Finish nowΒ orΒ Close without saving

5. TheΒ Filter funnel – find an amount or filter as required


6. If onlyΒ PaymentsΒ ORΒ DepositsΒ are required, select either orΒ ALLΒ to view all deposits and payments

7.Β PaymentΒ andΒ Deposit AmountsΒ to be selected

8.Β Print button

9.Β SettingsΒ gear icon – which allows you to choose your columns


The reconciliation page is found when clicking theΒ Gear Icon; underΒ ToolsΒ chooseΒ Reconcile.

Taking you to the newΒ Reconcile an accountΒ page, you can choose your bank account, ending balance and ending date. Then selectΒ Start reconciling.

If a manual reconciliation is required

Choose the transactions that have gone through the bank statement on the right hand side, by ticking the appropriate circle icons. This will then allow your bank to reconcile. Note the $0.00 difference; this is what you’re aiming for.

If your bank account syncs with QuickBooks Online

Choose your bank account, the ending balance and ending date, and click onΒ StartΒ reconciling.

This will take you to the reconciliation window, which will have automatically reconciled for you.

By syncing your bank feeds with QuickBooks Online, every transaction that has been added will already be selected in the bank reconciliation window, as shown below.

View history and reports

From the reconcile window, there is the option to viewΒ History and Reports. If you select this option, you need to choose your bank account and date range before selectingΒ View ReportΒ from theΒ ActionΒ column.

The reconciliation report for that period will be generated, with the option to print.


Hints and tips

On the odd occasion that you don’t quite balance, make sure you check that your ending date and balance have been added correctly. It could even be down to processing something twice.

Here are some handy tips to help your reconcile if something goes wrong.

1. As you can see in the image below, theΒ Payments & DepositsΒ amounts should equal what is on your bank statement.

  • Total Payments (debits on the bank statement) $17,944.92
  • Total Deposits ( credits on the bank statement) $15,172.02


If these do not match, this is where you can filter by either credits or debits, depending on which is out to find the problem.

2. Using theΒ Undo Button: if you are logged into a file as an accountant user and you need to undo a bank reconciliation, the undo button is now found underΒ History and ReportsΒ >Β ActionΒ >Β Undo.

TheΒ ChangesΒ andΒ Auto AdjustmentΒ columns are also found in theΒ History and ReportsΒ section.

** Please note:Β ONLYΒ an accountant user has access to the undo button.

3. What happens if your opening statement balances don’t match? As seen below, QuickBooks Online already recognises something has gone wrong. Click on theΒ Let’s resolve this discrepancy.

This will take you to aΒ Reconciliation Discrepancy Report, which will help you find the problem.


If you click onΒ View, it will take you to the audit trail of this transaction and the culprit will be found. To fix, clickΒ UnmatchΒ and delete the transaction. Then, navigate back to the online bank feed and rectify the transaction.

Back in the reconcile window, you now need to re-reconcile your bank account to the last date that it was reconciled, as below.


4. Remember to choose the statement ending date or you may find thatΒ ALLΒ transactions after the closing date will be chosen and you will have problems reconciling.

5. Before thinking of commencing the reconciliation process, make sure that all transactions from the online bank feeds window have been matched and added for the correct period.

6. Ensure you have entered the correct ending balance and date on your bank statement.

The new lookΒ Bank ReconciliationΒ is found under theΒ QuickBooks Labs. Just switch it on (as below) to experience the new look and feel.


To read more articles related to product updates, visitΒ here.


Related Articles

Looking for something else?

Get QuickBooks

Smart features made for your business. We've got you covered.

Help Me Choose

Use our product selector to find the best accounting software for you.

QuickBooks Support

Get help with QuickBooks. Find articles, video tutorials, and more.

Stay up-to-date with the latest small business insights and trends!


Sign up for our quarterly newsletter and receive educational and interesting content straight to your inbox.

Want more? Visit our tools and templates!

By signing up you are agreeing to our terms and privacy policy.

A happy small business owner signing up for the QuickBooks newsletter on laptop