Don't miss out! Small business, big savings 🤑 Save 50% for 12 months* Claim now
Need help choosing a plan?
Created with Sketch. 1800 917 771 Schedule a call
Need help?
We're here for you.
Schedule call
Created with Sketch.
Image Alt Text
product update

Set it, expense it, invoice it – making billable expenses easy!

As you probably know, we’re all about making things easy and that’s something we know both our existing customers and those trying Intuit QuickBooks Online for the first time love about us. In fact, small business owners and employees recently told us as part of a product comparison survey that they found QuickBooks easier to use than competitor Xero.

One example of how easy it is to use QuickBooks for key tasks is can be seen in this video which shows how to record a billable expense – just set it, expense it and invoice it!
How to record a billable expense

What’s a billable expense?

A billable expense is a work expense you can bill a customer for. For example, if your customer reimburses travel expenses, and you take a taxi to meet them, you can record your fare as a billable expense and then add it to their next invoice.

Step 1: Set it

Expense 1
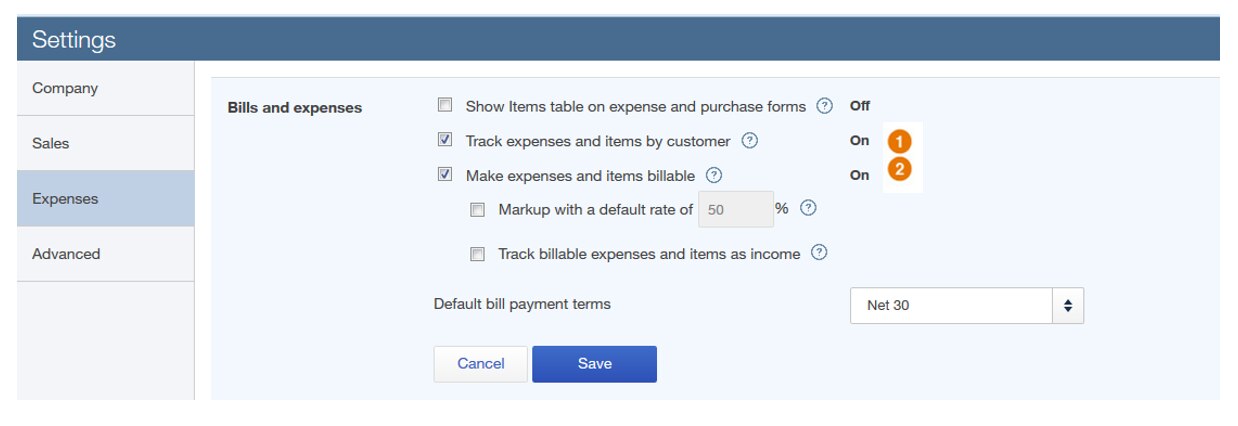
  • Click the Gear icon > Company Settings > Expenses > Bills and expenses
  • Turn on (1) Track expenses and items by customer and (2) Make expenses and items billable

Step 2: Expense it


Expense 2
  • Click Create (+) > Expense, then enter the expense and (3) mark it billable, and (4) specify a customer
  • (Optional) At the bottom of the expense form, attach the actual taxi receipt!

Step 3: Invoice it

Expense 3
  • Click Create (+) > Invoice
  • When you enter a customer’s name, (5) related billable items appear on the right
  • Click (6) Add to move a billable expense to the invoice

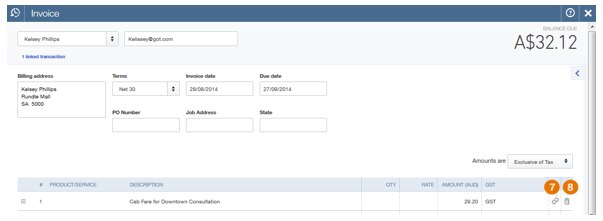
Your invoice will then look like this:

Expense 4
  • Click the (7) link icon to view more about a billable item or remove it from the invoice
  • If you click the (8) trash icon to delete a line, you can choose to unlink its related billable item as well

Notes

  • The billable expense feature is available in QuickBooks Plus only
  • If you see the old Preferences screen instead of the Settings screen, click Vendors & Purchases in the left column, and then select the ‘Use billable expenses and products/services’ checkbox

Want to try billable expenses? Enter a sample one at the QuickBooks test drive.

Related Articles

Looking for something else?

Get QuickBooks

Smart features made for your business. We've got you covered.

Help Me Choose

Use our product selector to find the best accounting software for you.

QuickBooks Support

Get help with QuickBooks. Find articles, video tutorials, and more.

Stay up-to-date with the latest small business insights and trends!


Sign up for our quarterly newsletter and receive educational and interesting content straight to your inbox.

Want more? Visit our tools and templates!

By signing up you are agreeing to our terms and privacy policy.

A happy small business owner signing up for the QuickBooks newsletter on laptop