QuickBooks Blog
Need help choosing a plan?
Created with Sketch. 1800 917 771 Schedule a call
Need help?
We're here for you.
Schedule call
Created with Sketch.
Desktop screen showing an Excel spreadsheet for business accounting and bookkeeping
Running a business

Using Excel for Accounting: Examples & Free Templates

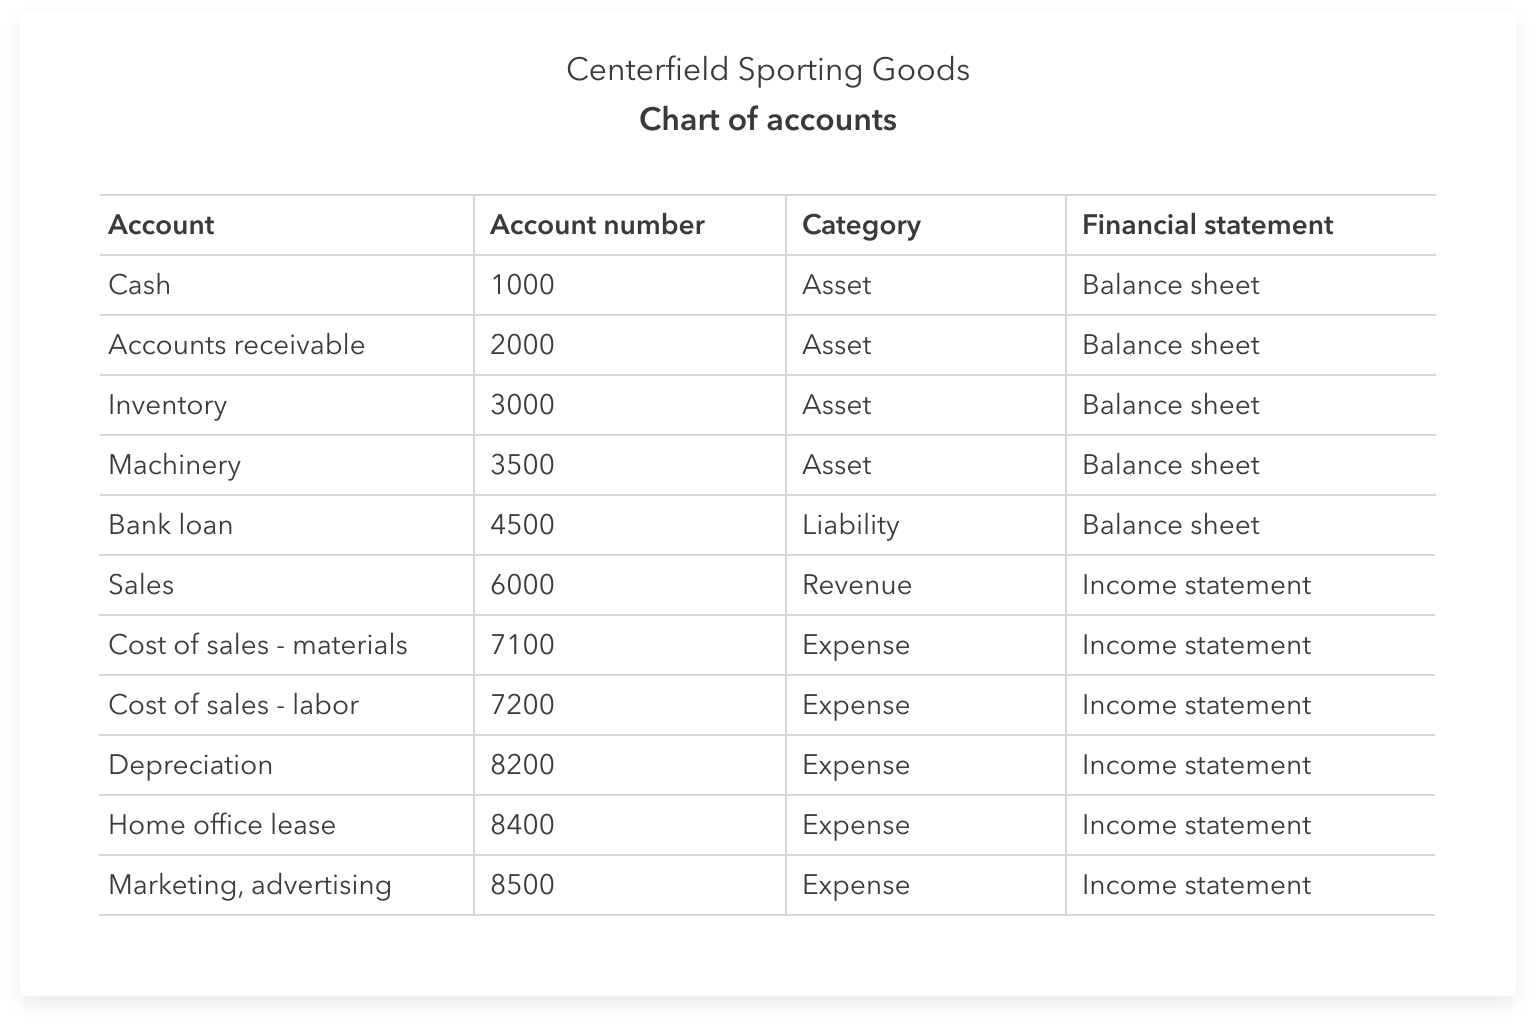
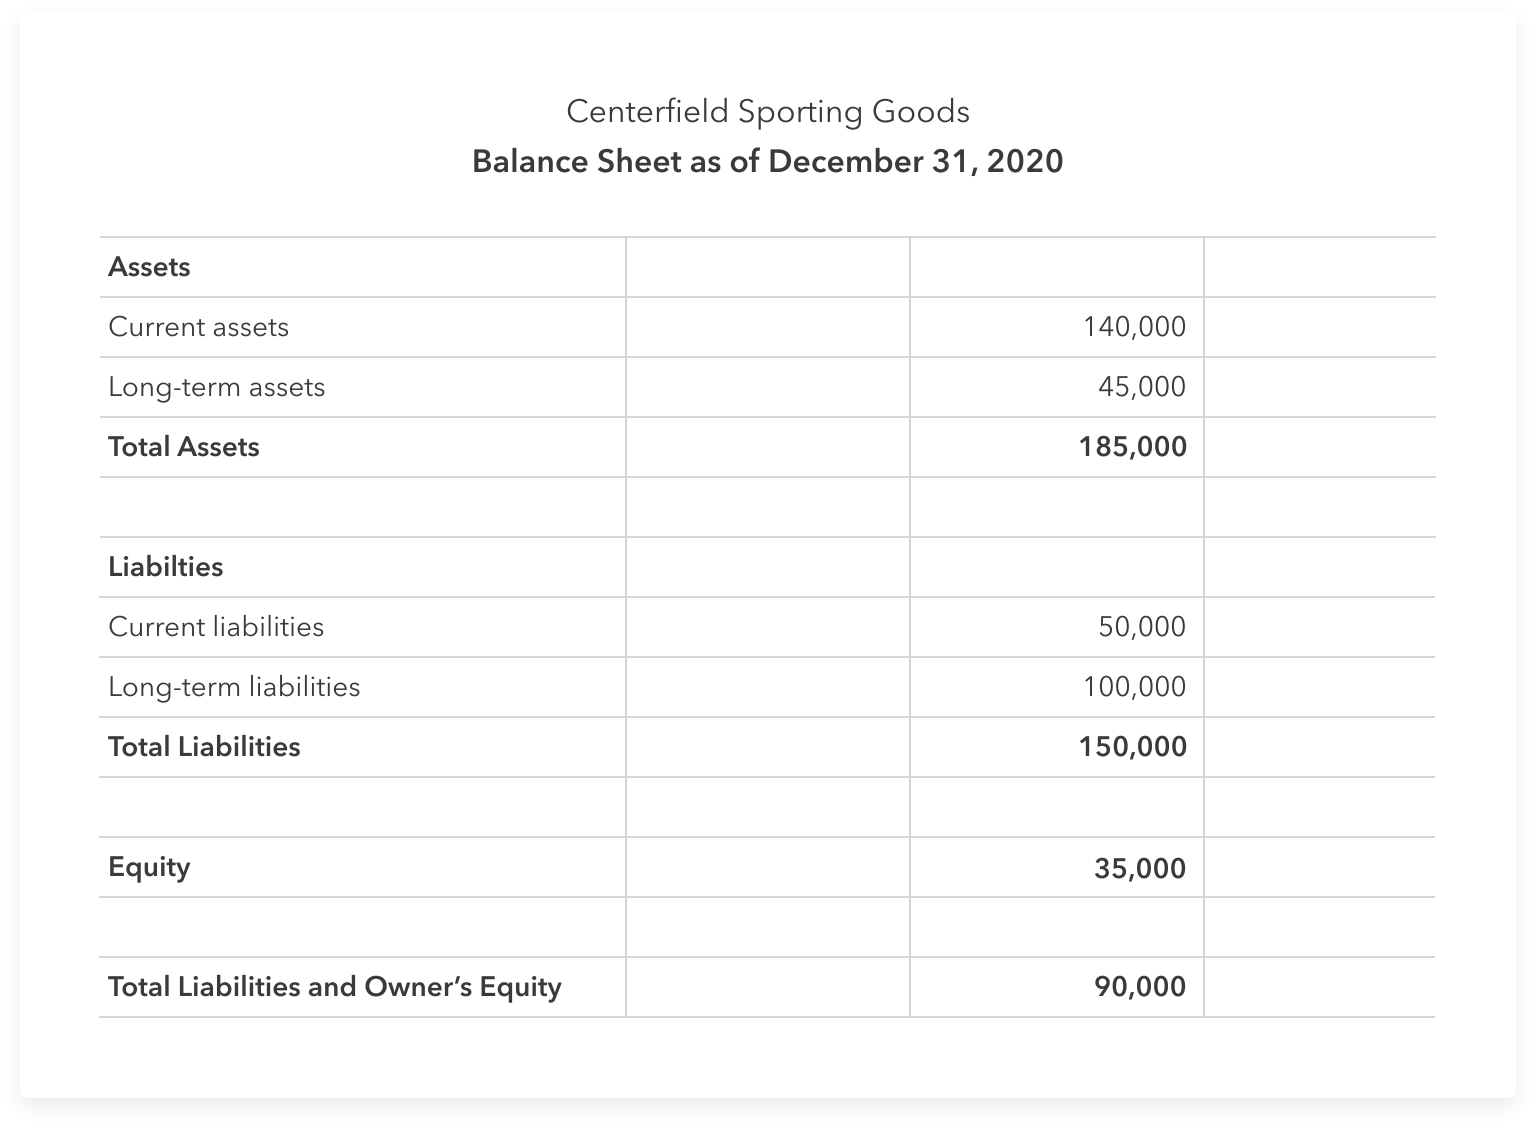
Starting a business is an exciting undertaking, but it can come with challenges. Your initial focus is likely to be on delivering a great product/service and finding customersβ€”which means that administrative tasks such as bookkeeping can take a back seat.Β 

However, good bookkeeping is an essential part of business growth and success. Many small business owners use an Excel accounting template when they get started, which is a useful tool in the early stages of business.

In this guide, we’ll cover everything you need to know about Excel and accounting, and provide tips for upgrading your accounting system as your business expands.

What is Excel accounting?

Excel accounting is the use of Microsoft Excel spreadsheets to record and manage a business’s financial transactions. It’s a straightforward bookkeeping method commonly used by sole traders or very small businesses.Β 

With built-in formulas and customisable templates, accounting in Excel allows you to manually track income, expenses, invoices, and cash flow. While it doesn’t offer the automation or real-time insights of dedicated accounting software, Excel can be a practical starting point if you’re managing simple finances on a tight budget.

How is Excel used for accounting?

While larger businesses often turn to dedicated accounting software, Excel remains a useful tool for basic bookkeeping tasks. Using Excel for accounting is especially common for sole traders and small businesses with straightforward needs.Β 

Excel is ideal for:

  • Creating a chart of accounts: Organise all your financial categories in one spreadsheet.
  • Tracking income and expenses: Record and categorise transactions manually.
  • Generating invoices: Use templates to bill clients and track payments.
  • Reconciling bank statements: Match records against bank statements to spot discrepancies.
  • Budgeting: Plan and forecast income and expenses over time.
  • Basic financial reporting: Create simple profit and loss statements.
  • Personal finance tracking: Manage household budgets or investment tracking.


Download our free Excel accounting template

To help you get started, we’ve developed an Excel accounting template. It’s free to download, and it offers an easy way to track income and expenses:

How to use Excel for accounting

To be able to use our Excel accounting template, you’ll need to understand the accounting process. In these next sections, we’ll explain how to make accounts in Excel and provide information about accounting basics. Our examples refer to a business called β€˜Centerfield Sporting Goods’ which uses an Excel bookkeeping template for its bookkeeping.Β 

Keep reading to find out how to set up accounts, post transactions, and create financial statements using Excel accounting.Β 

Create a chart of accounts using Excel

ο»ΏCentrefield Sporting Goods opened on 1 January 2025. The first thing they’ll need to do in their Excel accounting spreadsheet is create a chart of accounts.

The chart of accounts lists every account number and the account’s description. Balance sheet accounts, such as cash and accounts receivable, are listed first, followed by income statement accounts. Centrefield uses one revenue account (#6000 sales) in the income statement and several expense accounts.

Centrefield manufactures and sells baseball gloves. The business uses the cost of sales accounts for both materials and labour. They can add, remove, and change accounts as needed.


Preview of Centerfield’s chart of accounts

Post journal entries using Excel

Once you build a chart of accounts in an accounting spreadsheet, you’ll need to create a separate Excel document to post journal entries. A journal entry is a record of each accounting transaction listed in chronological order.Β 

The journal includes the journal entry number, accounts, dollar amounts, and a description of each entry. Journal entries include debits and credits that determine where to post a particular dollar amount in the entry.

Follow these steps to create accounting templates for your journals each month:

  1. Copy and paste your chart of accounts into the spreadsheet.
  2. Set up the column headings for date, account number, account title, etc.
  3. Add rows to the document each time you need to post a journal entry.
  4. Copy and paste the account numbers and account titles from the chart of accounts into the entry.

Use formulas to ensure that total debits equal total credits. Add a total formula that tracks the total dollar amount of debits and credits for all journal entries. Now, you’ve created your journal entry for your general ledger.


Preview of Centerfield’s journal entries

How to manage a general ledger using Excel

A company’s general ledger is a record of every transaction it posts throughout its lifetime, including all journal entries. General ledgers sort transactions by account. Each account lists the journal entries that posted activity to the account during a particular month. General ledgers provide the date, journal entry, and the entry description, along with the debit or credit amount and the ending balance.

It’s important to note the cash general ledger page only lists the cash portion of each journal entry. For the Centrefield Sporting Goods example, journal entry no. 1 only lists the $10,000 reduction (credit) in cash. The inventory increase (debit) is listed in the inventory general ledger, but not in the cash general ledger.

In your own accounting Excel sheet, use the column headers that you see in the Centrefield general ledger example to set up a general ledger template for each account in your chart of accounts. Here’s how:

  1. At the beginning of each month, post each balance sheet account’s beginning balance in a blank general ledger template. Income statement balances are adjusted to zero at the end of each month.
  2. Each time that you post a journal entry, post the activity to the general ledger. If you post a journal entry that impacts cash and inventory, you also post the activity to those accounts in the general ledger.
  3. At the end of the month, calculate the ending balance for each account. Use the ending balances in the general ledger to create the trial balance.
Preview of Centerfield’s general ledger

How to create a trial balance in Excel

The trial balance is a listing of each account used to post transactions and the current account balance. Follow these steps to create a trial balance in Excel:

  1. Take the account numbers and descriptions from the chart of accounts and copy the date into a new spreadsheet.
  2. Add a debit and credit column next to each account. Post each account’s ending balance from the general ledger into the spreadsheet.
  3. Total the debits and credits for all accounts. If you’ve posted journal entries and general ledger activity correctly, total debits should equal total credits.

If total debits and credits don’t balance, check each journal entry and verify you posted the data to the general ledger correctly. If you still have an error, check the formulas in your general ledger spreadsheet. Once you have an accurate trial balance, you’re ready to generate financial statements.

How to generate financial statements in Excel

The most useful financial statements are income statements and balance sheets. The statement of cash flow is also one of the basic financial statements, but this can be challenging to generate in Excel. For this reason, you should stick with the income statement and balance sheet if you’re doing your accounting in Excel. Here’s how:

  1. Create an Excel template and use it to generate the income statement each month.
  2. Keep the formulas for the subtotals so that you can check your work.Β 
  3. Post the account balances from your trial balance.
Preview of Centerfield’s income statement

How to post net income in Excel

You won’t find net income listed in the chart of accounts. Net income in the income statement increases equity (account No. 4800), which is a balance sheet account. When you produce the income statement, net income subtracts total expenses from total revenue. You’ll use net income in the balance sheet.

Here’s how to post net income in Excel:

  1. Create an Excel template and use it to generate the balance sheet each month.Β 
  2. Keep the formulas for the subtotals so that you can check your work.Β 
  3. Post the account balances from your trial balance.

Net income from the income statement increases equity in the balance sheet. This is a big source of confusion for small business owners, so you may get help from an accountant if you’re using Excel. Ask your accountant to verify that you’ve added net income to the equity account correctly.

Preview of Centerfield’s balance sheet

How to close the accounts in Excel

Balance sheet accounts are permanent. Income statement accounts are temporary. So you can β€œclose” income statement accounts to the net income.

Net income is the net impact of all revenue and expense transactions for the month. When you post the net income balance to equity in the balance sheet, the revenue and expense accounts are adjusted to zero. On the first day of the next month, the income statement accounts start with zero balances.

Balance sheet accounts, on the other hand, are permanent accounts. The balances carry forward from one month to the next.

Grow Your Business with QuickBooks

Important Excel accounting formulas and functions

These handy Excel formulas can help to streamline your bookkeeping:

  • SUM: Quickly adds up values in a range. For example, =SUM(A1:A10) totals the numbers in cells A1 to A10.
  • SUMIF: Adds values based on a condition. For instance, if column D lists transaction types and column E has the amounts, =SUMIF(D1:D10,"Sales",E1:E10) adds up only the sales.
  • XLOOKUP: A powerful tool for finding data. =XLOOKUP(A1,B1:B10,C1:C10) searches for the value in A1 in column B and returns the matching value from column Cβ€”great for looking up customer info or account balances.
  • DATEDIF: Calculates the time between two dates. =DATEDIF(A1,B1,"y") gives the number of years between two dates, or use "m" for months and "d" for days. Perfect for checking invoice age or loan duration.
  • PMT: Works out loan repayments. =PMT(0.05/12,24,10000) calculates monthly payments on a $10,000 loan with 5% annual interest over 2 years.
  • FV (Future Value): Estimates how much an investment will be worth. =FV(0.05/12,24,-100) shows the future value if you invest $100 monthly for 2 years at 5% interest.
  • COUNTIF: Counts how many cells meet a condition. For example, =COUNTIF(A1:A10,">0") counts how many values are greater than zeroβ€”handy for tracking certain transaction types.

These formulas are just the beginningβ€”once you're familiar with Excel use for accounting, it can be a powerful tool for managing your business finances.

Excel formatting tips

Good formatting makes your financial data easier to understand and manage. It also helps you spot errors and trends at a glance. Here are some tips:

  • Accounting number format: Use this to display currency symbols, commas, and two decimal placesβ€”ideal for financial data.
  • Cell alignment: Align text to the left, numbers to the right, and headings to the centre. This makes your spreadsheet more organised and easier to scan.
  • Conditional formatting: Automatically highlight values that meet certain rules. For example, show negative numbers in red. It’s a great way to flag issues quickly.
  • Freeze panes: Lock your column or row headers in place while scrolling. This helps you stay oriented in large spreadsheets.

When using Excel for accounting, be sure to switch to the Accounting number format (this is one of many steps that accounting software can automate for you).

Advantages of using Excel for accounting

Microsoft Excel is a flexible, cost-effective tool that can handle simple accounting tasks for small businesses or startups. Using basic Excel for accounting functions offers several key benefits:

  • Cost-effective: If you already have Microsoft Excel, there’s no extra costβ€”making it a budget-friendly option.
  • Familiar interface: Many people know how to use Excel, so there’s little to no learning curve to get started.
  • Flexible setup: You can customise spreadsheets to suit your specific business needs, from income tracking to budgeting.

While Excel works well for basic tasks, it may not keep up as your business grows and your accounting needs become more complex.

Disadvantages of using Excel for accounting

ο»ΏWhile Excel can be useful early on, it becomes less practical as your business grows. Without automation and built-in safeguards, manual processes can slow you down and increase the risk of errors. Common drawbacks include:

  • Manual data entry: Typing everything by hand is time-consuming and increases the chance of mistakes.
  • No automation: Unlike accounting software, Excel doesn’t automate tasks like bank reconciliations or journal entries.
  • Limited reporting: Creating complex reports (such as balance sheets or cash flow statements) is tricky and prone to errors.
  • Scalability issues: Excel isn’t built to handle high volumes of data, so it may lag or crash as your business grows.
  • Security concerns: Excel files are easier to lose, corrupt, or accidentally overwriteβ€”especially without cloud backups.
  • Collaboration difficulties: Sharing files can lead to version mix-ups, especially if multiple people are editing the same document.

As your financial activity increases, switching to dedicated accounting software can help streamline your processes and reduce risk.

Streamline your accounting and bookkeeping processes

Accounting spreadsheets require manual entry, so your risk of error is high. Business owners who use spreadsheets may use an outdated version of the program and risk losing documents altogether. And if spreadsheet links contain errors, your data may be incorrect.

QuickBooks Online can save you time and increase the accuracy of your accounting records. If you need a real-time spending tracker, you can select from the expense reports available. Then, it’s simply a matter of scanning receipts (and other source documents) and attaching them to journal entries. You can also use QuickBooks to download your bank statements and credit card activity into your accounting records. You’ll save time and reconcile your bank account faster.

With an accounting software like QuickBooks, you can process more transactions in less time. Make the switch to accounting software, so you’re ready to take on more business.


Related Articles

Looking for something else?

Get QuickBooks

Smart features made for your business. We've got you covered.

Help Me Choose

Use our product selector to find the best accounting plan for you.

QuickBooks Support

Get help with QuickBooks. Find articles, video tutorials, and more.

A computer screen showing a picture of a computer.

TAKE A NO-COMMITMENT TEST DRIVE

Your free 30-day trial awaits

Our customers save an average of 9 hours per week with QuickBooks invoicing*

No credit card needed

Cancel anytime

Unlimited support

By entering your email, you are agree to our Terms and acknowledge our Privacy Statement.