Using QuickBooks for inventory tracking
You might be wondering, ‘Does QuickBooks track inventory?’ The answer is yes! QuickBooks allows you to keep track of your stock in real time, anticipate inventory shortages and ensure you have enough stock on hand to meet customer demand. Key features of QuickBooks’ inventory tracking software includes:
- Stock level tracking: As stock comes in and out, QuickBooks inventory auto-updates your inventory levels, so you can always keep track of what’s selling and what to reorder.
- Real-time low stock alerts: QuickBooks will let you know when it's time to restock, so you’re never caught short and can stay on top of order fulfilment.
- Purchase order tracking: Keep track of what you have ordered from each vendor with purchase orders. Organise your supply chain and vendor contact info in one place.
- Inventory reports: See your best-selling items and most profitable items. Use this data to understand how different products are performing and make informed purchase decisions.
- Sync your online store inventory: Connect your inventory management app or eCommerce platform to QuickBooks to sync your inventory and sales orders from your online store on Shopify, Amazon, eBay, Etsy and more.
- Inventory valuation: Auto-calculate the cost of each product sold using the first-in, first-out (FIFO) method.
How to set up inventory tracking in QuickBooks
Before you start managing inventory in QuickBooks, you’ll need to turn on inventory tracking settings:
- Go to Settings Settings gear icon. and select Account and settings.
- Select the Sales tab.
- Select Edit ✎ in the Products and services section.
- Turn on Show Product/Service column on sales forms.
- You can also turn on price rules if you want to set up flexible pricing for the things you sell.
- Turn on both Track quantity and price/rate and Track inventory quantity on hand.
- Select Save and then Done.
Add inventory items
Next, it’s time to add your inventory items in QuickBooks:
- Go to Settings ⚙ and then Products & services.
- Select New , then select Inventory.
- Fill out the required details like Name and SKU.
From there, add your product’s quantity, reorder point and inventory asset account:
- Add your product’s Initial quantity on hand. Then enter when you started tracking that quantity in the As of date field.
- Add a Reorder point to get alerts when it's time to reorder.
- Select the Inventory asset account ▼ dropdown and select Inventory Asset. QuickBooks uses this account to track the cost of all the products you have in stock (or inventory value).
You can also add non-inventory items, for example dropshipped items, or add services you sell to customers, for example consulting or bookkeeping services:
- Go to Sales, then select Products & services
- Select New.
- Select Non-inventory or Service.
- Enter a Name for the product or service and an SKU, if you track them.
- From the Category ▼ dropdown, select the category that best describes your product or service. Learn more about item categories.
- If you sell the item, confirm the checkbox is selected for I sell this product/service to my customers. (If you don’t sell the product or service and want to track how much you spend on it, go to Step 2 below and start at item 3.)
- In the Description on sales forms field, enter a description. This is what your customers will see on their sales form.
- Enter an amount in the Sales price/rate field. Note: If you charge a variable rate for services, you can leave the Sales price/rate field blank. Then add the price when you fill out the invoice or sales receipt.
- Select the account you want to use to track the sale from the Income account ▼ dropdown. Tip: You can use an income account QuickBooks has already set up for you, or select + Add new to create a new income account. Learn more about adding accounts to your chart of accounts. Note: Changing an Income account mapping is not retroactive. The change will only affect future transactions.
- In the Sales tax section, sales tax is applied by default based on location. For more specific options, or to make the product or service nontaxable, select Edit sales tax. Then do one of the following, depending on the product or service:
- If the product or service is tax-exempt, select Nontaxable. Then select Done.
- If the item has a special tax rate, use the Search field or Browse all to find and select a more specific product or service type. Then select Done.
- When you're done, select Save and Close.
Keep track of your sales
Once you’ve set up all your inventory products in QuickBooks, you track them when they sell.
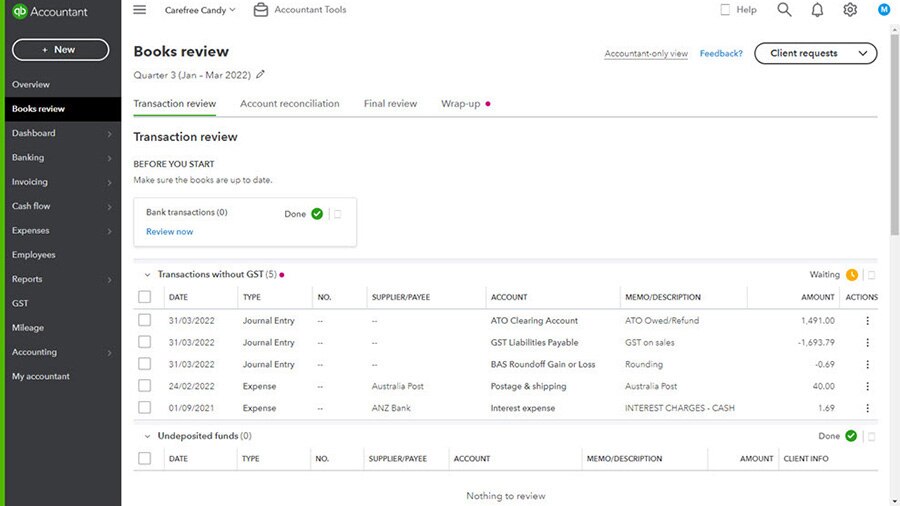
You can see which specific inventory items you sold and how much of them you've sold by going to the Report Centre and opening the Sales By Product Service Summary. This report shows you which specific products and services you've sold over a selected period of time. It also shows you your cost of goods, sold gross margin and gross margin percentage.
After an item sells, you can:
Monitor your inventory levels
At any time, you can check what’s on hand and what’s still on order. Just hover your mouse pointer over the quantity you entered for an item to see more info. If you’ve set reorder points or low stock level alerts, QuickBooks will also let you know when a product is running low.