

Now that your data has moved into QuickBooks Online, it’s time to review your QuickBooks Online account.
We have created a review checklist below to get you started using QuickBooks Online for your business. Here we go over what you need to do before you start making changes to your data or entering new transactions.
Note: Because not every business is registered for GST, the steps to clean up your GST might not apply to you. Skip these steps if your business isn't registered.
Verify your data
This is an important step to verify the data conversion to make it consistent with your old accounting system. These are the three areas to check.
1. Configure your Quickbooks Online Settings and Accounting Method
The first thing you need to do is check your file settings and ensure you have enabled the correct file settings, which will ensure that your migration is completed successfully.
First, you will need to verify your accounting method. (see step 6 of Pre-Conversion Tasks above)
Next, let's set up your QuickBooks Online account properly so, you can start reaping the rewards straight away.
- Go to Settings ⚙️ and select Account and Settings.
- Select each tab from the left menu and update information.
- Select Done when you've finished.
Note: It’s important to select the correct first month of the financial year under Advanced settings. For details, visit How do I set my advanced account settings.
2. Account Balances
Compare the balances between your prior accounting system and your new QuickBooks Online subscription by comparing the below reports across the two systems. Ensure your reports are being viewed on an accruals basis.
- Trial Balance
- General Ledger
- Balance Sheet
- Profit and Loss report (income statement)
- Accounts Payable ageing summary
- Accounts Receivable ageing summary
- Outstanding supplier and customer balances
The outstanding balances of suppliers and customers in your old software should line up with the new balances in your QuickBooks Online account. To avoid discrepancies you will have the opportunity to check the balance of 5-10 customers and suppliers to ensure account balances are lined up correctly. Also, check the historical account payable (A/P) and account receivable (A/R) on some random dates.
Note: There might be some discrepancies due to adjustment notes. In some accounting systems, you can specify a due date for an adjustment note, which isn't available in QuickBooks Online. This might cause amounts to appear in the wrong column.
3. GST Settings
It’s important that QuickBooks Online is set up with the correct ABN and lodging frequency before you and your client start using it. You can skip this step if your business isn’t registered for GST. Please follow the steps below to make sure GST has been set up correctly.
- Go to GST.
- Select the Settings dropdown.
- Select Tax settings.
- Check the Accounting method is correct and change the Lodging frequency if required.
- Select Save.
4. Bank Reconciliation
After the data conversion, all bank accounts are unreconciled. You'll need to reconcile them before you start using QuickBooks Online. For each bank account, follow these steps:
Before you start:
- Last statement ending date: Make sure your bank statement starts the day after your last reconciliation.
- Beginning balance: Make sure the beginning balance in QuickBooks matches the one on your bank statement. This is the account balance at the beginning of the time period you're reconciling. Here’s what to do if they don't match.
- Go to Bookkeeping and select Reconcile (Take me there).
- From the Account ▼ dropdown menu, select the account you want to reconcile.
- Enter the Ending balance and Ending date as shown in your exported reports or previous accounting system.
- When you're ready, select Start reconciling.
- Select All transactions for reconciliation.
Select Finish now, follow the steps (if any), then select Done.
If you need further help with reconciliation or have a unique situation, please visit Reconcile an account in QuickBooks Online.
Note: We bring over the main types for chart of accounts, but not the specific types (subtypes) if those exist in your previous accounting system. You're free to change the nominal code types after converting to something that suits you better.
5. GST Account Adjustment for Quickbooks GST Lodgement
Quickbooks uses a Control Account called GST Liability for all GST transactions.
By default, Dataswitcher will create and allocate any GST on transactions to the account categorised as GST. As a result, we need to reallocate the balance in the GST Account for the current lodgement period to the GST Liability Account for reporting purposes. This requires you to adjust the GST line on all transactions allocated through Spend and Receive money, as well as GST on your open invoices and bills.
We offer two options to Correct GST in your Quickbooks File. The option you chose depends on the volume of transactions you have within your file.
Option 1 is for smaller businesses with a low volume of transactions of <20 Sales Invoices and <20 Expenses and Bills.
Option 2: For those with higher volume of transactions of >20 Sales invoices and more than >20 Expenses and Bills
GST Adjustment for Cash Basis

Make note of the following in Xero before making any adjustments to invoices or adjustment notes in Quickbooks Online.
- Total GST on Sales for the current tax period in Xero
- Open Credit Notes in Xero match open Sales Adjustments in Quickbooks
- Open Sales Invoices in Xero match Open Sales Invoices in Xero
QuickBooks Online correct GST on Adjustment Notes:
1. Go to Sales > All Sales
2. Filter by Adjustment Notes
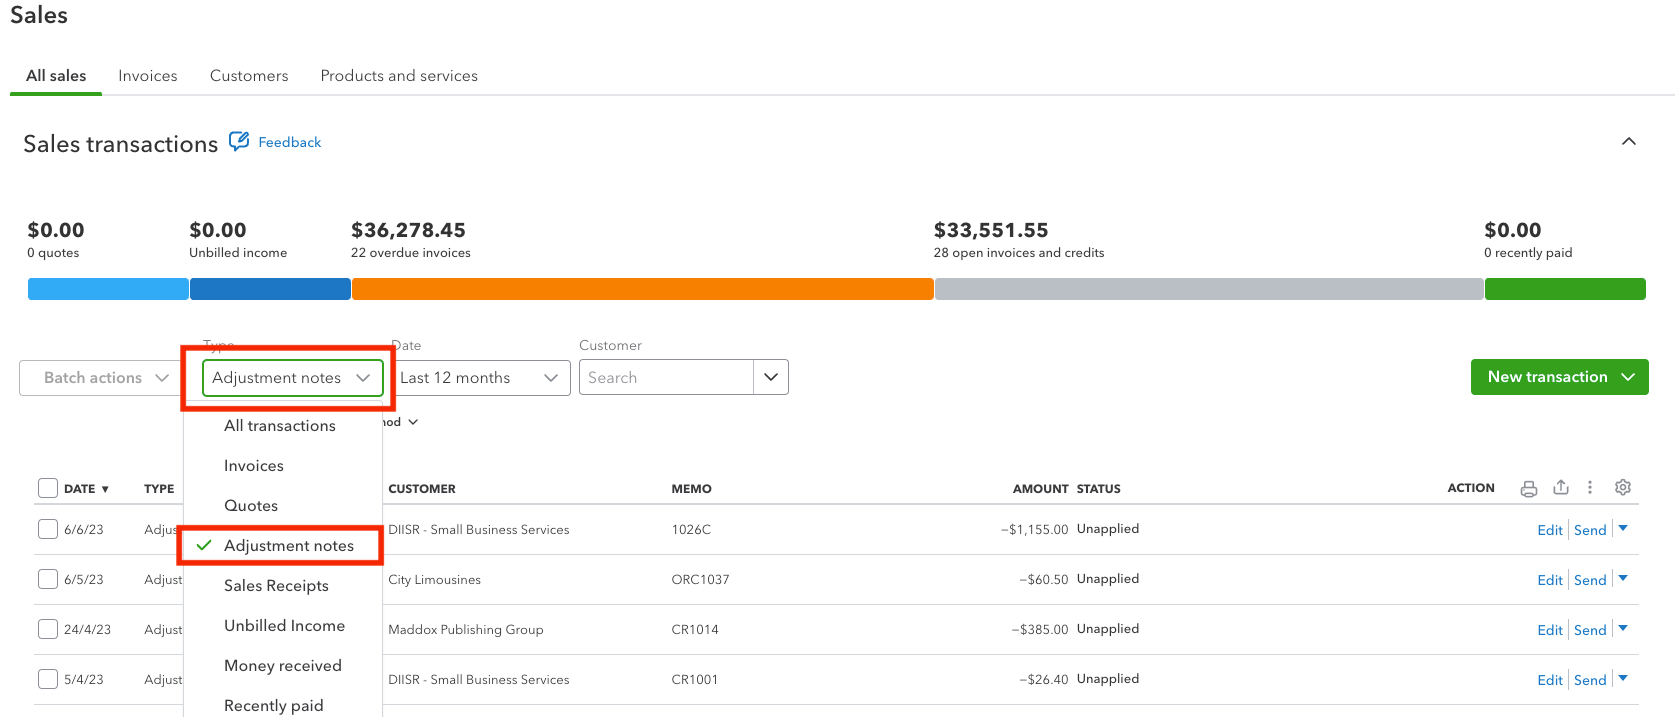
3. Under Actions, select Edit to edit the Adjustment note.
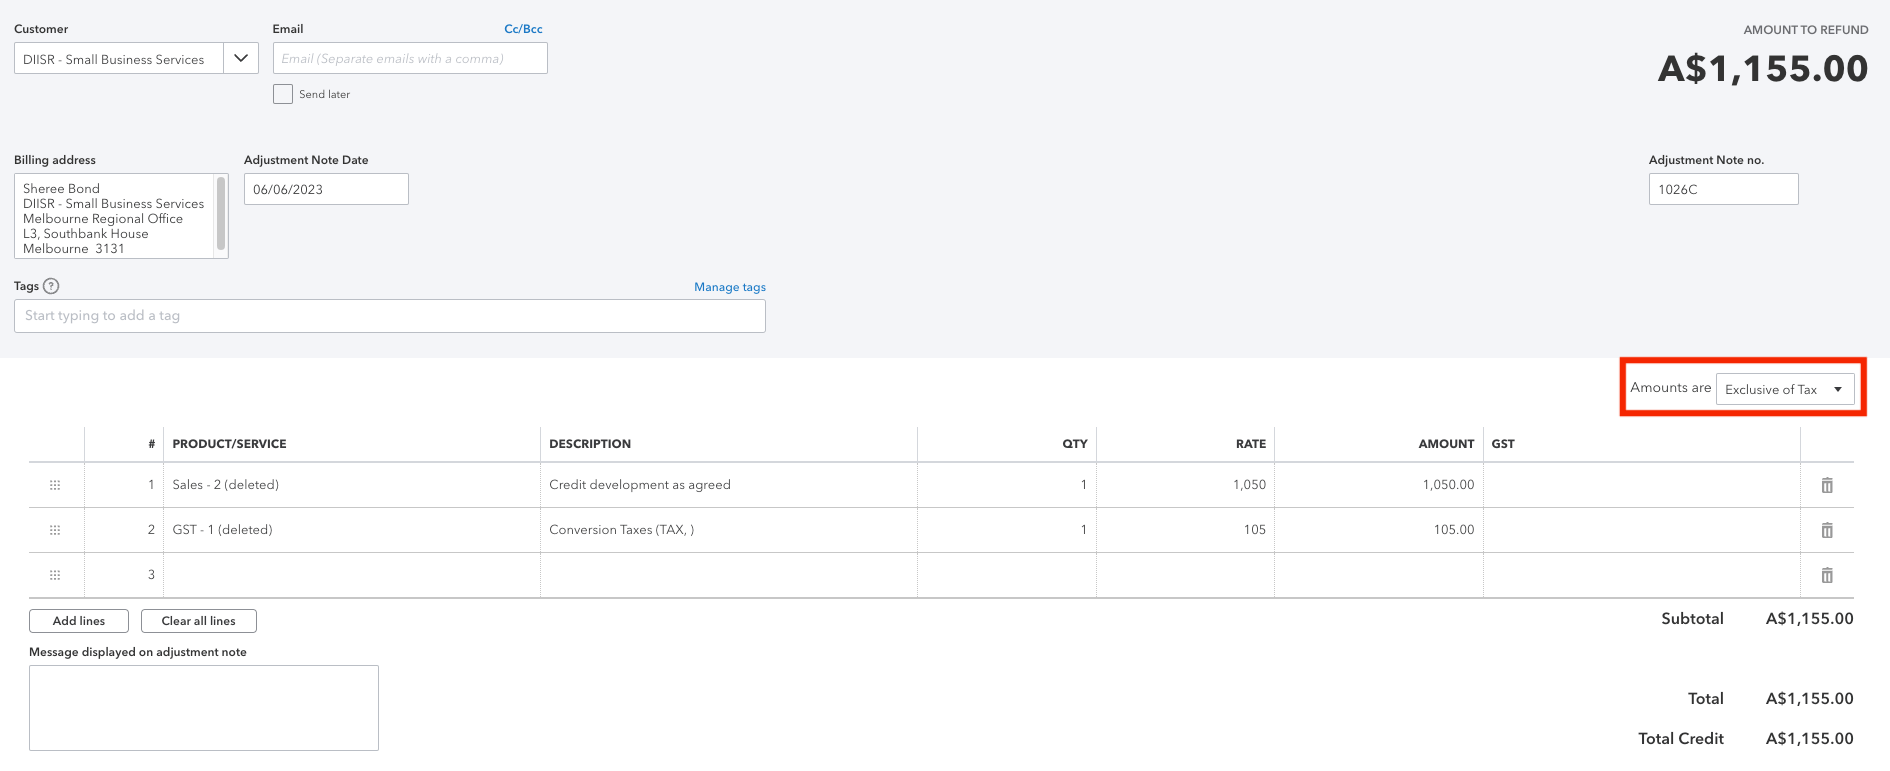
Note: You will notice that the Adjustment note has two lines. One is the Sales line item and the second is the GST with a description of Conversion Taxes (Tax). This line needs to be deleted.
4. Change the tax setting for the Adjustment from Amounts Are Out of Scope to Exclusive of Tax
5. You will notice a GST Column appear in the Adjustment note. In the row that shows the sales line, select the correct tax code from the drop-down.
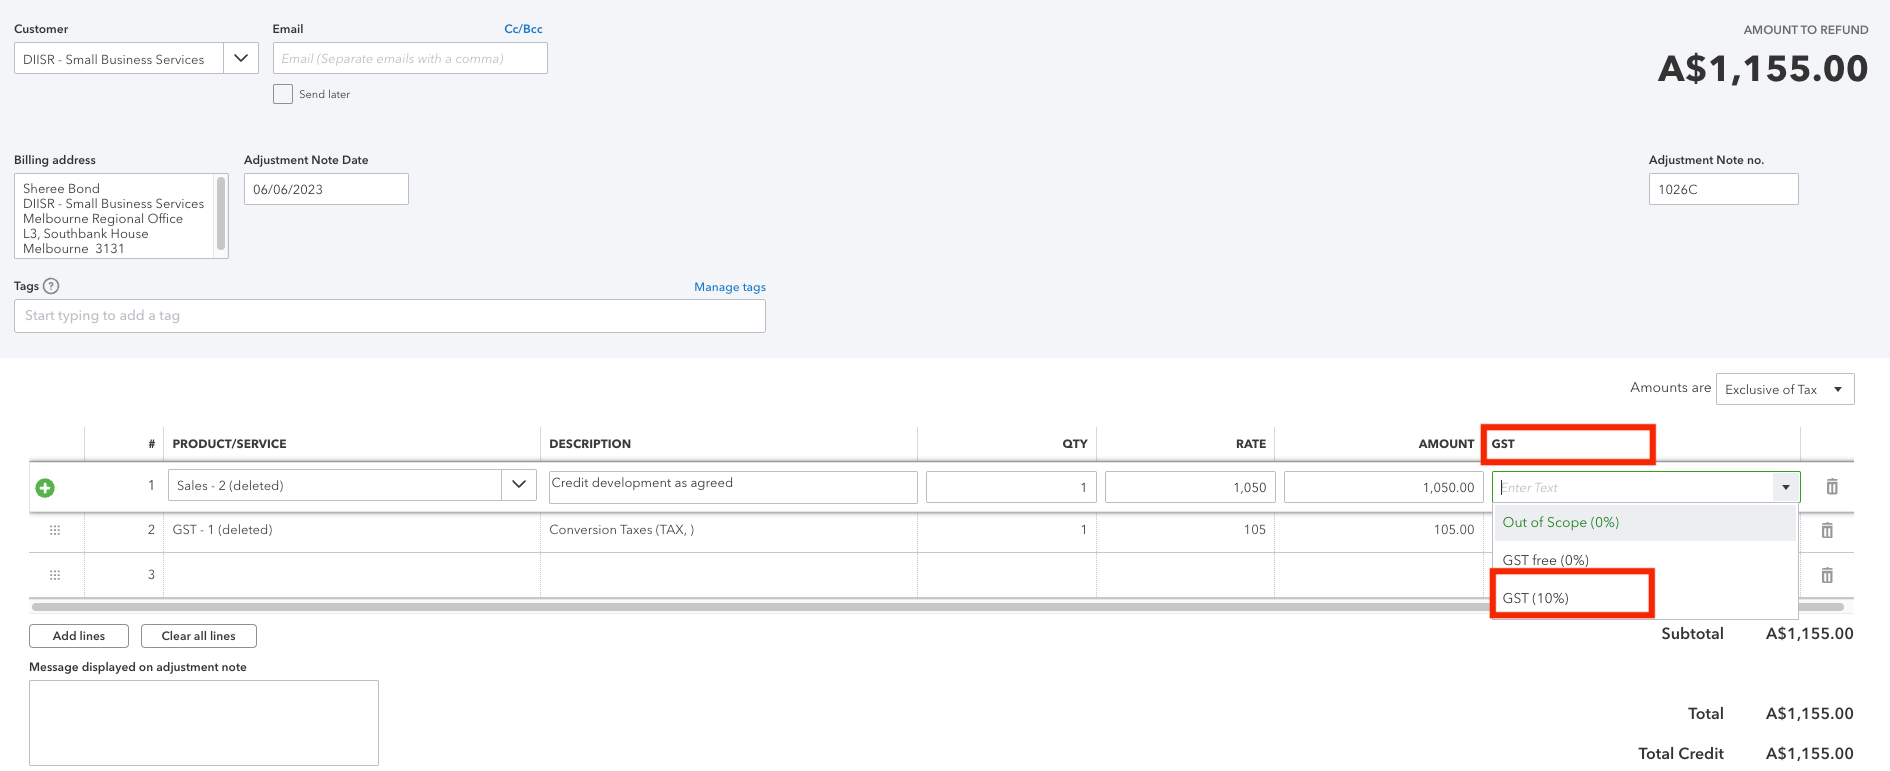
You will notice the tax amount appears in the GST field, adjusting the Total Credit amount.
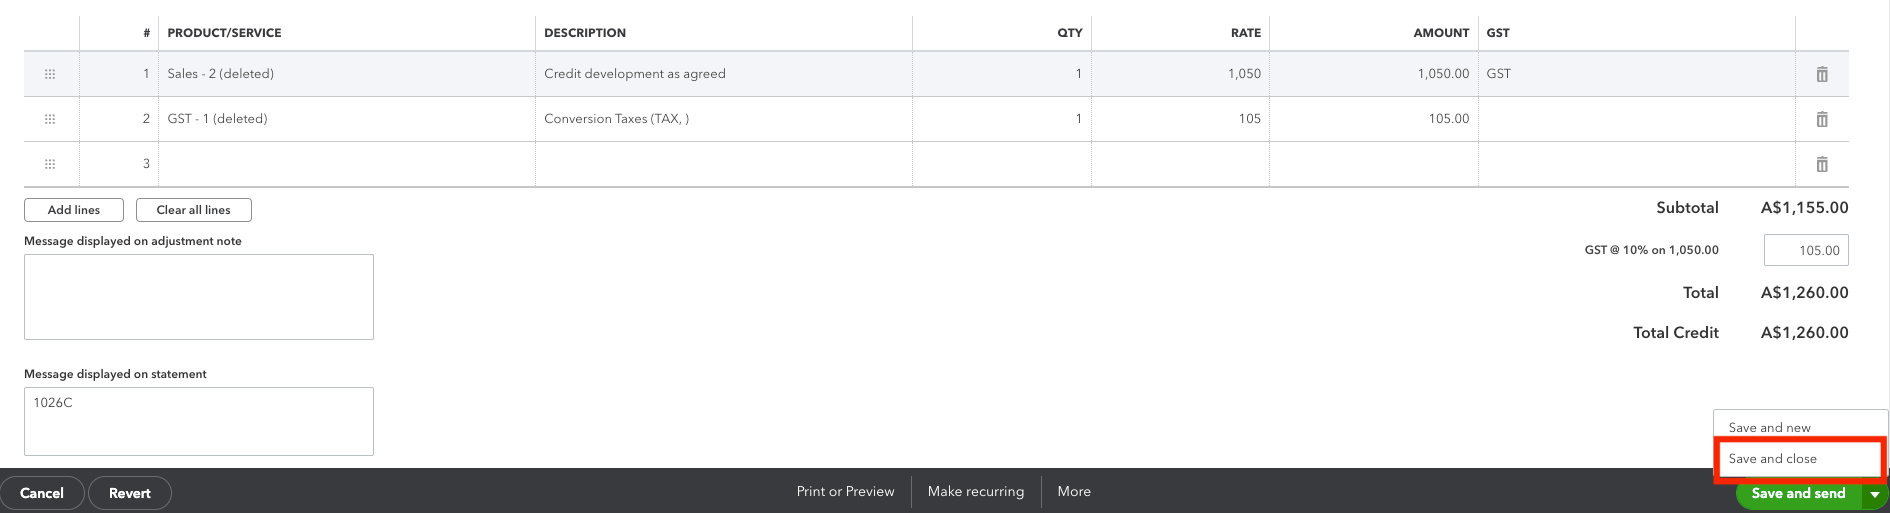
6. Next, Delete the Tax line item on the Adjustment to correct the Total Credit amount
7. Save and Close.
You will continue to do this for each Unapplied Adjustment Note.
Quickbooks Online correct GST on Sales Invoices:
1. Next, you go to Sales > Invoices and filter by Unpaid Status.
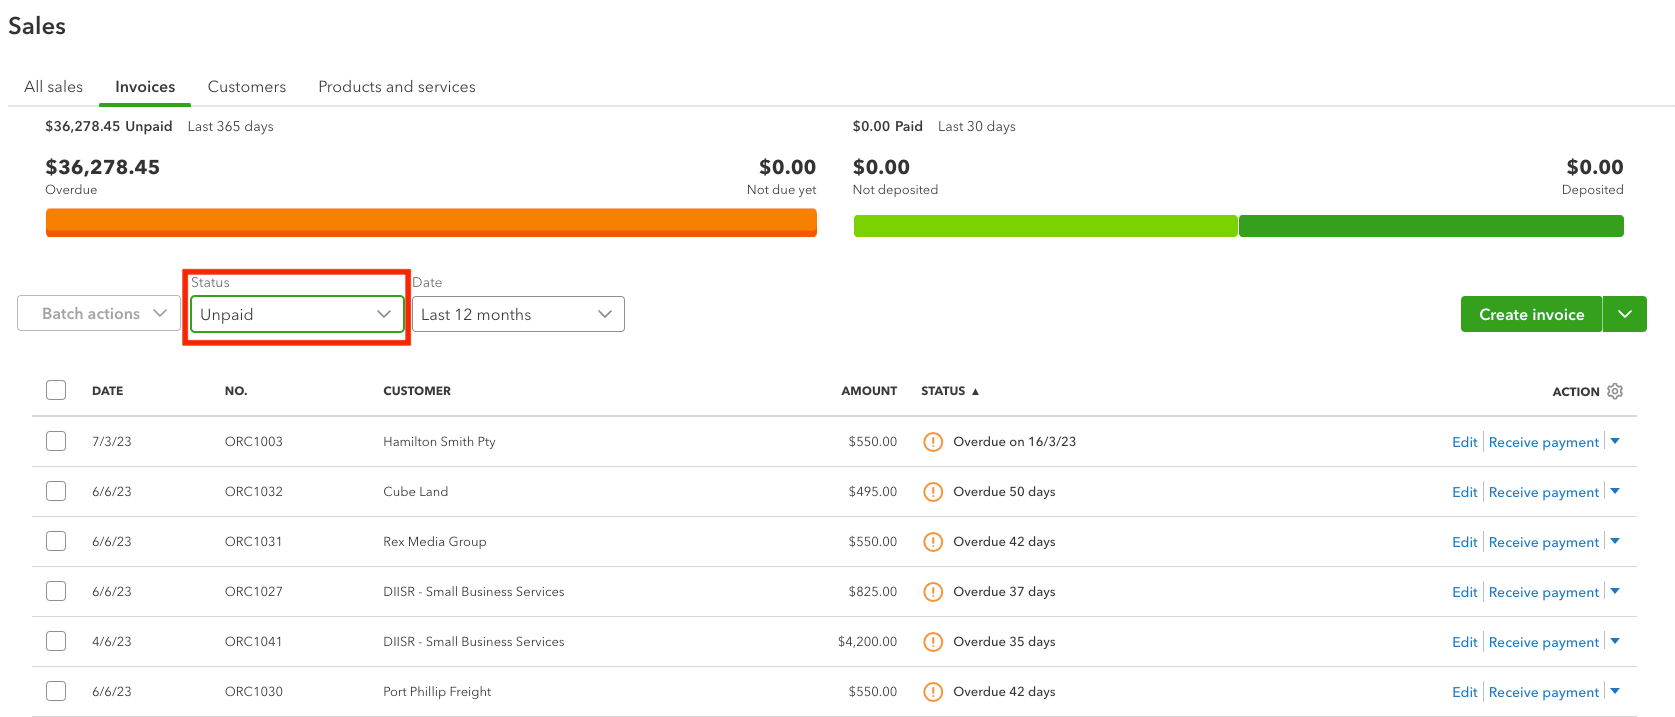
2. You will follow steps 3 - 7 above under Correcting GST on Adjustment Notes.
3. Next, Filter invoices that have been paid in the current lodgement period and correct the GST on all invoices that have been paid in the current lodgement period.
Correct GST on Bills, Expenses and Supplier Credits
Now that we have corrected GST on Sales Invoices and Sales Adjustment Notes, it’s time to correct the GST on Bills, Expenses and Adjustments.
1. Go to Expenses
2. Filter Expenses by Supplier Credit from the first day of the current lodgement period (i.e. if your last BAS lodgement was 31 March, then filter from 1 April to date of migration)
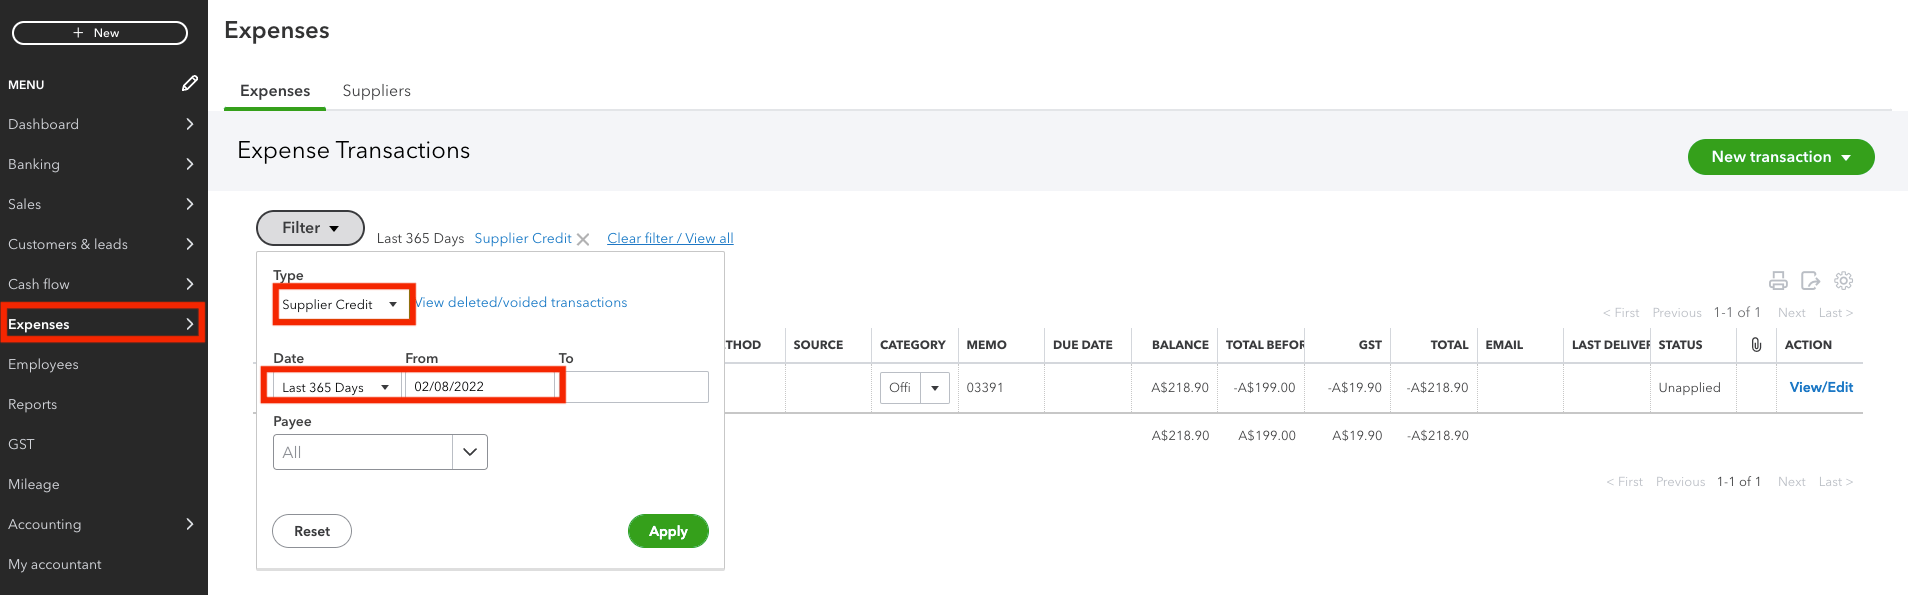
3. Under the Actions column, select Edit to open up the Supplier Credit
4. Change the tax setting so Amounts are Exclusive of GST
5. Select the GST on Purchases from the dropdown in the Service/Product Line on the Supplier Credit
6. Delete the GST (Conversion Tax) Line from the Supplier Credit
7. Save and close, then repeat the above steps for each Supplier Credit.
8. Next, repeat steps 2 - 7 for Expenses, then again for Bills.
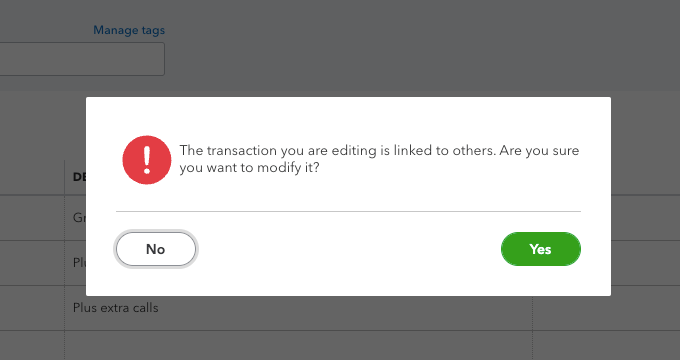
9. Where there is a payment applied against a Bill that falls within the current lodgment period, you will get a message pop-up notifying you that the transaction is linked to others. Are you sure you want to modify it? Select Yes.
Once you have completed these GST adjustments for both Sales and Expenses/Bills, check the GST Liability amount for the current period in QBO matches your Xero balance.
- Select GST
- Select Prepare BAS or IAS
- Select the Start date of your lodgement period and the End Date and Select Continue
- You will see your Total Sales and Total Purchase Amounts for this period in currently in Quickbooks.
- Check the total against your Xero reports.
- If there is a difference, review the transactions without GST Report and run this on a cash basis. This will tell you which transactions still need to be amended.
- Where the difference is due to Cash Coded transactions thatare not linked to a Bill or Invoice, we can create a manual journal to amend the difference, so the GST is correctly recognised in QBO.
In a spreadsheet, reconcile your GST on Sales and GST on Purchases in a spreadsheet to compare the difference. This will help you calculate, the adjusting journal that needs to be created.
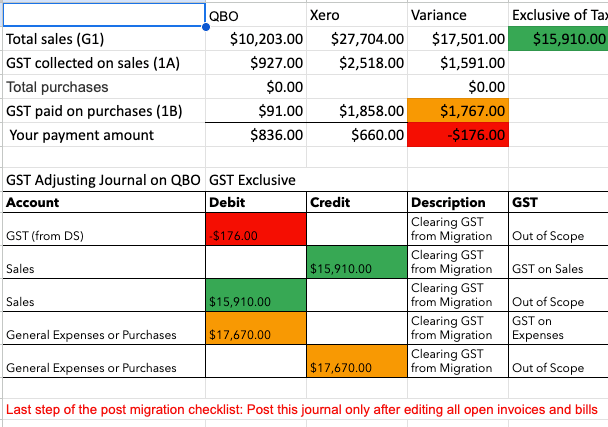
8. Lastly, once you have calculated the difference between your QBO and Xero, and calculated the journal needed to balance the difference. You will post the necessary adjusting entry
8.1 Click +New > Journal Entry to create a new journal entry.
8.2 Change the journal date to the opening balance date, and “tick” Is Adjusting Journal Entry?
8.3 Select Amounts are Exclusive of Tax.
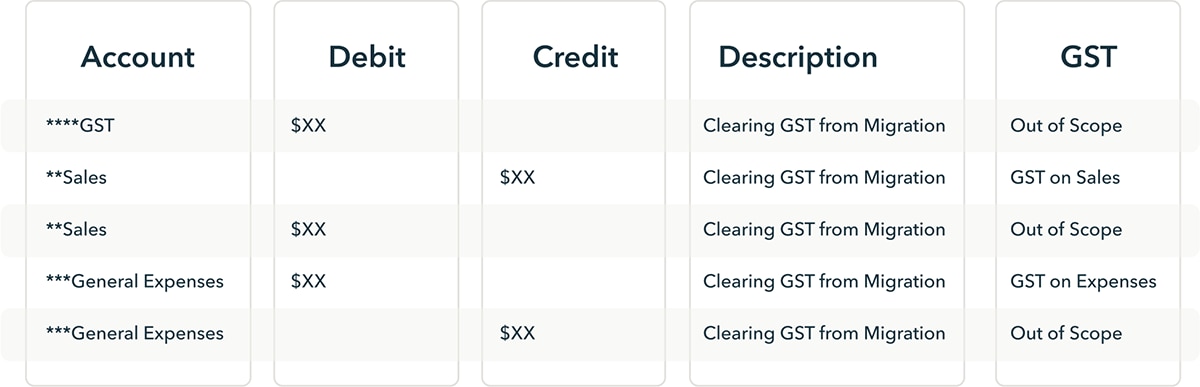
8.4 You will create the following journal entry:
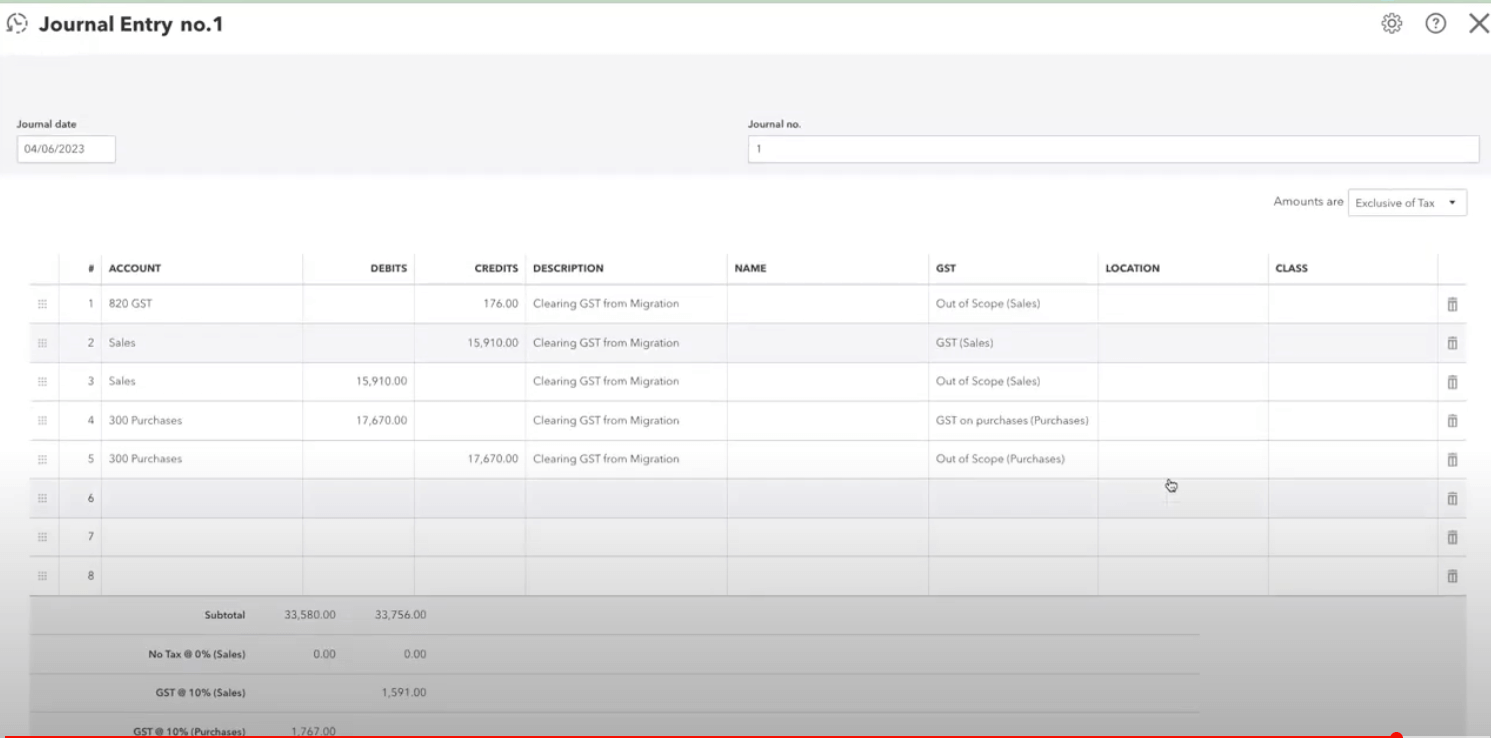
8.5 Check the GST in QBO once you have posted this journal. If the reports match, then your migration has been completed, and you are ready to start using QBO.


Intuit helps put more money in consumers’ and small businesses’ pockets, saving them time by eliminating work, and ensuring they have confidence in every financial decision they make.
Award Winning Accounting Software
