Don't miss out
Subscribe to QuickBooks for only
$1/month for 3 months
Don't miss out
Claim now
April Sale
Buy now and pay only $1/month
for your first 3 months
March into savings Don't miss out!
$1 /monthfor 3 months
$1/month
for 3 months
$1/month
for 12 months
When purchased in bundles of 10
50 %off for 3 months
50 %off for 12 months
  • Invoices
  • Expenses
  • Reports
Image Alt Text
accountants

How to Create an Effective Onboarding Checklist for Accounting and Bookkeeping Clients

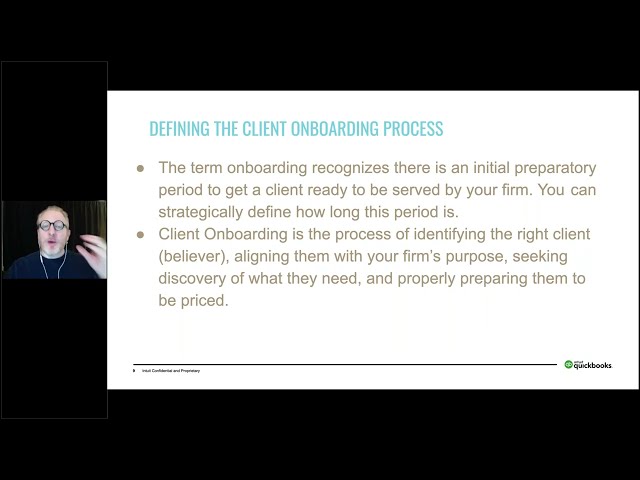
The onboarding process is a client’s first chance to get to know your business properly. First impressions matter, so the onboarding process is critical. Being onboarded with a standardised process from start to finish helps to build your clients’ confidence in your business, saves time and keeps things moving. For the purposes of this article, onboarding is defined as the process of bringing a new client on board, incorporating training and orientation.


When introducing your accounting and bookkeeping clients to QuickBooks Online it is important to have an effective onboarding process from start to finish. Follow these steps in our client onboarding checklist: 


Client Onboarding Checklist For QuickBooks Online

Let’s take a look at how you can create an accounting client onboarding checklist for QuickBooks Online that will satisfy your accounting and bookkeeping clients.

1. Pre-Onboarding Preparation 

Before you can start onboarding your accounting clients into your firm and QuickBooks Online, it’s best to follow a pre-onboarding checklist. This process will allow you to gather essential information on your client so that you can tailor their QuickBooks Online plan to suit their business needs. To gain a clear understanding of your client’s business and objectives, follow this checklist:

Gather Client Information 

Start by gathering all the necessary information needed about your client to provide them with a tailored accounting service. Set up a preliminary meeting and determine: 


  • Business Type: Determine the legal structure of the client's business, whether it's a sole proprietorship, partnership, LLC, corporation, etc.


  • Industry: Identify the industry in which the client operates. Different industries may have unique accounting and reporting requirements.


  • Size: Assess the size of the client's business, including the number of employees, annual revenue, and any growth projections.

Identify their Accounting and Bookkeeping Needs

Within your preliminary meeting, identify why the client needs your help. Write a list of questions to gain a full understanding of their accounting and/or bookkeeping needs. This could include: 


  • What are your short-term and long-term financial objectives? 
  • Are you looking to increase profitability, manage expenses, or expand your business?
  • What financial reports and metrics will be most useful for you?
  • What tax requirements and obligations apply to your business?
  • What accounting or bookkeeping challenges have you faced in the past?

Implement a Clear Client Communication Strategy

Implementing a clear client communication strategy will ensure effective client relationship management and help you build trust with your clients.

2. Set up your Clients on QuickBooks

If your client is new to QuickBooks Online, you can sign them up for special accountant pricing and discounts. If your client already uses QuickBooks, they can invite you to access their account. Simply add your client to your QuickBooks Online Accountant client dashboard to start managing their books. Let’s take a look at our setup checklist: 

Input All Client Details

Enter all relevant information on the client, including the full company name, address, and preferred contact details. This will be used for invoicing, so it’s important to get it right.

Modify the Client's Fiscal and Tax Year Settings

Based on the client’s tax obligations, set the fiscal year and tax year on their account - you can adjust this as their tax obligations change. Ensure that the tax year settings comply with local tax regulations.

Add the Client’s Chart of Accounts

  • Customize the Chart of Accounts depending on the financial structure of the client’s business. 
  • Add or delete accounts as necessary to accurately represent the client's income, expenses, assets, liabilities, and equity.
  • Add or modify account categories as needed to keep track of the client’s transactions. Ensure that your account numbering or naming follows a logical structure for easy reference when generating financial statements and reports.

3. Migrate your Client’s Data to QuickBooks Online

In order to keep your client’s financial records up-to-date, you need to migrate their financial data from their previous accounting software provider or spreadsheets like Excel into QuickBooks Online. Some clients may require data migration while others may require data conversion. Read more about choosing the right data migration method for your client


Here are some tips on migrating client data effectively.

Gather your Client’s Existing Financial Data

Start by collecting all your client’s financial data, including past accounting software files, spreadsheets, bank statements, invoices, and expenses. Ensure all of their financial data is accurately migrated or converted to your client’s QuickBooks Online account.

Link Bank Accounts and Credit Cards to QuickBooks Online

Linking your client’s bank accounts and credit cards to QuickBooks Online is easy. Simply provide all necessary account information when connecting their bank feeds. This allows you to establish a connection between QuickBooks and the client's bank account to streamline and automate data entry.

Import and Categorize Your Client’s Historical Bank Transactions

Once you’ve set up your client’s bank feed on QuickBooks Online, you can import their historical bank transactions into QuickBooks Online. Once imported, categorize all transactions based on the client’s chart of accounts. Include income, expenses, assets, and liabilities as categories. 

Sign up to QuickBooks Online Accountant for free and see why over 600,000 accountants love QuickBooks

4. User Training

When onboarding clients to QuickBooks, it is important to set up a training program to educate clients on using QuickBooks Online effectively. Without a comprehensive training plan, your client may struggle to understand the many features available on QuickBooks. Here’s a checklist on how to onboard a new client with effective training:

Complete Basic Training for QuickBooks

Give all your clients an overview of how QuickBooks Online works. You can choose to record training videos for navigating through the dashboard, accessing relevant features, and customizing their interface. Alternatively, provide your clients with access to QuickBooks resources to familiarise them with the platform's features.


Set up training sessions or use QuickBooks resources to explain the following key features: 

  • Creating Invoices: Walk clients through the process of generating invoices for customers or clients, customizing invoice templates, and tracking payments.
  • Recording Expenses: Teach your clients how to record and categorize expenses, add receipts, and track purchases.
  • Reconciling Accounts: Guide clients on reconciling bank and credit card accounts to ensure accurate bookkeeping.

Train Clients on Data Entry

Instruct clients and their team members on how to manually enter financial transactions into QuickBooks Online, especially for transactions that may not be captured through automated processes.


Provide step-by-step guidance on creating and managing key financial documents, including:


  • Invoices: Show users how to create and send invoices to customers, set payment terms, and track invoice statuses.
  • Bills: Explain how to record and manage bills and expenses, including due dates, vendor information, and payment methods.
  • Expenses: Demonstrate the process of categorizing and tracking expenses to help your client maintain accurate financial records.

5. Ongoing Support & Learning

The onboarding process doesn’t stop once you’ve completed training. You should always provide ongoing assistance to ensure clients can get the most out of QuickBooks Online. Here’s a quick checklist on how to continue supporting your clients: 

Take Advantage of QuickBooks Resources

Direct clients to QuickBooks' extensive library helpful resources that cover a wide range of topics and can help users troubleshoot issues independently including:


Schedule Regular Client Check-ins

Schedule regular check-ins with your clients through in-person, telephone or online meetings. During the meetings, you should: 


  • Address any questions or concerns your clients may have about QuickBooks Online or their financial data
  • Review their financial data and reports for accuracy and offer insights into their business's financial health
  • Provide extra training or guidance depending on the client's needs
  • Reinforce best practices and recommend optimizations to streamline their accounting and bookkeeping processes

Free Webinars for Accountants

Maintain your Continuing Professional Development (CPD) with QuickBooks free on-demand webinars and learn how QuickBooks can help you run your accounting practice

Sign up for QuickBooks Online Accountant for Free

Are you ready to streamline your accounting processes to provide a better experience for your clients? Then try QuickBooks Online Accountant for free. This powerful accounting software allows you to monitor and analyze your clients' financial transactions, account balances, and reports as they happen.

Related Articles