April Sale
Buy now and pay only $1/month
for your first 3 months
March into savings Don't miss out!
$1 /monthfor 3 months
Track your expenses as you go and save 11 hours of admin per week
QuickBooks Online $1 /monthfor 3 months
Start fresh this new year
with QuickBooks Online
$1 /monthfor 3 months
Sale ends soon. Don't miss out, sign up today
$1 /monthfor 3 months
Start fresh this new year
with QuickBooks Online
$1 /monthfor 3 months
$1/month
for 3 months
$1/month
for 12 months
When purchased in bundles of 10
50 %off for 3 months
50 %off for 12 months
  • Invoices
  • Expenses
  • Reports
How to Create an Invoice?
Invoicing

How to Create an Invoice?

There are many different ways that a small business owner can create an invoice—and that’s precisely the challenge. 

If you’re just getting started as an entrepreneur, you may be wondering whether to create these documents manually or to use software. Creating invoices manually has its benefits: you can fully customise your templates, aesthetics, and process. 

But if you do create your invoices from scratch using a spreadsheet or word processing software, you may encounter administrative errors. Moreover, if you’re creating invoices manually, you’ll run into challenges tracking them—and getting paid.

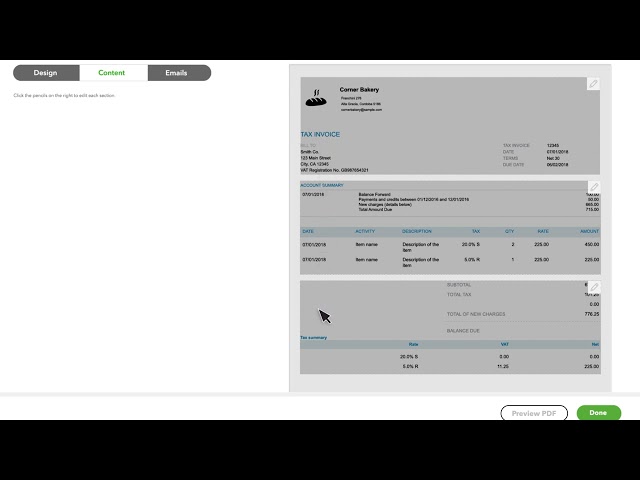
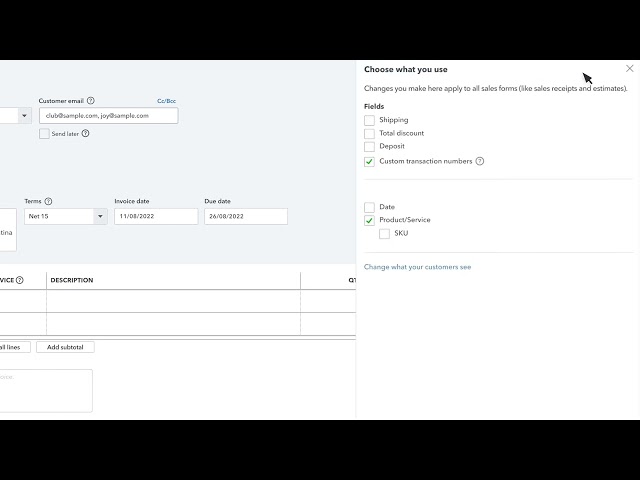
Using accounting software to create invoices can save you time and ensure consistency across all of your invoices. While it may make sense to manually build your own invoices for one, two, or even five customers, imagine how your efforts will scale across multiple customers. 

Eventually, the process of manually creating invoices may become unsustainable. You’ll run into a situation where you’ll need to hire someone to manage this process. Or, you can pay a monthly fee to use software, at a tiny fraction of the cost of bringing on an employee.

By using software you can manage—and scale—your invoicing process, with minimal effort.

The Purpose of an Invoice

An invoice is one of the most important documents that your business creates. Well-built invoices are tools for record-keeping and communicating with customers. And if you use an invoicing system that integrates with your accounting software, they also serve as a seamless paper trail.

Efficient, personalised invoicing can:

  • strengthen your relationships with customers
  • boost your cash flow
  • reinforce your brand
  • cut the time you spend on bookkeeping

That’s why invoicing software makes the invoicing process easier. Let’s say you send 10 invoices per month, and the process takes you 1 hour apiece. This is time that could be spent fulfilling services or generating new business. Using software, you can trim your invoicing time down from 10 hours to 1 hour. 

You can standardise your templates, quickly query information about payments, and answer customer questions as they come up.

An invoice is an important transactional tool with extremely functional applications. That’s why it’s important for small business owners to create them in a way that reduces the chances of error.

The advantage of invoicing software

Many businesses start off creating invoices in Word and then recording them in a spreadsheet. This approach might work at first, but as you build up your customer base, your accounting is going to pile up.

Accounting software does more than automate the task of invoice creation. It allows you to track how long it takes for customers to make a payment, how many invoices are overdue, when payments are scheduled to hit your bank account, and more.

Discover QuickBooks Free Invoicing Tools

Basic invoicing tips

However you create your invoices, there are a few key things you need to consider:

  • Make sure your customer’s name and contact information are clear so it’s easy to match invoices to specific accounts.
  • Give clear payment terms so your customer knows how/when to pay you.
  • Offer a range of payment options, so it’s as easy as possible for your customer to settle up

The Components of an Invoice

When creating invoices for your organisation, or for yourself as an independent contractor, be sure to always include the following:

  • Header: The word INVOICE should be in large letters centred across the top of the document. This practice will help you signal to your busy customers—who need to filter through many documents on a daily basis—that they need to make a payment.
  • Payer’s Name and Address: The company or person that is issuing the payment, along with the mailing address, should be listed. This information will help your customers understand that the document was, in fact, intended for them.
  • Payee’s Name and Address: The name of the person or company being paid should be listed, along with the mailing address; the payee’s email address will also suffice. This information will make it easier for your customers to send you a check.
  • Itemised Listing of Goods or Services: Depending on the type of work that is being billed, a description of the work that was done should be listed. For example, if the invoice is for a certain product, the product name, quantity, per-unit price, and total price should be listed on the invoice, typically in columns that run vertically on the page. Itemised details are especially important for both your and your customers’ accounting documentation.

If the invoice is for services (for example, the completion of a design or writing project), then the name of the project, a brief description of the type of work (i.e. graphic design, writing), and the hourly or flat rate should be listed. If it is an hourly rate, the number of hours worked should be included. If payment is per piece, each piece completed should be listed separately.

Underneath the listing of products or services being billed, there should be an invoice total that’s clearly marked to avoid any undue confusion.

  • Date: It’s important to include the date the invoice was issued, as well as the date(s) of the work completed or when the products were ordered or delivered—you can discuss this preference with your client and/or business to make processing easier for both of you.
  • Invoice Number: An invoice number is not generally required, but it may help in keeping invoices organised. Larger organisations often have complicated billing systems that may require a certain invoice number or code. Remember to discuss this with your client before submitting your invoice. No matter which system you use, be sure that the invoice number goes up incrementally each time it is sent.
  • Terms: You’ll want to be sure to note the payment terms. Whether the payer or the payee, it’s important that everyone has an expectation of when the payment is to be made. Most invoices have a 30-day term, meaning they must be paid within 30 days of receipt to avoid any late fees or penalties. This is usually written as “Net 30” on the invoice. Every organisation should establish their own payment terms depending on the type of business they do and the type of suppliers with whom they work.

Personalise your invoice to reinforce your brand

Your invoice is a transactional document, but it’s also a valuable opportunity to reinforce your brand. Every interaction with your customer matters and your invoices are extensions of your brand and company. 

Here are some tips to help you incorporate your brand into your invoice:

Consider your tone – Every business has your voice behind it so choose your language carefully. From the way you thank a customer to your sign-off, it all adds up to an overall impression.

Focus on design – Your invoice should reflect any branding your company already has in terms of colours, typefaces, and imagery. It shouldn’t overwhelm the main message and purpose of the invoice. If you need help, think about a design professional.

Add something extra – Use the comments section of an invoice to thank your customer by name. Keep your messages relevant and concise. You might decide to:

  • mention why you enjoyed working on the project
  • express an interest in working on similar projects
  • include a link to a relevant blog post to show that you’re up on industry trends

How to create an Invoice in QuickBooks

QuickBooks accounting software lets you create custom and professional invoices. You can also manage and track these invoices from your computer, smartphone, or tablet. QuickBooks also shows you what invoices are due or overdue and lets you send a personalised automatic reminder to late-paying customers. 

With all these great features, you might be wondering how you can create an invoice on QuickBooks. To do so all you have to do is follow the steps below:

  1. On your Dashboard, go to the Invoicing area and click Send your first invoice.
  2. Select the customer you're invoicing. If this is for a customer you haven’t yet entered into QuickBooks, you can add their details here or just click Save to add this name to your Customer List.
  3. Select the Payment Terms. For example, Net 30 means this customer must pay this invoice within 30 days of the invoice date.
  4. Enter What You Sold. If you haven’t added this service or product yet, click Add. You can then enter the product or service information.
  5. Email the Invoice. If you want to email the invoice to your customer, be sure to enter their email address.
  6. Preview Your Invoice. At the bottom of the invoice, click Print or Preview. Click Close when you’re done.
  7.  Customise Your Invoice. To customise how your invoice looks, click Customise, then Edit Current at the bottom of the invoice.
  8. Add Your Logo. Select your logo file. QuickBooks matches the template colours of your logo. If you’d like a different colour from your logo, just pick it on the image.
  9. Change Your Invoice Template. If you’d like a different look, QuickBooks has lots of templates to choose from. To the left of the invoice, you can scroll through and select templates to change the look of your invoice. Save your invoice when you’re done.
  10. Set Up Online Payments. Online Payments make it fast and easy for your customers to pay you. Click Get set up, then fill out a simple application.
  11. Send Your Invoice. When you’re ready to email your invoice, click Save and send.
  12. Customise Your Email and then Send It. You can change the subject and the body of the email to anything you like. Then click Send and close to send the invoice. 

Save time and automate your invoicing with QuickBooks

Our customers save 9 hours per week on invoicing.*

More Resources

As the creators of the world’s most popular accounting software, QuickBooks has conducted extensive research into what makes an invoice most effective. Take a look at the following resources that our team has created, below: