Collect sales tax
by Intuit• Updated 3 weeks ago
Once you have set up your sales tax, you are ready to create taxable sales. QuickBooks Desktop automatically charges and calculates sales tax when you create invoices, sales receipts and other sales form.
You may be required to collect taxes for certain goods and services you offer. QuickBooks Desktop helps you keep an accurate record of these taxes so you can easily monitor and remit them to the appropriate tax collecting agency.
This article is part of a series on Sales Tax. It covers the usual sales tax workflow in QuickBooks Desktop.
If you encounter problems while working on your sales tax, see Resolve common sales tax issues. |
Understand a taxable sales transaction
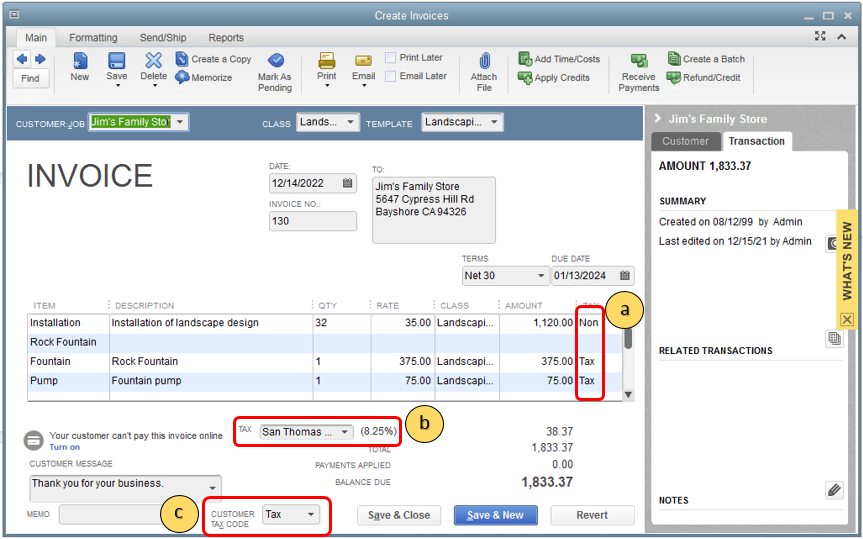
There are three areas in your sales form associated with sales tax.

- Item tax code: Used for tracking the taxable status of an item. This is automatically populated based on the tax code you assigned to the item during setup.
- Tax item/group: The sales tax item or group you setup. This field also displays the corresponding tax rate for the item/group. This is automatically populated based on the tax item/group you assigned to the customer during setup.
- Customer tax code: Used for tracking the taxable status of a customer. This is automatically populated based on the tax code you assigned to the customer during setup.
QuickBooks totals all taxable line items (Blueprints worth $100 + Wood Door for $1 500 = $1 600) and multiply it to the rate of the sales tax item or group you assigned to the customer (7.75%). Thus, the total tax collected is $124.
Change sales tax for one particular sale
You can change the tax rate for a specific sale. You can also change customer or item tax code for one particular sales transaction. For example, if a taxable customer is buying items for a non-profit organization, the sale should not be taxed regardless of the tax code for the customer or the item. Whatever change you made is applicable only to the specific sale and should not affect the item or customer setup.
More like this
- Refund sales tax collected from tax exempt customersby QuickBooks
- How to set up sales tax in QuickBooks Desktopby QuickBooks
- Set up sales tax in QuickBooks Desktopby QuickBooks
- Set up where you collect sales tax in QuickBooks Onlineby QuickBooks