A picture of a person using a mobile device.
Invoicing

How to Make an Invoice in QuickBooks, Excel & Word

Invoices are a vital part of your small business. They keep track of what customers or clients owe you when money is due, and what kind of cash flow you can expect in the coming weeks or months. Without invoices, your small or medium-sized business doesn’t have a way to collect money. You may also need an invoice to accrue the right amount of sales tax as required by the Canada Revenue Agency.


Invoice templates offer a way to streamline your invoicing process, which saves time and money. Learn how to create an invoice that distinctively fits your business, with the basic invoice template options that are available within three great software programs.

Back: What is Invoicing?

Next: What are Invoice Payment Terms?

Determine Which Invoice Template Is Right for You

Software for creating an invoice varies in terms of complexity and automation. A basic, free online invoice may include drop-down menus that guide the construction of a template, add more lines and perform basic calculations, but the customization is limited.


Specialized invoice templates, often offered as part of paid accounting software, typically provide more options, from inputting multiple fields to inserting formulas for calculating taxes, fees, and add-on services. They also provide tutorials on how to make an invoice that allows you to input custom calculations based on your unique business needs.

Creating a template enables you to replicate invoices without having to constantly create them from scratch. An efficient invoicing system saves your business time and money over the long term by automatically integrating financial calculations into your accounting software.

Required Information For Canadian Invoice Templates

Accuracy is the key when it comes to making an invoice example or template, and Canadian invoice templates require certain information for them to be legal. This information will come in handy if you have to collect sales tax from purchases and pay small-business taxes on your income.


  • At the top, identify your business with the name, logo and contact information.
  • Below that, show the customer’s name and contact information.
  • Highlight the date and invoice number for easy tracking, for both you and the customer.
  • On separate lines in a grid-like pattern, itemize the goods or services rendered and pair them with a column on the right showing the charges for each.
  • Total any sales taxes and include your business number for any orders of $30 or more, per Canadian law.
  • At the bottom, total the charges and indicate when they are due.

How to Make an Invoice in QuickBooks

QuickBooks Online has a step-by-step video tutorial that explains how to make an invoice template in less than three minutes. This resource allows you to easily build as many custom templates as you need.


  1. Click on Invoicing from your QuickBooks dashboard. Then click the green rectangle in the middle of the page that says “Send your first invoice.”
  2. Type in the name of the customer you’re invoicing . If you have a repeat customer, that person’s contact information automatically populates in the template. If you get a new customer, add the person’s details at this step for later reference by clicking “Save.”
  3. Choose the Payment Terms. This lets the customer know when the payment is due. The drop-down menu’s default is 30 days, or Net 30.
  4. Enter what you sold to the customer . If you already have some of these items set up, the drop-down menu filters these items. If not, you can create a new item from this invoice template by clicking Add. Fill in the information for later reference.
  5. Enter the customer’s email address next to the name. Consider saving the invoice at this stage by clicking Save in the bottom-right corner.
  6. Preview what you have so far. Click the “Print” or “Preview” button at the bottom to see what the customer sees when they receive your invoice.
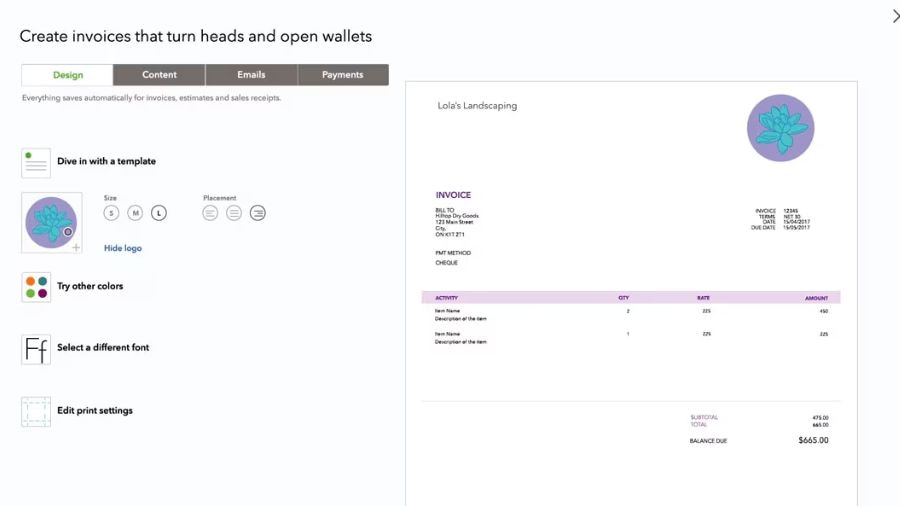
  7. Add your company logo. Go to the bottom of the invoice creator. Select “Customize” and “Edit Current” to fill in that big white space at the top of the invoice. The template lets you choose your logo file, and then alter the colours or size as you see fit for this document.
  8. Change your invoice template. Pick from Airy, Modern, Fresh, Bold, or Friendly templates.
  9. Enable online payments. Next to the customer’s email, choose whether or not you accept online payments. QuickBooks automatically integrates this payment system into your accounting software for easy and secure payments. Customers can click the online payment options to pay your invoice immediately with a credit card.
  10. Save and send your invoice. Click the green “Save and Send” button in the bottom right corner. This is where you can add a quick message to the customer or create a standard sentence or two to save time later. This also lets you preview your updated invoice. Click “Save and Close” when done.
  11. Start bringing in money. QuickBooks updates your sales transactions automatically, and deposits the funds in your bank account when the customer pays the invoice. Look at your sales transaction information to see what invoices are outstanding and which ones are paid.

How to Make an Invoice in Microsoft Word

Microsoft Word has several invoice templates to choose from, which are available for download on the Office website. The advantage of these templates is that you get to preview what they look like before customizing them with your information. Word also automatically adds the lines of goods and services to create a total at the bottom of the invoice, much like Excel does.


Each invoice easily adjusts and prints to letter, legal, executive, or card sizes, depending on your needs. Saving the updated Microsoft Word invoice template to your desktop or cloud-based system only takes a few mouse-clicks, and allows you to easily retrieve a template for use later.


However, if you use Word for invoicing, it may require extra steps to integrate these invoice transactions into your accounting software, unless your dedicated accounting software already uses Word as the default document program. Word also uses only basic additions in its invoices; this software lacks the ability to use more complicated formulas, such as those in Excel or Quickbooks.

How to Make an Invoice in Microsoft Excel

Microsoft Excel uses powerful number crunching and formulas to make accounting easier. Downloadable templates in Excel look similar to those in Word, with colours and white spaces already in place for easy readability. You don’t have to alter many cells to get a basic invoicing system, and altering the size of each Excel cell is quick and efficient. Save your updated invoice template to use later.


Excel makes it easy to note any sales tax collections, discounts, or percentages off. Unlike Word, Excel offers the ability to customize and use complex formulas. If you can become an expert at using Excel’s vast array of formulas for calculating KPIs, ROIs, and accounts receivables, this may be the right program for you.


Excel can be confusing if you aren’t as familiar with the program’s methods for inputting formulas. That’s one of many reasons why dedicated accounting software is often the easiest, most cost-effective option for invoice templates. Such software lets you spend more time on your core business model rather than trying to become an expert at using Excel’s formulas.

Benefits of Invoicing Online

Invoicing online means your customers receive invoices faster and you collect your money more quickly. QuickBooks Online offers more choices for free invoice templates because the software combines components of Word and Excel to mesh with its robust accounting features. All that’s required to get started is for you to type in your company’s contact information, change the colour, add your company’s logo, and choose a style.


QuickBooks makes it easy to accept payments online and get your invoices paid faster. Just integrate the “Pay Now” button into your invoice templates to take advantage of online payments including credit card payments, through a secure connection.


Your business is unique, and as such only you can determine which is the best type of invoice template to use based on your company’s individual needs. Whether you use Quickbooks for your invoicing or not, Quickbooks Online has plenty of useful free information to help you abide by Canadian Law as well as great tips and tricks for improving your bottom line.

Back: What is Invoicing?

Next: What are Invoice Payment Terms?

Related Articles

Your privacy

We collect data when you use our website to improve its performance. Doing so also helps us provide a secure, personalized experience. Select 'Accept cookies' to agree or 'Cookies settings' to choose which cookies we use. You can change your preferences anytime by clicking the 'Manage cookies' link in the footer.

Choose your cookie preferences

Some cookies are needed to make our website work and can't be turned off. But we need your consent to use others that are not essential. You can make your choices below and update them at any time using the 'Manage Cookies' link. To find out more, visit our Cookies Policy.

These cookies are necessary for the site to function. They also help us keep your data safe.
These cookies allow us to enhance your experience and remember your preferences, region or country, language, and accessibility options.
These cookies tell us how customers use our website. We study and organize this data to help us optimise our content and provide you with personalised experiences.
These cookies help us provide you with relevant communications and ads in our products and on other sites.

Looking for something else?

Get QuickBooks

Smart features made for your business. We've got you covered.

Firm of the Future

Expert advice and resources for today’s accounting professionals.

QuickBooks Support

Get help with QuickBooks. Find articles, video tutorials, and more.