Turn on suggestions
Auto-suggest helps you quickly narrow down your search results by suggesting possible matches as you type.
Showing results for
Get 50% OFF QuickBooks for 3 months*
Buy nowHello. My client upgraded to Plus yesterday to start using classes, but I've encountered some problems when trying to set the feature up properly. The section in Account and Settings for choosing the various options seems to be normal, and allows me to select "One to entire transaction" as the "Assign classes" option. But when I try to actually create any transactions (or to edit past transactions), classes remain line items rather than being placed in the header to apply to the whole transaction. (I've also confirmed this by entering a class for just one line of a multi-line transaction and then clicking save -- when I do so, QBO gives me the warning that I haven't assigned classes to the entirety of the transaction.) See the attached screenshot.
I've tried this in multiple browsers, after clearing cookies and my cache, on multiple computers, in incognito mode, in my own company's file, in the sample company file, and have also had my client try it on his own computer, and the same issue always occurs. Can anyone else replicate this?
One other issue which may be connected, and I wonder if it means this is some kind of bug, is that if I click on the question mark next to "Assign classes" in Account and Settings, the popup reads "undefined" instead of explaining what the option means:
Any help would be greatly appreciated. Thank you!
Solved! Go to Solution.

I appreciate for giving a detailed explanation, misk1. The setup you've provided is indeed correct, and once classes are enabled in Account and Settings, they can only be applied to entire customer transactions. Let me guide you through some additional features for organizing your financial data at the transaction level in QuickBooks Online.
To manage and organize financial data comprehensively, QuickBooks Online offers several features beyond classes, including location tracking and custom fields. These tools can serve as effective alternatives or complements to class tracking.
The Custom fields and location tracking in QuickBooks Online can be effective alternatives or complementary tools alongside class tracking for organizing transactions comprehensively.
The Custom fields allow you to capture specific details unique to your business needs, like project codes, customer types, or order statuses. Here's how you can set them up:


For further guidance, refer to this article: Add custom fields to sales forms and purchase orders in QuickBooks Online.
While location tracking allows them to segregate financial data by different regions, offices, or business segments. Here are the steps:


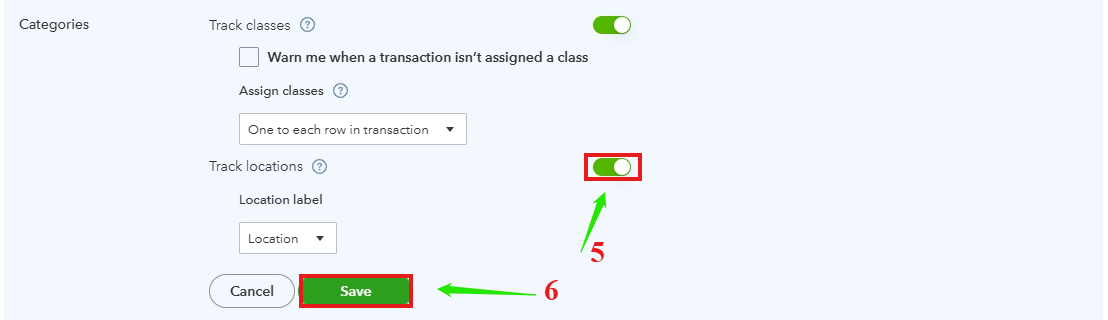
For more details, check this article: Set up and use location tracking in QuickBooks Online.
Moreover, once you track transactions by class, you can run reports by class, which will allow you to categorize and analyze your financial data based on specific segments of your business.
If you need further assistance or have any more queries, feel free to reach out. We're here to help you navigate these settings and optimize your QuickBooks Online experience.
I appreciate for giving a detailed explanation, misk1. The setup you've provided is indeed correct, and once classes are enabled in Account and Settings, they can only be applied to entire customer transactions. Let me guide you through some additional features for organizing your financial data at the transaction level in QuickBooks Online.
To manage and organize financial data comprehensively, QuickBooks Online offers several features beyond classes, including location tracking and custom fields. These tools can serve as effective alternatives or complements to class tracking.
The Custom fields and location tracking in QuickBooks Online can be effective alternatives or complementary tools alongside class tracking for organizing transactions comprehensively.
The Custom fields allow you to capture specific details unique to your business needs, like project codes, customer types, or order statuses. Here's how you can set them up:
For further guidance, refer to this article: Add custom fields to sales forms and purchase orders in QuickBooks Online.
While location tracking allows them to segregate financial data by different regions, offices, or business segments. Here are the steps:
For more details, check this article: Set up and use location tracking in QuickBooks Online.
Moreover, once you track transactions by class, you can run reports by class, which will allow you to categorize and analyze your financial data based on specific segments of your business.
If you need further assistance or have any more queries, feel free to reach out. We're here to help you navigate these settings and optimize your QuickBooks Online experience.
Ahhh, okay. I'd thought the "one per transaction" option applied to all transaction types. Thank you for the clarification.
I'm glad to hear that my colleague's explanation and guidance clarified your concerns about transaction types and the use of class settings in QuickBooks Online, Miks. Our goal is always to ensure that you have the tools and insights to manage your financial data effectively.
Consider exploring additional features such as custom fields and location tracking; you'll find them highly beneficial for fine-tuning how you organize and analyze your business transactions.
For a more in-depth understanding of these capabilities, I recommend checking out this article. It provides detailed guidance on managing and tracking your business performance and includes quick overviews that may serve as helpful references for future use: "Run a Report in QuickBooks Online."
Should you have any questions as you navigate through QuickBooks Online, or if you encounter any issues, please feel free to respond below. We are here to ensure that your experience is both productive and rewarding.


You have clicked a link to a site outside of the QuickBooks or ProFile Communities. By clicking "Continue", you will leave the community and be taken to that site instead.
For more information visit our Security Center or to report suspicious websites you can contact us here
