Let's manually add those 12-months worth of transactions, @info1448.
The amount of data that can be pulled-up from your bank account depends entirely from them. If they can provide 90 days worth of transaction, then you can manually add those transactions beyond that through the WebConnect process.
You’ll have to manually download the transactions from the bank. Then, upload the file to your account.
Download bank transactions:
- Go to your online banking account to get your file.
- Check or follow your bank’s instructions to get a copy of the data and then save on your computer.
- Ensure that the data range is at least one day before your oldest transaction to avoid duplicates.
- Please take note of the supported file format and size. It should be either a Comma-Separated Values (CSV) or a QuickBooks Online (QBO) file.
- Download your transactions and save the file to your desktop.
To upload the file to your QuickBooks account:
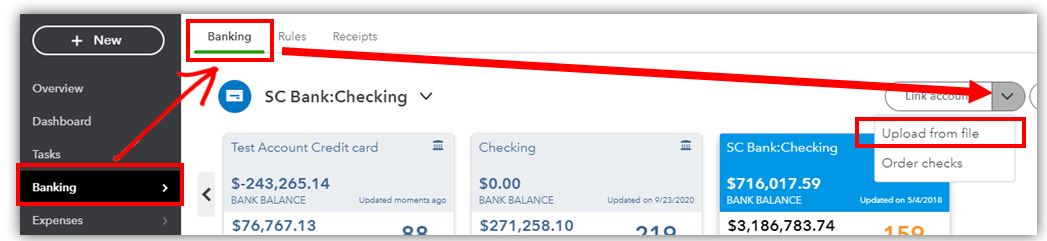
- Go to the Banking menu and select the bank where you’re uploading the transactions from the Banking tab.
- Click the Link account drop-down and select Upload from file.
- On the window that appears, click the Browse button and choose the file that you’ll be downloading.
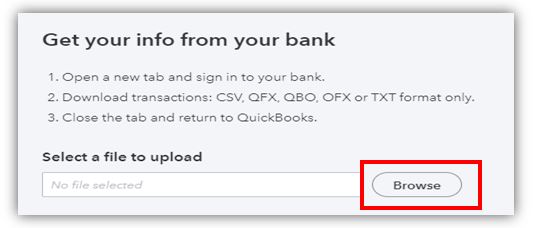
- Click on Open, then Next.
- Follow the onscreen instructions. Match the columns on the file with the banking fields in QuickBooks, then select Next.
- Click on Let's go. QuickBooks will now add the transactions to your account.
Check this article for more information: Manually upload transactions into QuickBooks Online. From here, you can now categorize and then reconcile the transactions.
Let me know if there’s anything else that I can assist with your bank transactions by leaving a comment below. I’m always here to assist. Have a wonderful day!