Turn on suggestions
Auto-suggest helps you quickly narrow down your search results by suggesting possible matches as you type.
Showing results for
Get 50% OFF QuickBooks for 3 months*
Buy nowI have a bill to field in invoicing, I added the bill to field to my custom invoice, the bill to box prints, but, no data prints. Yes, while creating the invoice, I put in a customer name. Please help, I need it to print on my custom invoice.
Solved! Go to Solution.

Thank you for the information, @pradervr, and congratulations on making the move from paper only to QuickBooks. I'll be sure to keep that in mind going forward. What I recommend doing from here is entering your customers, so when you select them on the invoice, it will automatically populate the "bill to" field with their information from the Customer Center. Here's how:
Entering Customers:
Because you're new to QuickBooks, I imagine you will need to enter vendors at some point. You can follow these same steps for entering vendors under the Vendor tab across the top. Also, since you mentioned adding the field to the custom invoice by going into the template, I want to give you some information on custom fields and customizing forms.
There are many ways that you can benefit from custom fields in QuickBooks, such as:
For more information on custom fields, see: Use QuickBooks Desktop custom fields. As for customizing the forms themselves, as I'm sure you noticed, there are a multitude of customization options for you to choose which will help your forms to really stand out. Here are some basics about customizing form templates:
Basic customization:
The basic customization window serves as a good starting point for customizing your templates. There are two ways to access it:
Bellow is a breakdown of the basic customization screen:
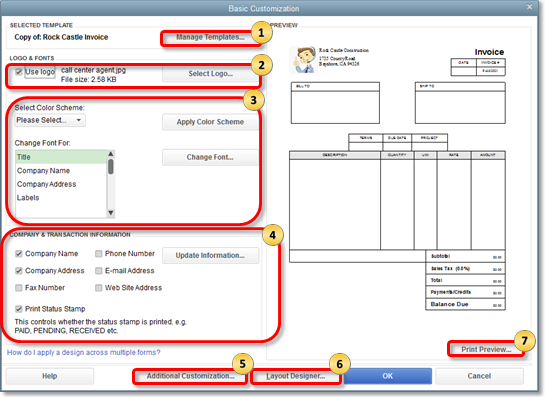
1.) Manage Templates: When you select this button, you’ll get to the screen where you can view the list of templates for a specific form. Here you can Copy, Delete or Download Templates. If you need to rename your template so you can easily distinguish and use it, you can also do that task on this window.
2.) Add your logo: Select the box Use logo if you want your company logo to appear on your invoices and other forms. If you have not previously used a logo, a window opens where you can select a logo. If you have been using a logo and want to change it, choose the Select Logo button to select the image you want to use.
3.) Change fonts and colors: This section allows you to personalize fonts and colors for certain details (Company Name, Labels, Data, etc.) used in the form.
4.) In the Company & Transaction Information area, you can select the contact information you want to appear on the invoice. You can also change any of this information by clicking Update Information. When you add information, you need to select Layout Designer to move the information where you want is displayed.
5.) Additional Customization: Select this button to get to the screen where you can remove/add information on the header, columns, and footer of the form as they appear on your screen and the printed copy. Select the Screen checkbox if you want to see the field on your computer screen while filling out the form in QuickBooks and select the Print checkbox if you want the field to appear on the printed form. Note that you can assign a unique title for each header, column or footer. You can also set printing options (Print orientation, etc…) by going to the Print tab.
6.) Layout Designer: You need to go to the Layout designer especially if you opt to add or remove header/columns from the template. The layout designer allows you to move and resize items and information on your template.
7.)Print Preview: The right side of the screen gives you a quick preview of the template and the changes you have made thus far. When you choose the Print Preview button, you’ll see how your form will look like once printed.
For more information and tips on how to customize templates, see: Use and customize form templates. And, to ensure you have everything you need for getting familiar with the Desktop version, take a look at this link here. This will take you to a resource center which outlines important topics form installing, to after you install, and if you run into issues early on.
By entering your customers into QuickBooks this way, you are ensuring that the "bill to" field will populate and print properly. Should you have additional questions about this, or anything else QuickBooks, feel free to reach back out to me. I'm always here to help.
Welcome back to the Community, @pradervr. I have a few clarifying questions to ask you before I get started. The "bill to" field you added; was it created as an additional field for the line items or a separate box entirely? This could explain why no data is printing, even though you've entered information to the field. Also, by default, there is a "bill to" box which will automatically populate from the customer's profile.
However, this could be due to data damage, or maybe a malfunction with the program itself. Either way, I've got you covered regardless of the situation. If it is related to data damage, you have a couple of tools at your disposal: The rebuild and verify data utilities. In the event you haven't had to use these before, they are automated diagnostic utilities that comb through, repair, and notify you of data damage within the file. They're simple to use, too. Here's how:
Run the Rebuild Data utility:
Run the Verify Data utility:
For your reference, here is an article that can help you further with troubleshooting potential data corruption: Resolve data damage on your company file.
After performing these steps, try printing your invoices once more. If data damage was causing the issue, it should be resolved now. If by chance your "bill to" box is still not printing with data, there may be something wrong with the program. When troubleshooting the software itself, you have a couple of options available. What I recommend to try first is running the PDF Repair tool. This is a program supplied by Intuit that, when used, can fix issues with printing. Here's where to find it and how to run it:
Download and Run the QuickBooks PDF Repair tool:
For your reference, here is an article with additional steps for troubleshooting this: Resolve Problems Printing. Also, if you're still having trouble with data not appearing when printing, you can try a clean uninstall and reinstall of the program. This process clears temporary files from your computer relating to Premier Desktop 2018, which could be causing info to not show or print properly. If you'd like to read more on this, follow this link here.
When you have the chance, please take a look at how this "bill to" field was entered into QuickBooks. If you give the steps I've recommended a try, please be sure to keep me informed of any developments that may arise. Should you have any questions about this or anything else QuickBooks, don't hesitate to seek me out here in the Community. I'll be here on standby, awaiting your response.
I added the field to the custom invoice by going into the template then clicking additional customization then making sure that the Bill To was checked for screen and print. I am new to quick books and this is the first time I have ever used it, had it for a month. Coming off of paper only---FYI. My customer data base is empty and I will be building it hopefully soon. While creating the invoice, I put the customer name into the bill too.
Thank you for the information, @pradervr, and congratulations on making the move from paper only to QuickBooks. I'll be sure to keep that in mind going forward. What I recommend doing from here is entering your customers, so when you select them on the invoice, it will automatically populate the "bill to" field with their information from the Customer Center. Here's how:
Entering Customers:
Because you're new to QuickBooks, I imagine you will need to enter vendors at some point. You can follow these same steps for entering vendors under the Vendor tab across the top. Also, since you mentioned adding the field to the custom invoice by going into the template, I want to give you some information on custom fields and customizing forms.
There are many ways that you can benefit from custom fields in QuickBooks, such as:
For more information on custom fields, see: Use QuickBooks Desktop custom fields. As for customizing the forms themselves, as I'm sure you noticed, there are a multitude of customization options for you to choose which will help your forms to really stand out. Here are some basics about customizing form templates:
Basic customization:
The basic customization window serves as a good starting point for customizing your templates. There are two ways to access it:
Bellow is a breakdown of the basic customization screen:
1.) Manage Templates: When you select this button, you’ll get to the screen where you can view the list of templates for a specific form. Here you can Copy, Delete or Download Templates. If you need to rename your template so you can easily distinguish and use it, you can also do that task on this window.
2.) Add your logo: Select the box Use logo if you want your company logo to appear on your invoices and other forms. If you have not previously used a logo, a window opens where you can select a logo. If you have been using a logo and want to change it, choose the Select Logo button to select the image you want to use.
3.) Change fonts and colors: This section allows you to personalize fonts and colors for certain details (Company Name, Labels, Data, etc.) used in the form.
4.) In the Company & Transaction Information area, you can select the contact information you want to appear on the invoice. You can also change any of this information by clicking Update Information. When you add information, you need to select Layout Designer to move the information where you want is displayed.
5.) Additional Customization: Select this button to get to the screen where you can remove/add information on the header, columns, and footer of the form as they appear on your screen and the printed copy. Select the Screen checkbox if you want to see the field on your computer screen while filling out the form in QuickBooks and select the Print checkbox if you want the field to appear on the printed form. Note that you can assign a unique title for each header, column or footer. You can also set printing options (Print orientation, etc…) by going to the Print tab.
6.) Layout Designer: You need to go to the Layout designer especially if you opt to add or remove header/columns from the template. The layout designer allows you to move and resize items and information on your template.
7.)Print Preview: The right side of the screen gives you a quick preview of the template and the changes you have made thus far. When you choose the Print Preview button, you’ll see how your form will look like once printed.
For more information and tips on how to customize templates, see: Use and customize form templates. And, to ensure you have everything you need for getting familiar with the Desktop version, take a look at this link here. This will take you to a resource center which outlines important topics form installing, to after you install, and if you run into issues early on.
By entering your customers into QuickBooks this way, you are ensuring that the "bill to" field will populate and print properly. Should you have additional questions about this, or anything else QuickBooks, feel free to reach back out to me. I'm always here to help.
"My customer data base is empty and I will be building it hopefully soon. While creating the invoice, I put the customer name into the bill too."
Edit Customer, and fill in the Address Block here, because the Bill To is basically like a Mailing Label:
Name
Address
City ST zip
Up to 5 lines allowed:
Customer Name
Company info
Mailing address line 1
Mailing line 2
City ST zip
When you make an invoice, top Left, choosing the name, the Database accesses this info for you, bringing it to the screen.
Customer name and address are not showing on Progress Invoice, I have already checked that they need to be screen and print and entered correctly , still not showing up. Please Help!
Hi there, @AAP2.
I'm here to help you check why does the customer's name and address are not showing on your progress invoice.
First, please ensure to select a customer when creating transactions in QuickBooks Desktop (QBDT). If the address wasn't showing on the progress invoice, please also ensure to set up an address on your customer's information.
However, if everything was set up correctly, you may need to resort your lists. Your lists may become damaged and the damaged can often be repaired by re-sorting which puts a list back to its default order.
For additional reference, you may check this article: Re-sort lists.
On the other hand, if the issue persists, I recommend getting in touch with our Support Team to check and investigate this further securely. For the support's contact information, you may check it here: Contact the QuickBooks Desktop Customer Support Team.
I'd be always here to help you if you have any other questions about invoices, just add a comment below. Have a great day ahead!
I just purchased QB desktop for MAC 2020. I have spent the last 3 hours trying to have my customer's name appear in the bill to and ship to fields of my custom invoice template. ??? Why is this so difficult
I understand this wasn't an easy process for you, @Drabkin.
Thanks for choosing QuickBooks Desktop for Mac as your accounting software and business partner. To make it up to you here, I'll be providing some insights about the custom invoice template.
Currently, there's no option to auto-populate the customer's name in the Bill To and Ship To fields when creating an invoice template. However, we can manually edit them and then add the customer name. Here's how:

You can also batch print or email your invoices to make your task easy and efficient. I'll guide you with the steps:

Feel free to explore Chapter 5 of this user guide for more tips on how to manage your invoices: QuickBooks for Mac User Guide.
I'm always around to help if you have more questions about managing your invoices or anything else related to QuickBooks. Take care and stay healthy.
When I try to bill one of my customers, Bill o is all that shows up in the bill to box. Not my customers name and address. I changed my invoice template so I don't know what I have done wrong.
Thanks, Kori
You've done nothing wrong, Kori3.
Great job for changing the invoice template. It's one of the troubleshooting steps to resolve issues on your company file.
You can also run a data checkup by performing the verify and rebuild data utility. It will help fix data corruption. Once done, make sure to restart QuickBooks for changes to take effect.
If the same issue persists, I recommend contacting our QuickBooks Desktop Team. They can create a case about this behavior and forward it to our Product Team for further investigation.
Let me know how the step above went through by leaving a comment below. Just tag my name, and I'll get back to you.


You have clicked a link to a site outside of the QuickBooks or ProFile Communities. By clicking "Continue", you will leave the community and be taken to that site instead.
For more information visit our Security Center or to report suspicious websites you can contact us here