QuickBooks HelpQuickBooksHelpIntuit

Get Paid in QuickBooks Money

by Intuit4 Updated 3 days ago

Learn how to use QuickBooks Money to get paid faster.

With QuickBooks Money you can request a payment from another person or business using Invoices, Quick requests (mobile only) or Payment links (web only). When you  have Payments enabled in QuickBooks Money, you’ll access these features through the Get Paid tab.

Use QuickBooks Money mobile to get paid
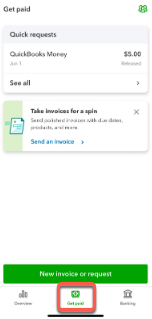
Get paid tab in QuickBooks Money via web browser.

  1. Sign in to the QuickBooks Money mobile app.
  2. Select Invoice on the home screen.
    • You can also select Get Paid on the home screen, then New Invoice or Request, and then Invoice.
  3. Select a Customer.
    • If the customer isn’t listed, you’ll need to create a new customer. 
    • The customer must have an email address for the app to deliver the payment request.
  4. Selectthe product or service needed, or select Add new product or service to add a new one.
  5. Confirm the details and the payment methods you would like to use
  6. Select Email.
  1. Sign in to QuickBooks Money web site.
    1. You can also select Get Paid on the home screen, then New invoice or request, and then Quick request.
  2. Enter the amount you would like to request from your customer.
  3. Select Next.
  4. Select a Customer.
    1. If your customer isn’t listed, you’ll need to create a new customer.
    2. Your customer must have an email address, as this is the only way the app can deliver a Quick request
  5. Confirm the details
  6. Enter in the product or service sold
  7. Select Send
    1. This will trigger an email to be sent to the customer. The email will include options for payment (Credit Card, Debit, ACH, Apple Pay, PayPal/Venmo).
    2. After the email is sent you’ll also see the options to share the request through text and other messaging platforms on your mobile device. You can also show a QB Code to collect a payment in person.

Once the payment is made by your customer, you will will get a notification that the request was paid.

Note: From the time that the request is marked as Paid to when it is available in the account will vary from 1-5 days depending on how the payment was made.

Use QuickBooks Money web to get paid

image
  1. Select Get paid.
  2. Select Create invoice.
    1. If this is your first time creating an invoice, don’t forget to customize your invoice.
  3. Add customer by selecting from the drop down or Add new.
  4. Verify the payment terms, Invoice date, and Due date.
  5. Edit the Product or service.
  6. Select Review and send if you are ready to send to your customer or Save to send later.

One-time links work once and automatically expire after your customer pays through the link. These are great for getting paid for a single product or service from a single customer within a few days. To give your customers more time to pay, an invoice may be a better option.

  1. Select Get paid then Payment links
  2. Select Create a link, then One-time payment link, and then Next.
  3. Enter the payment amount.
  4. Add text about the product or service you’re collecting payment for.
  5. Enter or select the Customer name.
  6. Enter the customer email address.
  7. Click Send payment link.
    • An email is sent to your customer with the payment link. You can also copy the link to share via text or messaging.
    • You’ll also see the option to view a QR Code that will allow customers to scan and pay with their smartphone or tablet.

Multi-use links allow multiple customers to pay for the same product or service and can be used multiple times. These are best used for groups of customers who pay for the same thing or a customer who pays the same amount regularly.

  1. Select Get paid, then Payment links
  2. Select Multi-use payment link, then Next.
  3. Enter the payment amount.
  4. Add text about the product or service you’re collecting payment for.
    • If you’ll  deliver the product after you collect payment, select the I am selling a product and delivering it after I get paid box then select the estimated date of delivery.
  5. Select Create link.
  6. Copy the link to share on through text, email, or social media platforms
    • You’ll also see the option to view a QR Code that will allow customers to scan and pay with their smartphone or tablet.
QuickBooks Money

Sign in now for personalized help

See articles customized for your product and join our large community of QuickBooks users.

More like this