Turn on suggestions
Auto-suggest helps you quickly narrow down your search results by suggesting possible matches as you type.
Showing results for
Solved! Go to Solution.
Hey there, tom98.
In order to begin a chat session you'll need to launch the in-product help feature.
Here's how:
1. Click the Help icon on the top right
2. Choose Contact Us in the new window.
3. Type your reason for contact in the text window.
4. Hit Speak with an agent now
Once you complete these steps you'll connect to a live agent in a chat session who will further be able to assist you.
If you have any other questions, feel free to post them here.
I need help completing my PPP loan application. I received a phone call asking for additional information.
Hi dpdblue.The SBA updated the PPP requirements, and we need more info to process and submit your app. We’re adding these requirements to the app process and will email you as soon as it’s available. You can also check your account for updates. Let me know if you need anything else.
just installed QB 2020 but it will not except my product numbers
Thanks for joining us here, @njbervid.
I'm here to help locate the correct product number for your QuickBooks 2020 version.
On the other hand, you can also visit the Customer Account Management Portal Site (CAMPS) to view your license and product information. Here's how:
Note: If you can’t find QuickBooks Desktop, select Find by email. Your Desktop app or service may be registered with a different email address.
Once logged in, locate your app or subscription in the Products & Services list, then select Details. You can browse this article for more information: Manage your QuickBooks Desktop products and subscriptions in CAMPS.
Also, feel free to contact our Customer Care Team if you need additional help. I'll guide you how.
To ensure that they'll assist you on time, check out our support hours.
QuickBooks 2020 version has new features that can benefit your business, refer to this article to learn more: What’s new in QuickBooks Desktop 2020.
I'll be here always if you need further assistance. Don't hesitate to comment again on this thread.
case # [removed] has anything been resolved?
Hey there, @Expressjkr.
Thanks for reaching out to the Community.
To know if more information about a case, you'll need to contact support as they have the tools to pull your account and check more into the activity of it. I've included the steps below to contact our support team.
Please let me know if you have further questions or concerns. You can always reach out to us here in the Community anytime you need a helping hand. Take care and have a great weekend!
**Say "Thanks" by clicking the thumb icon in a post
**Mark the post that answers your question by clicking on "Accept as solution"
there is no help icon in the top right. What to do?
Thank you for joining this thread @Tommmy.
If you are encountering software issues, there are a few basic troubleshooting steps you can perform. I'd be glad to help get this sorted out. At the moment, you can press F1 to get to the QuickBooks Desktop Help.
First, you'll need to ensure that your QuickBooks is updated. I'd recommend doing the manual updates.
Here's how:

Then if you can't see the Help menu, you'll need to run the Repair tool. Please refer to this article for more details: Repair your QuickBooks Desktop.
If you need some references in the future, you can also check out our site: Help articles for QuickBooks Desktop.
Please let me know if you need further assistance. I'm always around to help. Have a great day.
i exported twice. how to delete?
Welcome to the QuickBooks Community, @deb52.
I'm glad to share with you the steps to delete the exported file. Here's how:
Also, if in case you want to import kit, sample files, and headers in QuickBooks Desktop, you can refer to this link: IIF Overview. This article will provide you step by step process to transfer data to and from different platforms by using IIF files.
Keep in touch with me if you have additional concern. I'll appreciate the opportunity to help. Stay safe and take care always.
i do not have internet explorer. i have a mac and use firefox as a browser. please advise.
Hello there, deb52,
If you've exported your QuickBooks data twice to QuickBooks Online twice, the new export will overwrite the previous one.
If you've saved the the file on your desktop, you can search on your download folders to delete the duplicate. Here's how:
Let me know if there's anything else I can be of help.
I have been charged $20 per month by intuit for the past 3 months. I have not used intuit for at least three years. I've placed a stop order with my bank.
Please respond. Case #[removed]
Roger Williams Nature Photography
I don't see a help icon
I'm being charged $20 for the past three months and I have no idea why. I haven't used intuit for at least three years. I've placed a stop order on your debit.
We're unable to check the charges on your account, 4306.
I recommend contacting our support. They'll be able to check your account and help you with turning off the auto-renewal.
You can reach us here, https://help.quickbooks.intuit.com/en_US/contact.
I'll be right here if you need further assistance.
I have a case number but no way to track the original charge
Welcome to Community @Sue Vicory,
Let me help you with your charges in your account. If the description of the charge is coming from Intuit, I recommend our QuickBooks Support to assist you as the public forum. We cannot verify your charges or post here in the Community since it consists of the personal details about your account. You can follow these steps on how to contact our QuickBooks Support in QuickBooks Online. Here's how:
Note: Due to COVID-19, we have limited staffing and have reduced our support hours to 6 AM-6 PM PT Monday-Friday.
In case you'll need help with managing your subscription, you can refer to this link for more detailed information: QuickBooks Online Help Article.
If you have additional questions about QuickBooks Online, feel free to leave a message in the comment section. I'll be happier to help. Take care and have a wonderful day!
Daphne Kate
I'm still working on trying to set up direct deposit for employees. We solved the first issue. Once I entered info, the next screen tells me that "Error 30200 - we're having a problem verifying your account status"
And I am so frustrated that there is no way to get to the chat option on your web page.
Daphne Kate
There is no help button on top right of this message page.
Hi there, @Thissucks2345.
Unexpected issues in QuickBooks Online (QBO) are sometimes affected by the large data in the cache. Browser troubleshooting often fixes it. Please follow the steps below.

Also, to keep you updated about the latest features and enhancements of the software, you can visit our QuickBooks Blog. From here you can also read through articles under Accountant advice, QuickBooks Resource Center, etc.
Please keep me posted on your results with this here, the Community has you covered. Thanks again, I'll be standing by for your response.
Since purchasing our new version of QB, we're having issues reconciling accounts. Is anyone available to assist us with this? Thank you.
Hey there, stephenrobbins1.
I'm happy to provide the steps below on how to reconcile an account. If you need more individualized assistance and want more of a step-by-step guide on the process I would recommend reaching out to our support team, otherwise, here are the steps.
Note: If you have QuickBooks Online follow these steps for reconciling your account, If you have QuickBooks Desktop follow along below.
Learn how to reconcile your accounts so they match your bank and credit card statements.
Just like balancing your checkbook, you need to review your accounts in QuickBooks to make sure they match your real-life bank and credit card statements. This process is called reconciling.
We recommend you reconciling your checking, savings, and credit card accounts every month. Once you get your bank statements, compare the list of transactions with what you entered into QuickBooks. If everything matches, you know your accounts are balanced and accurate.
Step 1: Review your opening balance:
If you haven't already, back up your company file.
If you’re reconciling an account for the first time, review the opening balance. The opening balance needs to match the balance of your real-life bank account for whatever day you choose to start tracking the account in QuickBooks.
Opening Balances:
When you create a new account in QuickBooks, you pick a day to start tracking transactions. You enter the balance of your real-life bank account for whatever day you choose. This starting point is the opening balance. We recommend setting the opening balance at the beginning of a bank statement. This makes your first reconciliation much easier.
Step 2: Prepare for the reconciliation:
Make sure you enter all transactions for the bank statement period you plan to reconcile. If there are transactions that haven't cleared your bank yet and aren't on your statement, wait to enter them.
Step 3: Start your reconciliation:
Once you get your bank statement, you can start reconciling.
If you're reconciling multiple months, start with your oldest bank statement. Reconcile each month separately, one statement at a time.
Important: If you're reconciling a Merchant or Payments account and QuickBooks Desktop sees that you aren't signed in, you'll see a sign-in window. This ensures your account is successfully linked to a valid company ID.
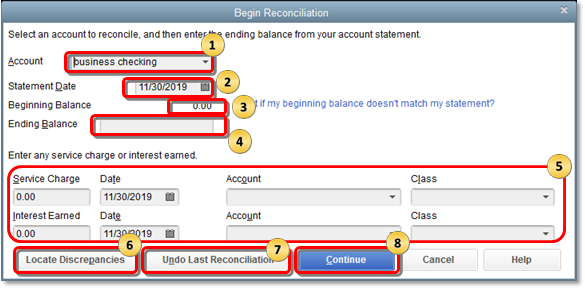
If your beginning balance doesn't match your statement, don't worry. You have a few tools that can help you.
Note: When you undo a previous reconciliation, your beginning balance reverts back to the beginning balance of the reconciliation before it. All cleared transactions on the reconciliation become uncleared.
Step 4: Compare your bank statement and QuickBooks:
To reconcile, simply compare the list of transactions on your bank statement with what's in QuickBooks.
The tricky part is making sure you have the right dates and transactions. When you're done reviewing your statement, you'll know everything made it into QuickBooks.
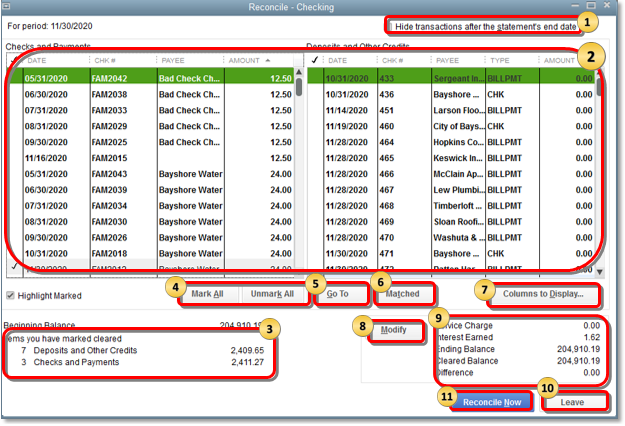
Here are a few things to make reconciling easier.
Tip: By default, the transactions are listed by to date. If there are more transactions in QuickBooks than there are on your bank statement, resort the list. This makes it easier to find transactions with a specific amount, reference #, etc.
If balances don't match at the end
If the difference isn't $0.00, don't worry. QuickBooks gives you several ways to fix any issues.
For bank accounts, QuickBooks opens the Reconcile Adjustment window. You have a few options:
The journal entry goes into a special expense account called Reconciliation Discrepancies. If you need to review the adjustment later on:
You'll see all of your adjustments on the list. Then review a Previous Reconciliation report for the reconciliation you adjusted. This will show you cleared transactions and any changes made after the transaction that may not show in your discrepancies.
If you made an adjustment, you'll see a General Journal Entry at the top of the report in the Cleared Transactions section.
For other types of accounts, QuickBooks opens the Make Payment window. This lets you write a check or enter a bill to pay to cover the outstanding balance. If you don't want to record payment, select Cancel.
If you run into issues or discrepancies, meaning transactions in QuickBooks don't match your bank statement, don't worry. Here's how to fix mismatches and other reconciliation issues:
Next Steps: Review the reconciliation
After you reconcile, you can select Display to view the Reconciliation report or Print to print it. Your work is done.
If you need to review a reconciliation report later on:
If you have any other questions, feel free to post down below. Thank you for your time and have a nice afternoon.


You have clicked a link to a site outside of the QuickBooks or ProFile Communities. By clicking "Continue", you will leave the community and be taken to that site instead.
For more information visit our Security Center or to report suspicious websites you can contact us here