Set up access between QuickBooks Desktop and connected Intuit services
by Intuit•5• Updated 3 years ago
Learn how to ask for access to the Intuit account linked to your QuickBooks company file.
What's the Intuit account and why do I need it?
Using an Intuit account is different from using your QuickBooks company file user ID. Your QuickBooks company file user ID gives you access to basic features like creating an invoice or paying a bill. But, when you use an Intuit account, you can take advantage of additional Intuit services that your business may be connected to, such as QuickBooks Payments, Payroll direct deposit, Payroll Workforce, QuickBooks Time, and Receipt Management.
To use the connected services of your company file, your Intuit account primary admin must approve the request. Once your primary admin accepts your request, you'll be able to use all the connected services using your Intuit account.
We understand that some businesses share their QuickBooks Desktop admin credentials with people working in the same organization. We don’t recommend this practice. Instead, we've introduced a better way to ask for access to the Intuit account linked to your QuickBooks company file from your Intuit account primary admin.
Understand the differences between Intuit account roles and QuickBooks roles
QuickBooks company file roles
- QuickBooks company file admin — user of the company file who signs in with admin credentials and owns or manages this company file.
- QuickBooks company file user ID — used to access the QuickBooks company file.
Intuit account roles
- Intuit account primary admin — user of the company who also has an Intuit account for the company file. A primary admin can add or remove users, edit user roles, and assign secondary admin roles to users.
- Intuit Account user ID — used to access the connected Intuit services like QuickBooks Payments, Payroll, direct deposit, Payroll Workforce, QuickBooks Time, Receipt Management, and more.
Step 1: Send a request to your primary admin for access to the Intuit account
- Sign in to your QuickBooks company file using QuickBooks Desktop user ID.
Note: Currently, requests for access to the Intuit account linked to your QuickBooks company file are available for users logging in as the QuickBooks company file admin. - You’re asked to sign in to the Intuit account. The Intuit account admin user ID field is prefilled.
Replace the prefilled user ID with your own user ID (usually your email) and sign in to the Intuit account of the company file. If you don’t have an Intuit account, we’ll help you create one.
If you're already a part of the Intuit account and your Intuit account login session is active, then you can start using the connected services.
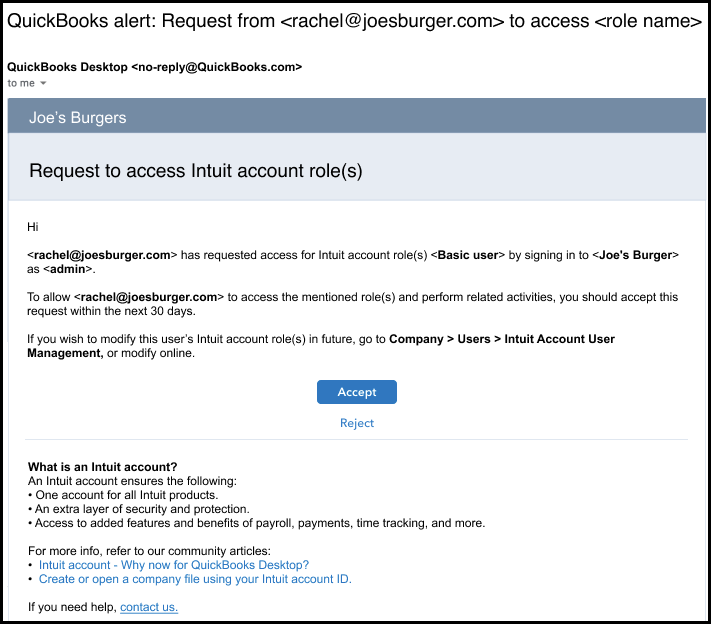
If your user ID isn't part of the Intuit account of the company file, a request for access email is sent to the Intuit account primary admin. This also happens if you try to access My Company or any of the Intuit services like QuickBooks Desktop Payroll Direct Deposit or QuickBooks Time.
Once the email is sent, you’ll get a screen confirming your request. When your primary admin approves, you’ll get an email confirmation and you can sign in to your Intuit account with your user ID. Logged in as QuickBooks company file admin, you can stay signed in to the Intuit account only for a single session, but not more than 24 hours.
To gain Intuit account access for 180 days, sign in with your non-admin QuickBooks company file user ID to send a request to your primary admin for access to the Intuit account. - Select OK to acknowledge the message.
You'll also get an acknowledgement email making sure that a request for access is sent to the primary admin for approval.
Step 2: Your primary admin accepts your request
- Your primary admin has 30 days to accept your request for access. The primary admin can accept or reject the request from the email.

- When the primary admin selects Accept, a browser window opens and QuickBooks prompts them to sign in to the Intuit Account.
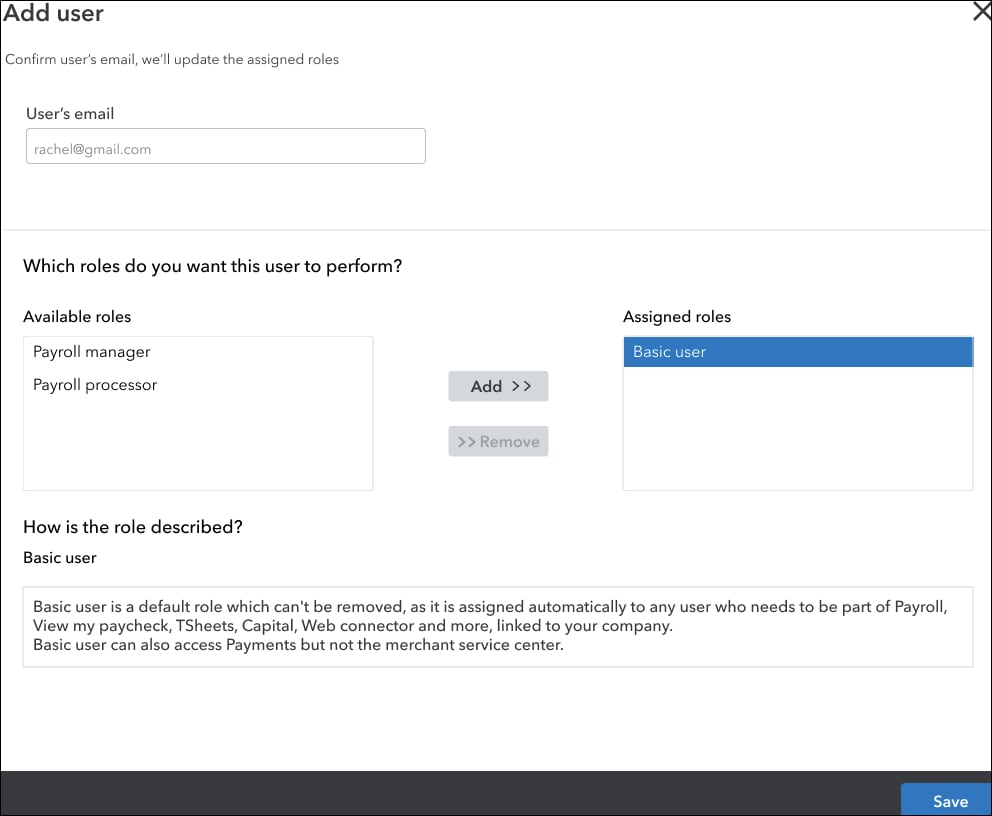
- After signing in, the primary admin sees the Intuit Account User Management dashboard, prefilled with your email and current role. Your primary admin can change your role or give you additional ones. Once they're done, the primary admin selects Save to add you to the Intuit account.

You're now successfully added to the Intuit account for the company. You can start using the Intuit services connected to the QuickBooks Desktop company file right away.
Note: If the primary admin doesn't respond to your request within 30 days, it will expire. You'll need to start a new request by repeating the steps above.
For additional info, watch this video created by an Intuit affiliate and certified expert.
More like this
- Intuit Field Service Management setup and supportby QuickBooks
- How to access QuickBooks Desktop files with One Intuit Accountby QuickBooks
- Get started with the new Shipping Manager in QuickBooks Desktopby QuickBooks
- Set up Intuit Data Protectby QuickBooks
- Set up enhanced security in Gmail for QuickBooks Desktopby QuickBooks