QuickBooks HelpQuickBooksHelpIntuit

Switch from Bill Pay powered by Melio to QuickBooks Bill Pay

by Intuit Updated 3 weeks ago

Learn more about what you need to do to prepare for the switch from Bill Pay powered by Melio to QuickBooks Bill Pay for QuickBooks Online and QuickBooks Online Accountant. This is also known as Melio Green by users. 

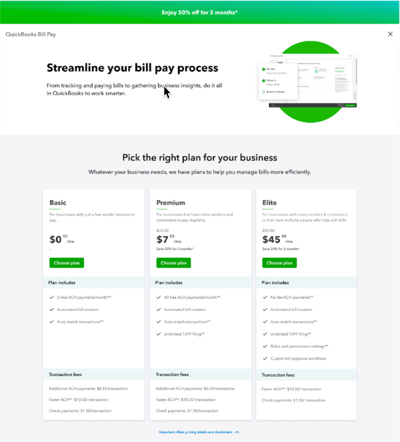
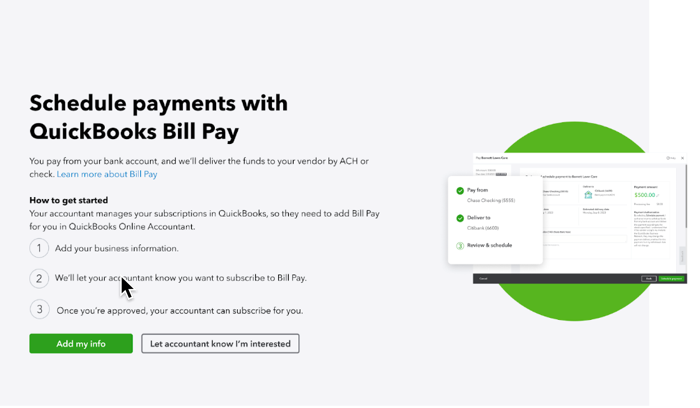
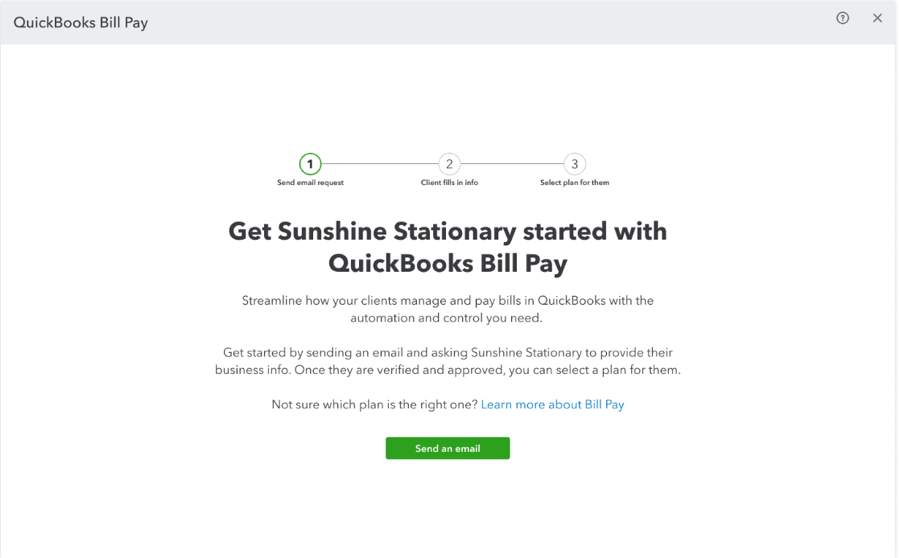
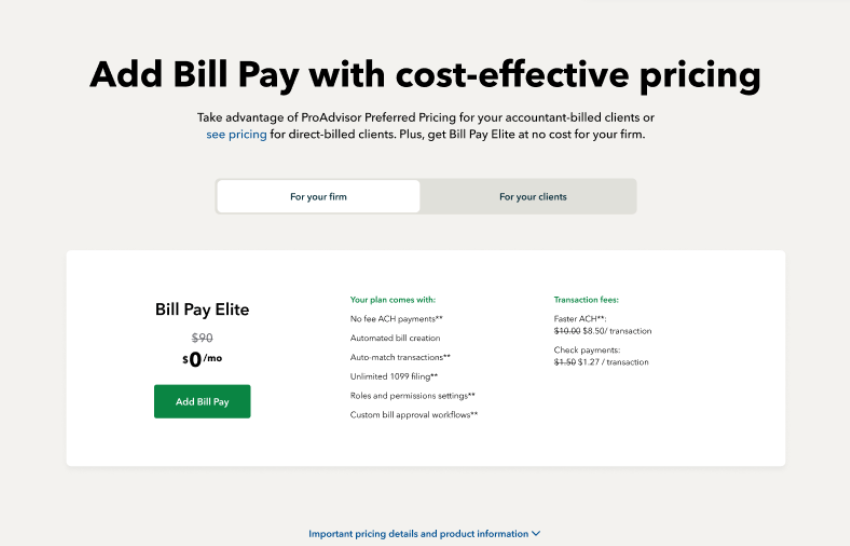
The Bill Pay powered by Melio integration will be discontinued on May 20, 2024, businesses previously using Bill Pay powered by Melio will be able to apply for one of three QuickBooks Bill Pay plans: Basic, Premium or Elite in QuickBooks Online. Accountants who have accountant-billed clients or who want to use Bill Pay  for their own firm in QuickBooks Online Accountant, click here to see available plans and pricing. 

Just choose a subscription plan that's right for your or your client’s business.  You can choose from a Bill Pay Basic plan with no additional subscription fee and up to 5 free* ACH transactions per month or get more features with Bill Pay paid plans.**

Note: The number of additional users who can use Bill Pay is based on your QuickBooks Online plan. Advanced users have up to 25 users, Plus users can have up to 5 users and Essentials have 3. Simple Start only has one user.

Select a section below to address any questions you may have. 

You can continue to use Bill Pay powered by Melio to schedule payments until May 20, 2024. 

On May 21, 2024, the Schedule payment option in QuickBooks Online and QuickBooks Online Accountant, won’t open Bill Pay powered by Melio. Instead, you’ll be asked to apply for QuickBooks Bill Pay.

Any bill payments scheduled to go out between May 21, 2024 and June 18, 2024 will still be paid on time. Any payments scheduled to go out after June 18, 2024, including recurring payments, will be canceled by Melio. 

Here’s how you can view or cancel future or recurring payments.

To view scheduled and recurring payments:

  1. Go to Expenses and select Bills
  2. Go to Paid and select a bill that was paid.
  3. Select Show Payments and you’ll  see the Paid by Melio note on it.
  4. Select View Details and then  View Online Payment. This opens up a page that will show you all your payments made through Melio.
  5. Go to Scheduled to  see all your previously scheduled or recurring payments that you should cancel. This tab will be empty if you have no open scheduled or recurring payments.
  6. You can see the STATUS to identify SCHEDULED or RECURRING payments

To cancel scheduled payments

  1. Select the scheduled payment you want to cancel. Select View payment and then Cancel payment 
  2. Select Yes to confirm.
  3. That's it. You’ll get an email confirming the payment has been canceled.

To cancel recurring payments

  1. Select the recurring payment you want to cancel.Select View payment and then  Cancel payment 
  2. Select Cancel all payments. Make sure that you’re canceling all remaining payments and not just one instance. 
  3. Select Cancel recurring payments.
  4. You’ll get an email confirming the recurring payment has been canceled.

As part of this discontinuation of Bill Pay powered by Melio, we have migrated over your vendor information including wallet as well as your payment history into QuickBooks.

Your vendor info in Bill Pay powered by Melio (such as their business name, address, and payment info), will automatically move to QuickBooks for you. You don’t need to enter this info again. 

View and edit Vendor Details:

  1. Select Vendors, and then a vendor.
  2. Select Vendor Details to see all contact info like email, phone number, and address. 
  3. Select Edit to see vendor info and ACH payment details (such as, the last 4 digits of the account number and routing number) and to edit Vendor Details.

Note: Any existing vendor details in QuickBooks Online won't be changed or modified during this transition.

Your vendor’s wallet information has been added to the vendor card along with your other vendor information.

Information about past bills you’ve paid with Melio are synced and available in QuickBooks and QuickBooks Online Accountants. You can view past payment info for a bill paid via Melio by going to the Bills page select Paid Bills and then select the bill you want to view. When you click on view more details you can view the details, if you have additional questions you can reach Melio at ​​paymenthistory@qbousers.meliopayments.com, please provide Melio support with the same email address you use for your Quickbooks Online account.

You can sign up for QuickBooks Bill Pay starting May 21, 2024 in QuickBooks Online or QuickBooks Online Accountant. Select the option that fits your business.

Note: The number of additional users who can use Bill Pay is based on your QuickBooks Online plan. Advanced users have up to 25 users, Plus users can have up to 5 users and Essentials have 3. Simple Start only has one user.

Beginning on May 21st, you can sign up for Bill Pay with this link or with these steps: 

Note: You’ll need to sign in to your QuickBooks Online account to view the page. 

  1. Create a new bill or select an existing unpaid bill.
  2. Select Schedule Payment or Save and Schedule Payment depending on what type of bill you’re reviewing:
    1. If you create a new bill, select Save and Schedule Payment.
    2. For an unpaid bill, schedule directly from Expenses (Take me there), Vendors (Take me there), or Bills (Take me there).
  3. This will take you to the detailed pricing page with the 3 Bill Pay Plans. Click on choose a plan to begin the application process.

A screen shot of a woman's hand writing on a screen.

Alternatively you can click on this link and sign into your QuickBooks Online subscription to link directly to the pricing page and start the application process.

You can ask your accountant to help sign your company up for QuickBooks Bill Pay within QuickBooks Online Accountant.

You’ll receive an email with the subject: Help your accountant set up QuickBooks Bill Pay, with steps to complete a short application process. You may be asked for info such as: business name, business email, bank account information, SSN or EIN, and you may have to connect your bank account.

  1. Create a new bill or select an existing unpaid bill.
  2. Select Schedule Payment or Save and Schedule Payment depending on what type of bill you’re reviewing:
    1. If you create a new bill, select Save and Schedule Payment.
    2. For an unpaid bill, schedule directly from Expenses (Take me there), Vendors (Take me there), or Bills (Take me there).
  3. This will take you to an informational page where you can send an email to your accountants and start the application process.

A person is showing a bill on a phone.

Alternatively you can click on this link and sign into your QuickBooks Online subscription to view next steps and send your accountant an email.

Accountants can add QuickBooks Bill Pay to an existing QuickBooks Online Accountant subscription from the Subscriptions and Billing page from May 21, 2024.

  1. Go to settings Settings gear icon..
  2. Select Subscriptions and Billing and then Accountant-Billed Subscriptions.
  3. For your client, select Client Actions then Add Bill Pay.
    A sign that is advertising a book for a small fee.
  4. Select Send an email to send your client a short onboarding form to fill out with their business info in their QuickBooks Online account. 
  1. Your clients will receive an email with the subject: Help your accountant set up QuickBooks Bill Pay asking them to Add Info
    1. They’ll sign in to their QuickBooks Online account and begin the QuickBooks Bill Pay application by adding business info such as business name, business type, EIN, owner's personal info, and a bank account (where to pull funds from to pay bills).
    2. Once the application is approved, you will automatically receive an email and can complete your client’s subscription in QuickBooks Online Accountant by selecting a plan, confirming it, and reviewing the billing info. Then selecting subscribe.

To view the full step to step process – review this help article.

You can sign up for QuickBooks Bill Pay in QuickBooks Online Accountants starting May 21, 2024.

Accountants who have an active QuickBooks Online Accountant subscription and at least one QuickBooks Online customer attached may qualify for a QuickBooks Bill Pay Elite subSG DF1X`ZΩscription to use to manage your own firm’s Account Payable.  For more information click here.

  1. Create a new bill or select an existing unpaid bill.
  2. Select Schedule Payment or Save and Schedule Payment depending on what type of bill you’re reviewing:
    1. If you create a new bill, select Save and Schedule Payment.
    2. For an unpaid bill, schedule directly from Expenses (Take me there), Vendors (Take me there), or Bills (Take me there).
  3. This will open up an informational page with Bill Pay Elite for Firm members. From there scroll down to the pricing chart and click on Add Bill Pay to begin the application process.
    Afeebleware is posted on a utility box for afee.

Note: Individual information should be provided for the primary owner of the applicant business. You must complete the application for your own business. Accountants using QuickBooks Bill Pay for their own firm may complete the application for their firm if they are the primary owner of the firm. 

  • Industry
  • Legal Business name
  • Business address
  • Business phone
  • Business email
  • Business type
  • Business website [optional]
  • Primary Principal Owner’s SSN last 4 or Business EIN
  • Primary Principal Owner’s First name
  • Primary Principal Owner’s Last name 
  • Primary Principal Owner’s Date of birth 
  • Primary Principal Owner’s Phone number
  • Primary Principal Owner’s Personal address
  • Bank account information

Not all users are eligible for QuickBooks Bill Pay. 

Note: QuickBooks Bill Pay may not be available for all businesses due to multiple reasons. Accounts are subject to eligibility criteria, credit, and application approval.

If you are a QuickBooks Online customer on a trial period, then you will not be able to sign up for QuickBooks Bill Pay until your trial is completed. 

We’re committed to keeping QuickBooks open for integrations. You can continue to sync apps, including bill pay apps like Melio, via the QuickBooks App Marketplace.


Disclaimers:

*Product Information:

QuickBooks Bill Pay: QuickBooks Bill Pay product features and availability subject to change. QuickBooks Bill Pay account subject to eligibility criteria, credit, and application approval. Subscription to QuickBooks Online or QuickBooks Online Accountant required.

Money movement services are provided by Intuit Payments Inc., licensed as a Money Transmitter by the New York State Department of Financial Services. For more information about Intuit Payments’ money transmission licenses, please visit https://www.intuit.com/legal/licenses/payment-licenses/.

Bill Pay services powered by Melio with funds held by Evolve Bank & Trust or J.P. Morgan (members of the FDIC and the Federal Reserve). Melio is a registered trademark of Melio LTD Corporation.

**Features:

Standard ACH:  Transaction fees apply for ACH payments over the monthly allotted amount included in QuickBooks Bill Pay Basic and Premium plans. Limits may apply on total number and amount of payments.

QuickBooks Bill Pay BasicQuickBooks Bill Pay EliteQuickBooks Bill Pay PremiumQuickBooks MoneyQuickBooks Online AccountantQuickBooks Online AdvancedQuickBooks Online EssentialsQuickBooks Online PlusQuickBooks Online Simple StartQuickBooks Payments

Sign in now for personalized help

See articles customized for your product and join our large community of QuickBooks users.

More like this