Space for pervasive banner when authenticated

Set up and track your inventory in QuickBooks Online


QuickBooks Online includes features to help you to track what's on hand, get alerts when it’s time to restock, and see insights on what you buy and sell. You can also enter non-inventory products and services so you can quickly add them to your sales forms.
Inventory features are available for QuickBooks Online Plus and Advanced. If you use QuickBooks Online Simple Start or Essentials and would like to start using inventory tracking, you can buy the inventory add-on or upgrade your QuickBooks subscription.
This video will go over how to order and account for new inventory using a purchase order, what to do when you receive your new inventory, and how to make adjustments to your inventory if QuickBooks thinks you have more or less than you really do.
Stay on top of your inventory needs: track products cost of goods and get notifications when inventory is low. Get the tools you need to drive your business forward with QuickBooks Advanced.
Video transcript
[0:00] If you are using QuickBooks to manage your inventory, then you can order new inventory whenever you are running low. Let's go over how to order and account for new inventory using a purchase order. Then we'll go over what to do when you receive your new inventory. Finally, you'll see how to make adjustments to your inventory if QuickBooks thinks you have more or less than you really do.
[0:24] If you haven't already created inventory products in QuickBooks, you'll need to do that first, and this video here can show you how. To start, navigate to All Apps, and then Inventory in the Inventory menu. You can also find this inventory under the Products and Services menu from the Sales and Get Paid tab. Here you can see which products are low or out of stock.
[0:47] If you see a product you need to reorder, select the arrow next to Edit and Reorder to open a purchase order. If you want to include multiple items on the same purchase order, you can select them all, then under Batch Actions, select Reorder. If you don't have purchase orders turned on, you'll need to do so before continuing. You can do this in the Expenses section in the Account Settings.
[1:10] Select the vendor you want to order from. If you set up a preferred vendor for your product, you'll see one selected already, but you can change it if you need to. The shipping address is your address. But if you do drop shipping and you want your order delivered directly to a customer's address, you can select the customer under Ship To.
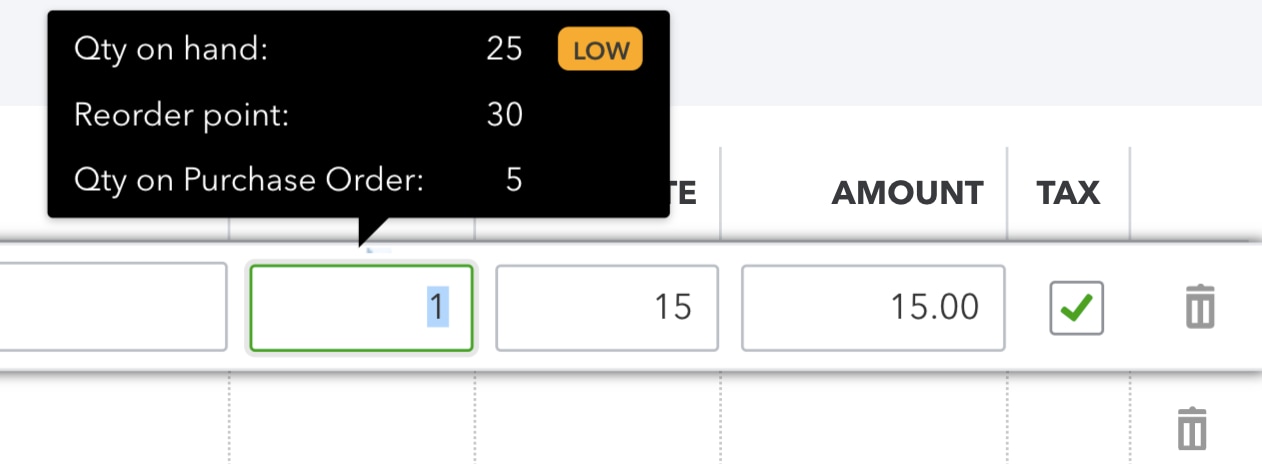
[1:32] Fill in Ship Via if there's a specific carrier that you want your vendor to use. Under Item Details, enter all the items you want to order. Enter in the quantity you want to order. Notice that if you hover over this, QuickBooks will show you how much you have on hand and your reorder point. You can adjust the rates and amounts for individual products as needed.
[1:55] You can also add more products to the PO. Just select them from the dropdown menu or add them if you don't see them. You can also add a message to your vendor or add an attachment. Once you're finished, you can save and send to your vendor or select another save option and send it later. Here is the customizable email that QuickBooks will send to your vendor along with the purchase order.
[2:20] If everything looks good, select Send and Close. If you go to the Vendors section under Expenses and Bills, you can see your new purchase order listed here. Once you send it off, your vendor can start processing your order. A purchase order itself does not change your inventory levels. It's just an order with your vendor.
[2:41] When you actually receive your inventory from your vendor, you'll need to record how you paid for it. You can enter it as bill or check depending on how you are paying for the inventory. This is what actually adjusts your inventory quantity and handles all the accounting.
[2:58] If you've received and paid for the inventory already, then you enter a check if you paid by check, or an expense if you paid by any other method. If you haven't paid yet and your vendor has given you a bill with a due date, then enter a bill. These methods are all very similar.
[3:15] For this example, we'll enter a bill, but there are videos with more details on how to record bills, checks, and expenses at the end of this video. Select your vendor. Since you have an open purchase order with them, you'll see it over here. Select Add to add the details of the purchase order to your bill, check, or expense.
[3:36] If the amount of inventory you received or the price you paid for it is different from what was on the purchase order, you can change it here. Once you are finished, select a Save option. Now, if you go back to Product and Services, you'll see that QuickBooks updated the inventory quantity based on your purchase order and the following bill. One final note about managing inventory.
[4:00] If the amount of inventory you actually have on hand is not the same as what's in QuickBooks, you can make an adjustment. Select the arrow next to the product and Adjust quantity. You'll see the product here and the amount QuickBooks thinks you have on hand here. Enter in the number you actually have here, then choose an Inventory adjustment account.
[4:23] This tells QuickBooks where the value of the missing inventory should go. The default is Inventory Shrinkage, but you can create a more descriptive cost of goods sold or expense account for things like theft, spoilage, or charitable contributions if you prefer. This will affect your financial statements, so you should consult your account before doing this.
[4:44] Once you are finished, select Save, and you'll see that QuickBooks has adjusted your inventory. Now you're ready to start managing your inventory with QuickBooks.
Prerequisites
Inventory features are available only for QuickBooks Online Plus and Advanced.
If you don’t have Plus or Advanced, upgrade your QuickBooks plan to start tracking your inventory.
Step 1: Turn on inventory tracking
If you haven’t yet, turn on these settings so you can add your inventory.
Go to Settings
 and select Account and settings.
Select the Sales tab.
Select Edit ✎ in the Products and services section.
Turn on
Show Product/Service column on sales forms.
You can also turn on price rules if you want to set up flexible pricing for the things you sell.
Turn on both
Track quantity and price/rate.
Track inventory quantity on hand.
Select Save and then Done.
Step 2: Add your inventory products
Now you can add your inventory items as well as other products and services you sell into QuickBooks. This lets you quickly add them as line items to your sales forms. The steps to add inventory, non-inventory, and service items are slightly different:
Add products you want to track as part of your inventory
Follow the steps to add inventory items. These are products you sell that let you set and track product quantities.
Add products and services you buy or sell, but don’t track as part of your inventory
QuickBooks won't track quantities for these items.
Follow the steps to add service items. These are the services you sell to customers. For example, landscaping or bookkeeping services.
Follow the steps to add non-inventory items. These are things you buy or sell but don’t (or can’t) track as inventory. For example, nuts and bolts used in an installation.
Follow the steps to create bundles. Bundles let you group multiple products or services together. For example, a gift basket of fruit, cheese, or wine. Adding products in a bundle saves you from having to select them one by one in invoices or receipts.
Step 3: Keep track of what sells
Once you set up all your inventory products, you track them when they sell. To track what you sell:
Create an invoice if you’ll get paid later.
Add a sales receipt if your customer paid on the spot.
Learn how to apply for QuickBooks Payments.
QuickBooks then decreases what’s on hand by the amount on the invoice or sales receipt.
Check what’s on hand and what’s on order as you work
Check what’s on hand and what’s still on order as you work on an invoice, sales receipt, or another type of transaction. Just hover your pointer over the quantity you entered for an item to see more info.
If you set reorder points, QuickBooks will also let you know when something's running low. If you set a low-stock alert, QuickBooks will also let you know when something's running low.
Step 4: Restock your inventory
QuickBooks tells you when it’s time to restock. You can order inventory right in QuickBooks. Then, track what you receive from vendors and what’s still on order. When you do, the quantity on hand automatically increases by the number of items you receive.
Learn how to reorder anything that’s running low or out of stock.
Step 5: Use reports to check the status of your inventory
Access reports to instantly see your best sellers, what’s on-hand, cost of goods, and more.
Learn how to use reports to see inventory status and performance.
Sign in now for personalized help
See articles customized for your product and join our large community of QuickBooks users.
Call Sales: 1-800-365-9606




