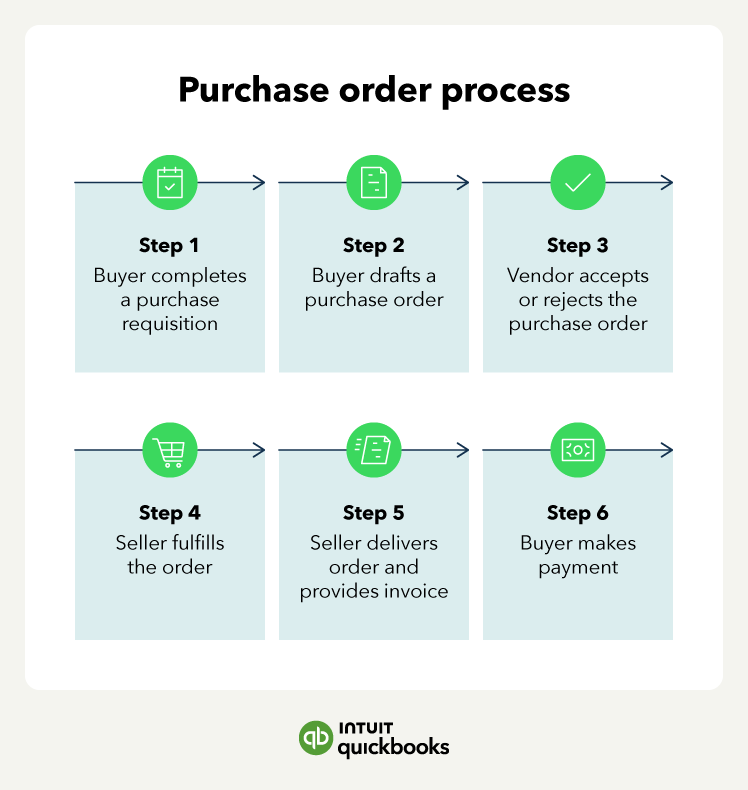
Step 1: Purchase requisition
The purchasing process starts with a need for supplies or services. This need is often conveyed using a purchase requisition form. For instance, a contractor at Connor’s Construction Company needs lumber to add a 500 sq ft detached garage to a customer's home build. To request the material be ordered, they submit a requisition form for the supplies to the procurement manager.
A requisition form should include a list of required materials, the estimated cost, the date the supplies are needed, and a reason for the order. There is also a place on the form for the appropriate person or department to sign and approve the request.
It's worth noting that for solopreneurs and smaller companies, the requisition step is often skipped, with PO creation being the first step.
Step 2: PO creation
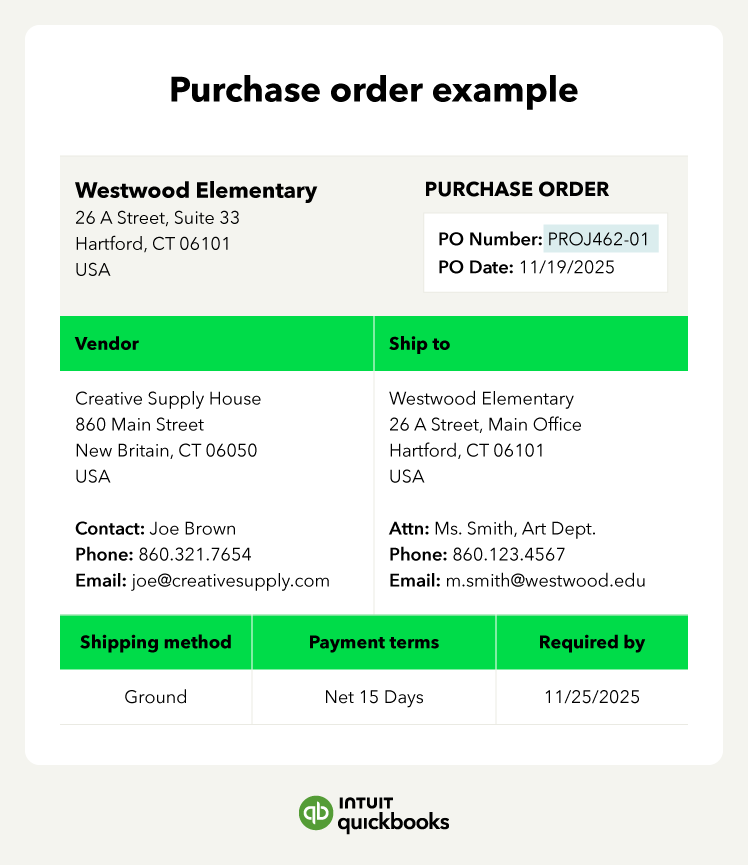
After a requisition is approved, the form is used to create a purchase order. The PO will typically include more specific information, such as item descriptions, pricing, and delivery dates. Once complete, this document is sent to the vendor.
For example, the procurement manager at Connor’s Construction Company creates a PO for the lumber needed using the contractor's requisition form. The manager then sends the PO to Joe’s Lumber Yard, a company they’ve purchased from before.
Alternatively, a company can use a quote or a request for quote if this is the first purchase with a particular supplier, or they want to compare for better prices and availability. Once the vendor and pricing are known, a PO can be created.
Step 3: Acceptance
Once the vendor has received the PO, they can accept or reject it. Alternatively, they can send it back for revision if they don’t have the inventory or spot a pricing issue. For example, Joe’s Lumber Yard sees that the plywood price is listed at $33.75 when it is actually $34.95. So they send the PO back to Connor’s Construction Company for revision.
Once the vendor approves a PO, it becomes a legally binding contract.
Step 4: Order fulfillment
Now that the vendor has accepted the contract, they can begin fulfilling the order. In our construction example, this means that Joe’s Lumber Yard will deliver the materials to the job site by March 20th.
Upon delivery, the seller will usually provide a delivery receipt, goods receipt, or packing slip.
Step 5: The three-way match
After the materials ordered have been delivered, the vendor will send an invoice. This begins the three-way matching process involving three documents:
- The Purchase Order: What was ordered?
- The Receiving Report (packing slip or receipt): What was delivered?
- The Vendor Invoice: What the vendor says you owe.
Matching all three of these documents is key to maintaining clean accounting records. Once the documents have been matched, payment can be authorized and issued.
In our example, Joe’s Lumber Yard sends Connor’s Construction Company an invoice. The construction company matches it to the delivery receipt and the PO. Now that the records match, Connor, the owner, approves payment to Joe’s Lumber Yard.
Step 6: Payment
The final step in the P2P process is to issue the actual payment. After verifying the three-way match is complete, the accounts payable team (or the person performing these functions for your business) can then process the payment. Payment can be issued via check, Automated Clearing House (ACH), or credit card. The AP team will also record the payment in the company’s general ledger.
Since the business owner already approved payment in our construction example, the AP team now schedules a check to be sent to Joe’s Lumber Yard in compliance with their net 60 terms. The team also records the payment in the ledger to ensure the company’s accounting is accurate.


 As a buyer, you can also cancel the purchase order. For instance, if the seller responds with higher prices, you can cancel before the order is placed. However, if a seller has begun fulfilling your order, cancelling may result in cancellation or restocking fees or a forfeiture of any deposit paid.