An illustration of business wonders using Excel for accounting.
Bookkeeping

How Excel accounting works for bookkeeping and free templates

When you start your business, time and money are in short supply. Your top priorities are finding customers and delivering a great product or service. Bookkeeping and accounting likely aren’t at the top of your to-do list.


Many small business owners use an Excel accounting template at first because it’s more familiar and straightforward. However, most accounting professionals encourage the use of online accounting software for easy and more accurate accounting and bookkeeping. 


Excel is a very straightforward way to do it but you’ll still need to understand the accounting process and how to complete each task using Excel. You’ll need to set up accounts, post transactions, and create your income statement using Excel—that’s where this beginner’s guide comes in to simplify how to set up and use Excel for accounting.

Basics of setting up Excel for accounting

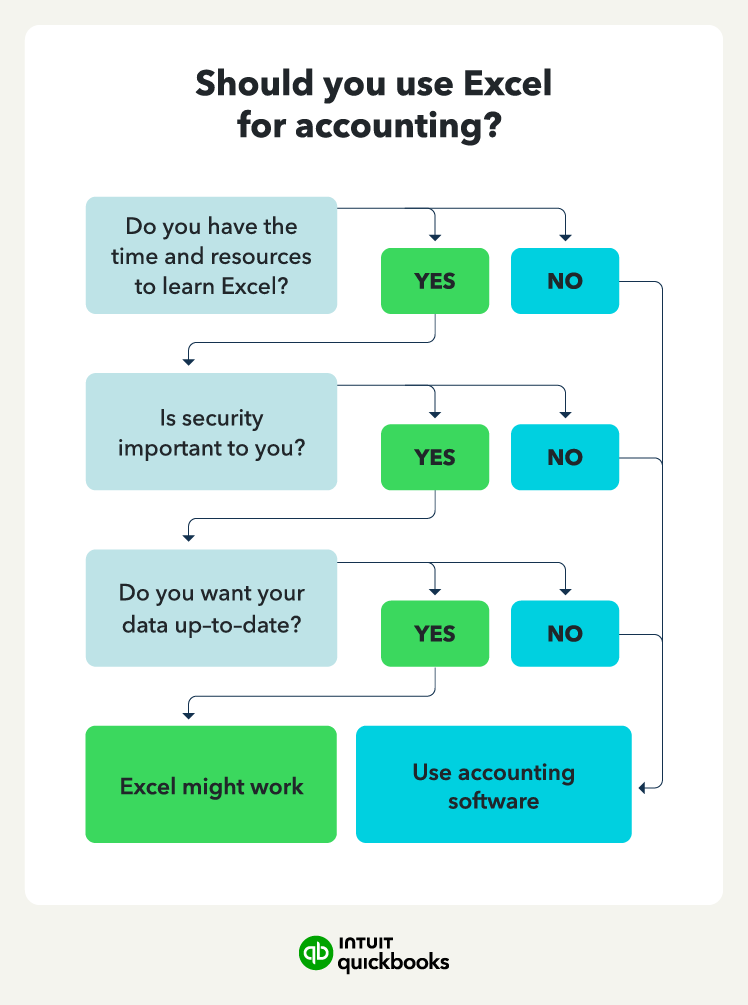
An illustration of when you should use Excel for accounting, versus when to consider using a dedicated accounting software.
With QuickBooks, payroll and bookkeeping work hand-in-hand.

Before you use Excel for accounting purposes, you’ll want to identify your accounting needs. Know that most Excel accounting templates will only be useful for single-entry accounting—as opposed to double-entry accounting.


This works if your business does not have certain accounts, such as inventory or accounts receivable and payable. As a result, you’ll only be able to create an income statement using your Excel accounting template. 


Excel bookkeeping might not be an efficient solution for businesses. As your business grows and you go through the journey of running a business, you’ll need to post more accounting transactions. There are plenty of reasons not to use Excel for accounting, but for simple businesses and owners familiar with Excel a template can be a quick and easy way to jump-start your bookkeeping.

Use cases of Excel for accounting (free templates)

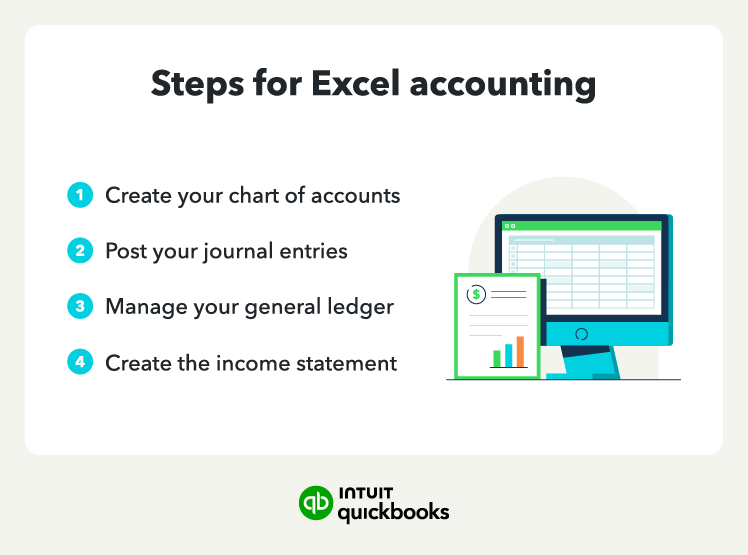
An illustration of the steps for excel accounting.

Let’s use our template below to create an example of how to use spreadsheets for accounting. In our template, Centerfield Sporting Goods is using an Excel accounting template to manage its business. The first thing they’ll need to do is create a chart of accounts: 

1. Create a chart of accounts

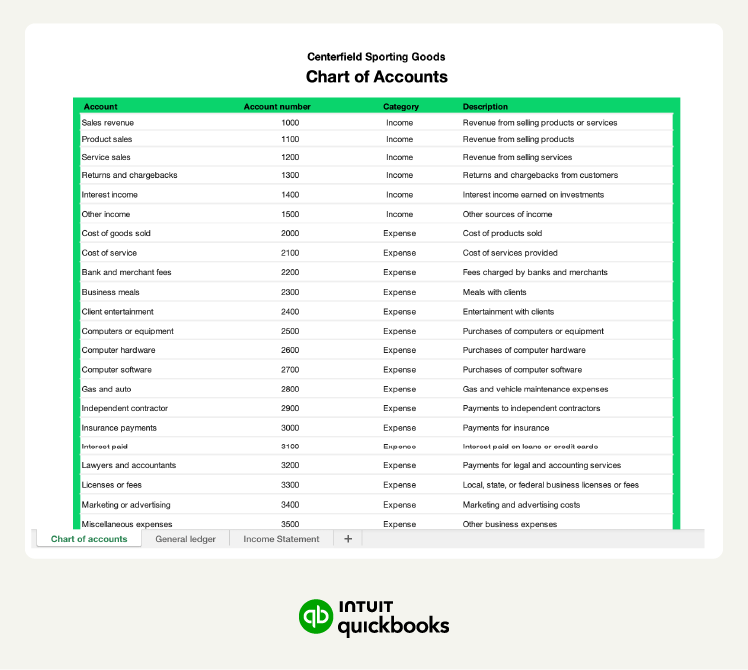
Screenshot of a chart of accounts in Excel.

The chart of accounts lists every account, assigns it a number, and lists the account’s description. Income will appear first. Centerfield assigns account numbers in the 1000s for income accounts (for example, #1000 for sales revenue). Expense accounts start at 2000 and go up from there. 


Centerfield sells baseball equipment and offers coaching services. They can add, remove, and change accounts as needed. Once you build a chart of accounts in an accounting spreadsheet, the next sheet is where you’ll post journal entries (also referred to as financial transactions).

2. Post journal entries 

A journal entry is a record of each accounting transaction listed in chronological order. Bookkeepers post transactions using a journal entry. The journal includes a record of the transaction, including the accounts, dollar amounts, and a description of each entry. 


Journal entries document every step of a financial transaction, providing a clear and concise record of every business activity. In the case of single-entry Excel accounting, the journal entries will only include a debit or credit.


For example, the purchase of supplies would be a debit to the supplies expense account. In Centerfield’s case, a $25 purchase on 6/5 would appear as:


  • Debit: 6/5 Office Depot - Office supplies $25


Accounting software that uses double-entry bookkeeping requires that each transaction include debit and credit. For example, if Centerfield uses a credit card to pay for the purchase, it would show up in the software as:


  • Debit: 6/5 Office Depot - Office supplies $25
  • Credit: 6/5 Credit Card - Short-term liability $25


The ledger then summarizes all of the activity from the journal entries, providing the business with a clear picture of its financial status.

3. Manage the general ledger

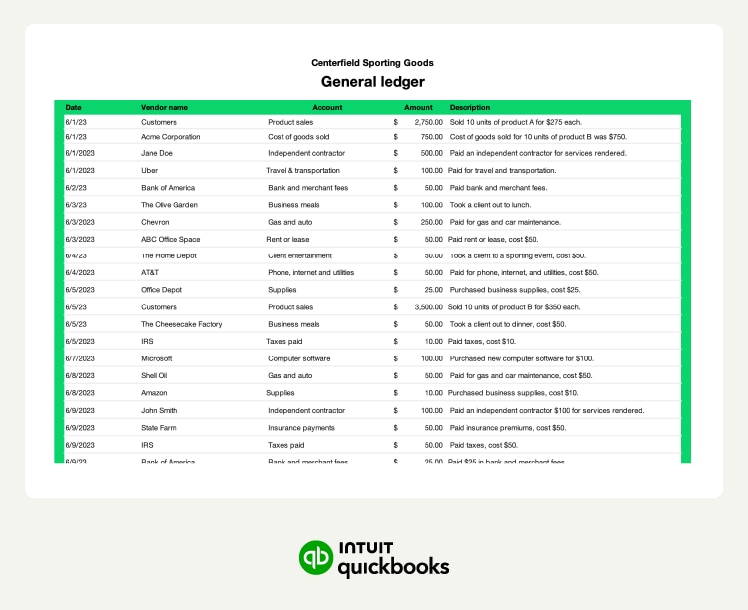
Screenshot of a general ledger in Excel.

A company’s general ledger (also known as accounting ledger) is a record of every transaction it posts over a period, including all journal entries. Business owners and accounting professionals use the data in the general ledger to create financial statements.


The general ledger tab in the template lists transactions by date. Each transaction lists the journal entries activity for that date, including the vendor, account, amount, and transaction description. 


It’s important to note that this is a single-entry general ledger, only listing the transactions that hit the purchase accounts of the business (such as cash, bank, or credit card accounts).

4. Create the income statement

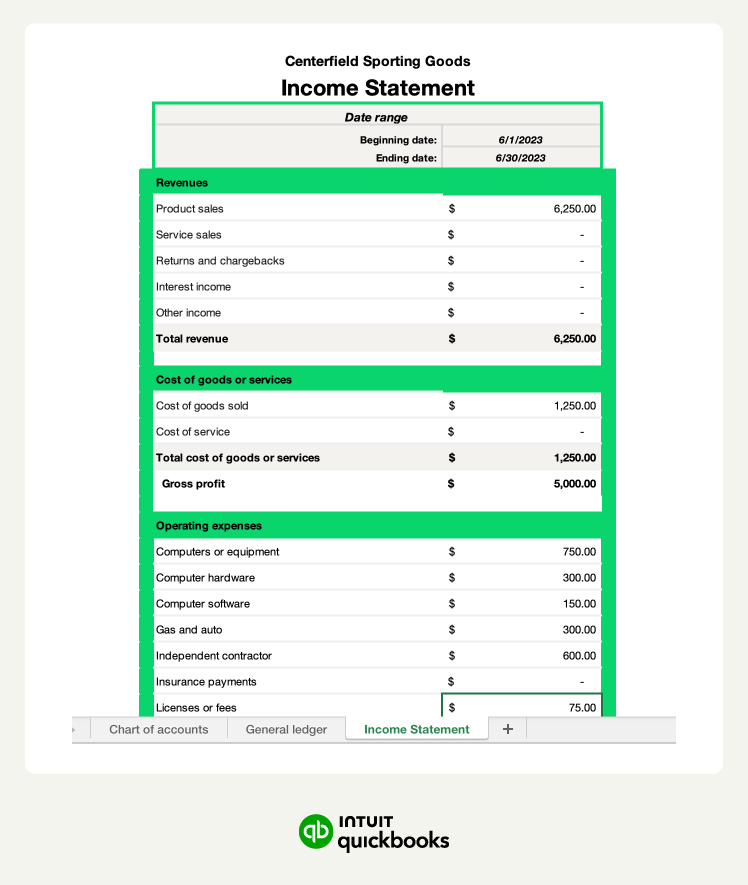
Screenshot of an income statement in Excel.

The financial statement you’ll need to be familiar with when doing Excel accounting is the income statement. The balance sheet and statement of cash flows can be challenging to generate in Excel. 


As your business grows, you can use accounting software to produce all three statements. Excel accounting might limit you to income statements. From the Excel template, you can generate the income statement each month. Keep the formulas for the subtotals so that you can check your work.


Net income is the net impact of all monthly revenue and expense transactions. You can create a new sheet on the first day of each month or simply continue using the general ledger tab to record transactions. You can then update the date range on the income statement tab to reflect your current period.

Plus: How to apply the accounting number format in Excel

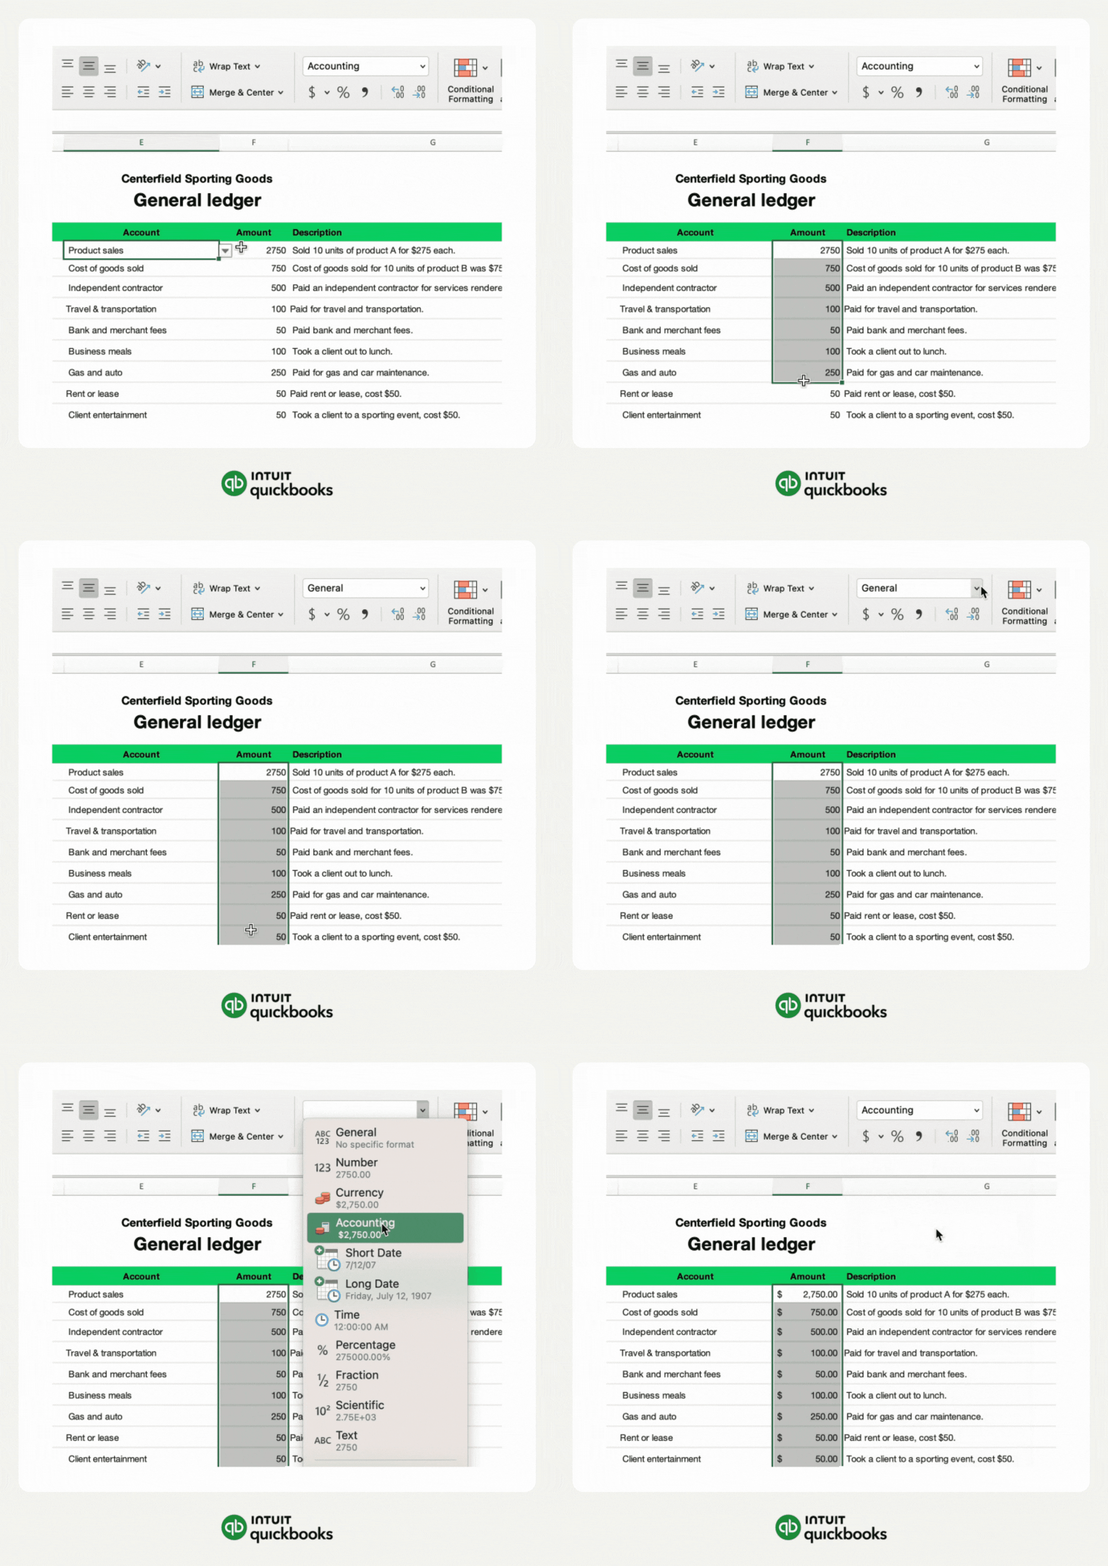
When using Excel for accounting, you’ll likely want to update your cell format to the official accounting number style (one of the benefits of accounting software is that you don’t have to worry about this step). 

The accounting number format in Excel will present your data in a way that’s consistent with how accounting professionals display numbers. This format can help make large data sets easier to read and interpret. If your Excel software has a cell format as a shortcut on the Home tab of your spreadsheet, it’s a quick and easy adjustment to make your cells in the accounting number format:


Excel accounting shortcut

Now, if you don’t have it, it’s still pretty quick and easy to change your cells to the accounting format.

Excel accounting long way

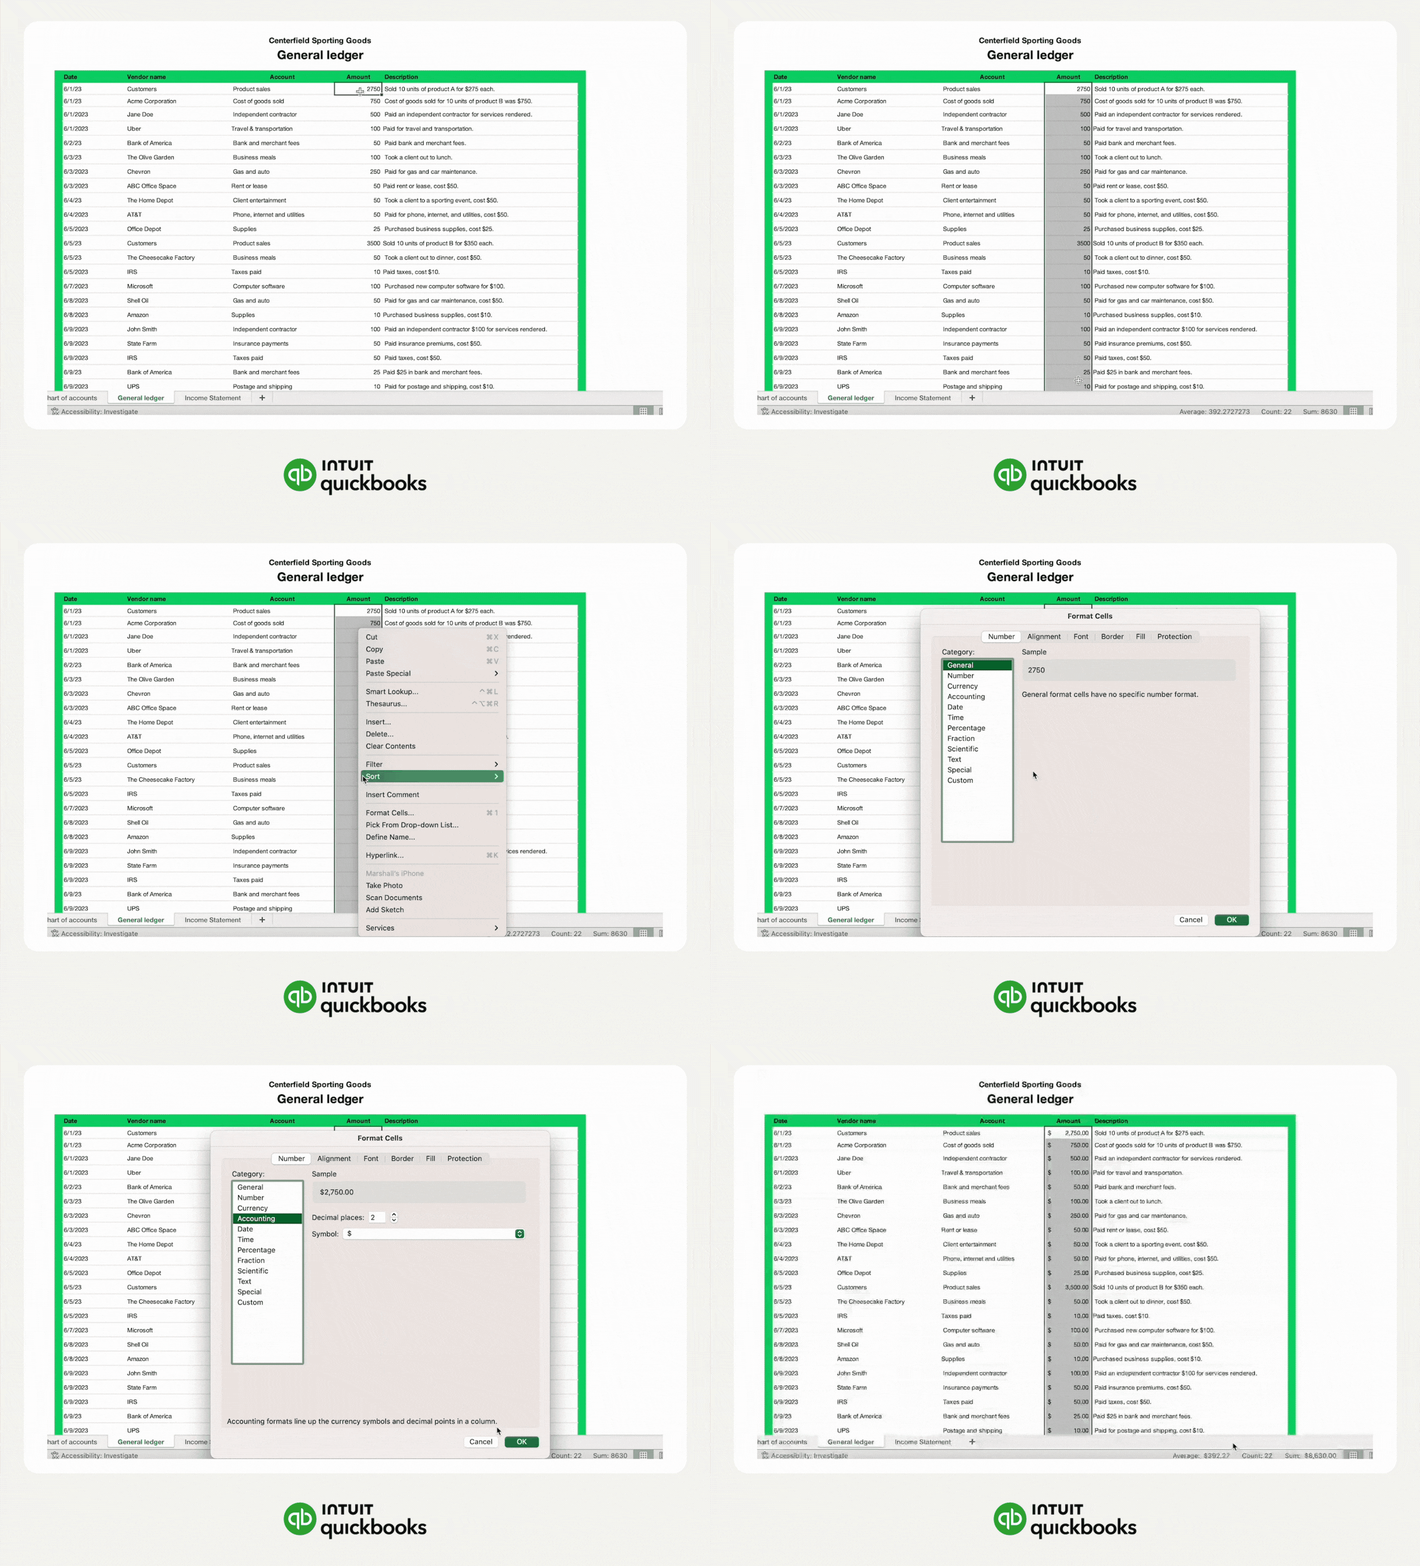
In particular, here’s how to format any cell in the accounting number format:

  1. Select the cells containing financial data: To apply the format to your financial data, you first need to select the cells containing the data you want to format. You can select multiple cells by holding down the Ctrl key as you click each cell.
  2. Open the Format Cells dialog box: Once you have selected the cells you want to format, you need to open the Format Cells dialog box. You can do this by right-clicking on the selected cells and choosing Format Cells from the context menu.
  3. Choose the Accounting Number formatting option: In the Format Cells dialog box, select the Number tab and scroll down until you see the Accounting Number formatting option. This option will display your financial data with dollar signs, negative values in parentheses, and two decimal places.
  4. Customize the formatting options (optional): If you want to customize the Accounting Number format, you can do so by clicking the Options button in the Format Cells dialog box. Here, you can choose different currency symbols, adjust the number of decimal places displayed, and modify other options to better suit your needs.
  5. Apply the Accounting Number format to your data: Once you have selected the Accounting Number formatting option and customized it (if desired), click OK to apply the format to your financial data.

The accounting number format in Excel can help organize and analyze your organization's financial data.

Streamline your accounting and save time 

You can use software like QuickBooks to save time and increase the accuracy of your accounting records. If you need a real-time spending tracker, select from the expense reports available. Then scan receipts and other source documents and attach them to journal entries. You can also automate recording transactions by downloading your bank statements and credit card activity into your accounting records. You’ll save time and reconcile your bank account faster.


With accounting software, you can process more transactions in less time. Make the switch to accounting software, so you’re ready to take on more business.

Excel accounting FAQ

Image Alt Text
DO MORE

QuickBooks Online

All of your bank and credit card transactions automatically sync to QuickBooks to help you seamlessly track your income & expenses.


Recommended for you

Mail icon
Get the latest to your inbox
No Thanks

Get the latest to your inbox

Relevant resources to help start, run, and grow your business.

By clicking “Submit,” you agree to permit Intuit to contact you regarding QuickBooks and have read and acknowledge our Privacy Statement.

Thanks for subscribing.

Fresh business resources are headed your way!

Looking for something else?

QuickBooks

From big jobs to small tasks, we've got your business covered.

Firm of the Future

Topical articles and news from top pros and Intuit product experts.

QuickBooks Support

Get help with QuickBooks. Find articles, video tutorials, and more.