Image Alt Text
inventory

Integration spotlight: QuickBooks Online inventory management add on

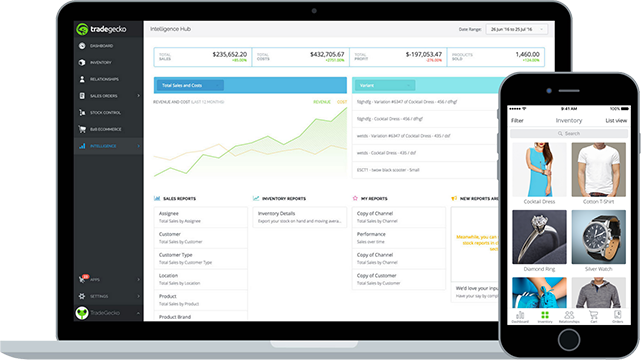
Small business owners know all too well that effective time management is key to running a business successfully. By utilizing TradeGecko as a QuickBooks inventory management add on, you can quickly and easily manage accounting operations and inventory management from the one dashboard.


How does TradeGecko work as a QuickBooks inventory management add on?

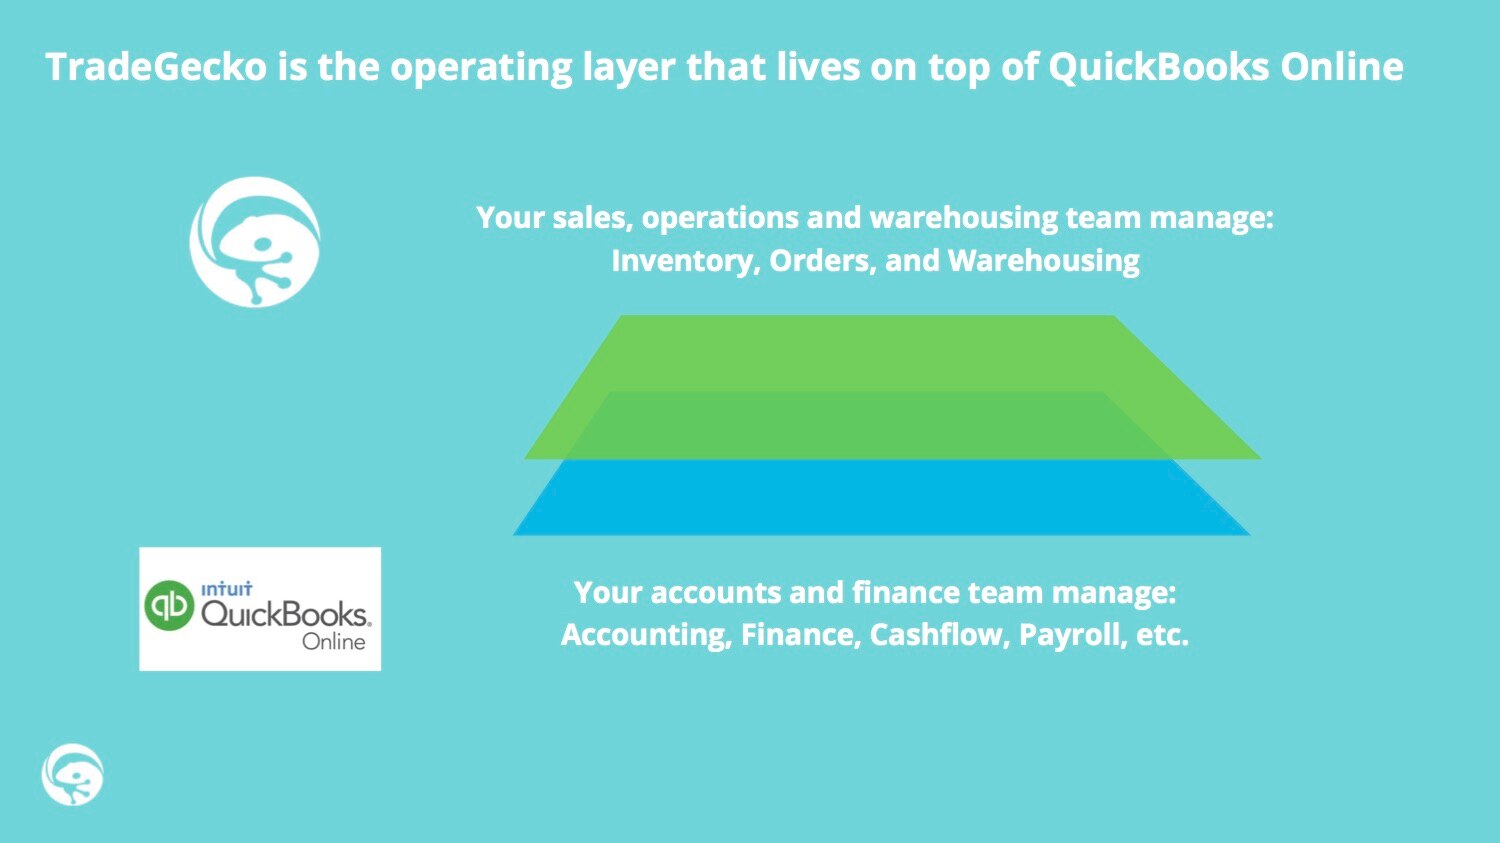
QuickBooks Online is a cloud-based accounting and bookkeeping software that allows small business owners to manage payroll, create invoices, reconcile bank transactions, and more.


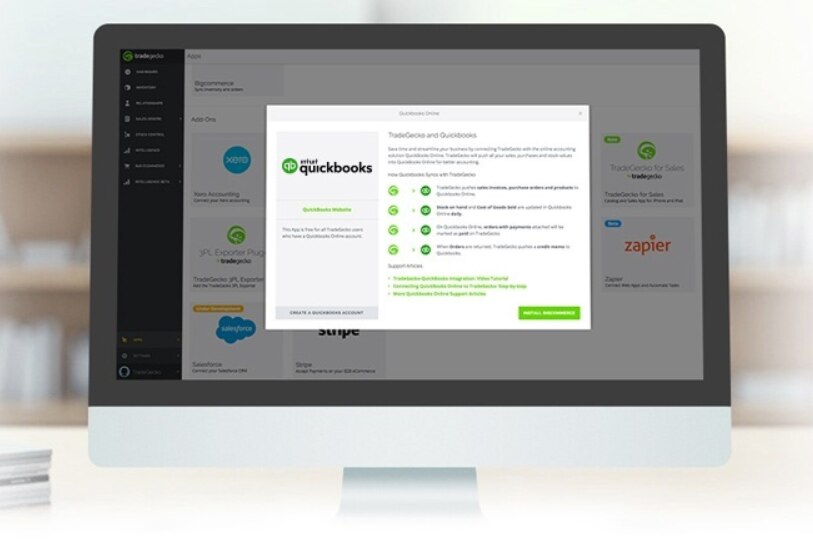
TradeGecko acts as QuickBooks inventory management add on, working with QBO to automate accounting processes, and manage multiple warehouse locations, currencies, and eCommerce channels. Relevant financial and accounting data from TradeGecko also pushes to QBO, eliminating manual data entry.


So while your sales, operations, and warehousing team can manage inventory and orders, your accounts and financing team can manage accounting, finance, cash flow, and so on from the same place. That means everyone in the team has access to the same synchronized accounting and order information – saving time and reducing errors.


TradeGecko has a huge variety of inventory management and business management capabilities, so you can customize the platform to suit your needs. However, some of the key benefits of integrating with QBO include:


Create sales invoices – When a sales order is created in TradeGecko, the total amount is immediately sent to QuickBooks Online as an invoice for payment.


Create purchase orders – When a purchase order is created in TradeGecko, the total amount automatically appears in QuickBooks Online as a bill.


Reporting stock movements – At the end of each day, changes in stock levels on TradeGecko are collated in a journal on QBO. This includes shipments of sales orders (‘Shipped’), received purchase orders (‘Procurements’), and stock adjustments.


Multi-currency pricing – TradeGecko’s multi-currency pricing automatically converts amounts to the base currency of your QBO account.


Tax bundling – TradeGecko will predefine bundles of taxes (local sub taxes, sales taxes, compound taxes, etc.) in various percentages or combined. This information is then synced with QuickBooks through every sales order and purchase order.

H2: How to set up a TradeGecko-QuickBooks Online inventory management add on


As long as you have a TradeGecko account and a QuickBooks Online account, you can set up the integration between the two systems for free. Here’s how:


1. Create default accounts in QuickBooks


Before connecting QuickBooks to TradeGecko, you will need to make sure certain accounts exist with QuickBooks. These include:

Account Category Detail Type Notes
Income Sales of Product Income This will be your Sales account. 
Bank or Credit Card Cash on Hand/ Credit Card This will be your Payments account. Depending on how you wish to receive payment, select Bank or Credit Card. If you wish to receive payment in cash, choose Bank> Cash on Hand. If you decide to set up your Credit Card instead of Bank, be sure to set your currency to match your default currency on your TradeGecko account.
Expenses Supplies & Materials This will be your Purchases account. 
Cost of Goods Sold Supplies & Materials This will be your Cost of Goods Sold account. 
Other Assets Other Assets This will be your Stock on Hand account. 

2. Create your sales tax


If you haven’t already set up your Sales Tax in QuickBooks, click on the Sales Tax tab on the left side of your QuickBooks account. Then click on ‘New Tax’ to create a new Tax Record.


3. Connect QuickBooks to TradeGecko


Go to your TradeGecko account > Settings > Apps. Select the QuickBooks application, read through the details and install QuickBooks.


Note: You will need to authorize Intuit to securely share your data to TradeGecko. Once the data has been imported, you will be directed to an overview page.


4. Connect your default accounts


Connect ‘Sales’ with the drop-down option labeled Income or Sales from your QBO account.

Connect ‘Payments’ with the account for EITHER your Bank OR Credit Card.

Connect ‘Purchases’ with your Purchases Account from the drop-down options.

Connect ‘Stock on Hand’ to Inventory Asset.

Connect ‘Cost of Goods Sold’ with the account for Cost of Goods Sold.

Connect ‘Stock Purchases’ with the account for Purchases.

5. Set up payment types


TradeGecko has four types of default payment methods: Cash, Credit Card, PayPal, and Bank Transfer. From the drop-down fields provided, link a payment method to a specific account. Find out how to add new payment methods.


6. Set up tax types


If you don’t already have your tax set up in TradeGecko, you can import it directly from your QuickBooks account. Click on ‘Tax Types’ to import them from QuickBooks, and they will be automatically linked. Once you've finished setting up your tax types, click on ‘Next Steps’, and you're done!

Setting up TradeGecko with QuickBooks Online takes just a few clicks. If you’re already using QBO and want to see if TradeGecko is a good fit for your business, sign up!

Enjoy a one stop inventory management solution!

Seamlessly synchronizes with Quickbooks Online so you can get back to doing the things you love.


Mail icon
Get the latest to your inbox
No Thanks

Get the latest to your inbox

Relevant resources to help start, run, and grow your business.

By clicking “Submit,” you agree to permit Intuit to contact you regarding QuickBooks and have read and acknowledge our Privacy Statement.

Thanks for subscribing.

Fresh business resources are headed your way!

Looking for something else?

QuickBooks

From big jobs to small tasks, we've got your business covered.

Firm of the Future

Topical articles and news from top pros and Intuit product experts.

QuickBooks Support

Get help with QuickBooks. Find articles, video tutorials, and more.