
Get 50% OFF QuickBooks for 3 months*

Buy now
Switch to QuickBooks and 70% off for 3 Months
January 23, 2025
Solved

Setting up vendor payment terms.

  • January 23, 2025
  • 1 reply
  • 90 views

How do I set up my vendor payment term for when the bill is due the 25th of the following month? It keeps saying that it is due the 25th of this month when I choose that 25th option. 

Best answer by GianSeth_A1

To set up vendor payment terms in QuickBooks Online, so the bill is due on the 25th of the following month, you'll need to create a custom payment term. I'll be assisting you to achieve that, Sunny. Here’s a step-by-step guide on how to do it:
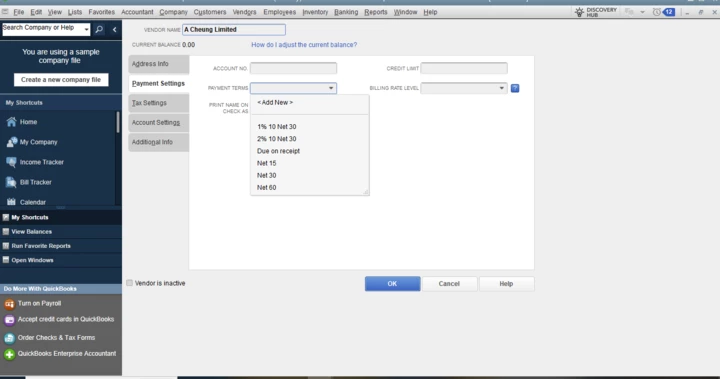
 

  1. Go to the Lists menu.
  2. Click on Customer & Vendor Profile Lists.
  3. Select Terms List.
  4. Proceed to Create New Term:
  5. In the Terms List window, click the Terms button at the bottom left corner.
  6. Click on New.

For setting up the payment term, follow the steps below:
 

  1. In the New Terms window, you’ll see two options: Standard and Date Driven.
  2. Choose Date Driven and use the following settings:
  3. Enter 25 for the due date.
  4. Set to 31 days (this ensures that it applies to all bills regardless of when they're issued in the month).

After completing the steps above, proceed to name the term "Due 25th of Next Month" and save.
 

Moreover, when assigning the custom term to vendors, the following steps will guide you:
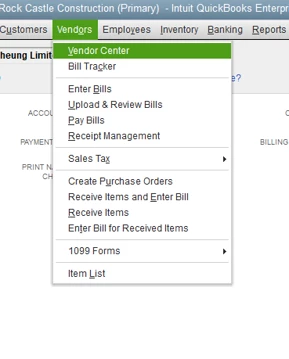
 

  1. Navigate to Vendors, then select Vendor Center.
  2. Choose a vendor and double-click the vendor you want to assign this term to.


In applying the custom term, follow the guide below: 

  1. Go to the vendor's edit window and proceed to the Payment Settings tab.
  2. In the Terms drop-down, select the term you just created, "Due 25th of Next Month".

If you continue to experience issues, double-check that the custom term is correctly applied to your vendors and try creating a sample bill to ensure it reflects the correct due date.


For further reference in setting up payment terms, check out this article: Payment Terms.


If you're looking to take your business to the next level, QuickBooks Enterprise is the solution you've been searching for! As a leading financial management software, QuickBooks Enterprise offers a comprehensive suite of features specifically designed to meet the needs of growing businesses, large or small.

Additionally, you may explore these two articles, which provide information about the customer transaction workflow and receiving payments in your QBDT account:

By following the steps outlined above, you will be able to establish specific terms for a vendor. If you require any additional help, please feel free to reach out. I am always available to assist you. Have a wonderful day!

1 reply

QuickBooks Team
January 23, 2025

To set up vendor payment terms in QuickBooks Online, so the bill is due on the 25th of the following month, you'll need to create a custom payment term. I'll be assisting you to achieve that, Sunny. Here’s a step-by-step guide on how to do it:
 

  1. Go to the Lists menu.
  2. Click on Customer & Vendor Profile Lists.
  3. Select Terms List.
  4. Proceed to Create New Term:
  5. In the Terms List window, click the Terms button at the bottom left corner.
  6. Click on New.

For setting up the payment term, follow the steps below:
 

  1. In the New Terms window, you’ll see two options: Standard and Date Driven.
  2. Choose Date Driven and use the following settings:
  3. Enter 25 for the due date.
  4. Set to 31 days (this ensures that it applies to all bills regardless of when they're issued in the month).

After completing the steps above, proceed to name the term "Due 25th of Next Month" and save.
 

Moreover, when assigning the custom term to vendors, the following steps will guide you:
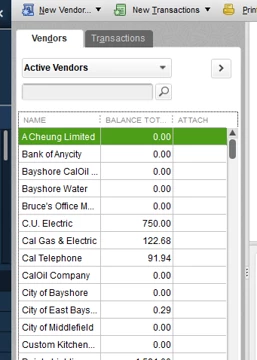
 

  1. Navigate to Vendors, then select Vendor Center.
  2. Choose a vendor and double-click the vendor you want to assign this term to.


In applying the custom term, follow the guide below: 

  1. Go to the vendor's edit window and proceed to the Payment Settings tab.
  2. In the Terms drop-down, select the term you just created, "Due 25th of Next Month".

If you continue to experience issues, double-check that the custom term is correctly applied to your vendors and try creating a sample bill to ensure it reflects the correct due date.


For further reference in setting up payment terms, check out this article: Payment Terms.


If you're looking to take your business to the next level, QuickBooks Enterprise is the solution you've been searching for! As a leading financial management software, QuickBooks Enterprise offers a comprehensive suite of features specifically designed to meet the needs of growing businesses, large or small.

Additionally, you may explore these two articles, which provide information about the customer transaction workflow and receiving payments in your QBDT account:

By following the steps outlined above, you will be able to establish specific terms for a vendor. If you require any additional help, please feel free to reach out. I am always available to assist you. Have a wonderful day!

sunny20Author
January 24, 2025

Awesome! Thank you, that fixed the issue. On another note, would you happen to know how we can print an A/P aging report by discount due dates? We keep missing our discount dates because it only shows due dates only. Thanks so much!

MariaSoledadG
QuickBooks Team
January 25, 2025

Thanks! I was able to add the column. This may sound silly but how does the information get "pulled" from the vendor payment terms to the column? If I have to enter it manually, that defeats the purpose of running the report. Thanks again.


I'm glad you added the column successfully. To ensure we're on the same page, did you enter the Discount Due Date information when creating a bill or on the vendor profile? Allow me to provide details on why this is happening and help you decide what you can do, Sunny20.


But before we begin, can provide a screenshot of the Discount Due Date details from your entries? This will allow us to thoroughly assess the issue.


If you're able to enter the information when creating the bill, that data is pulled from the vendor payment terms and should automatically populate the appropriate columns in the report. In terms of reporting, the "source" refers to where the data originates, which, in this case, is the information you entered in the bill.


On the other hand, if you input the information on the vendor profile, this will be generated on the Vendor Contact List report. I've added a screenshot for your visual reference: 


Once done, you can generate both the Vendor Contact List and AP Aging Detail report, and then export both reports so you consolidate them into one.


To give you more information on the available reports that you have access to, check out this article for reference: Understand Reports.


Additionally, discover how to configure your report preferences, tailor them to your needs, and manage memorized reports by referring to this useful resource: Set Report Preferences.
 

Feel free to reply below if you have any other concerns when managing payment terms on the report. I'm always right here to help you. Have a nice day!